Products
Solutions
Resources
9977 N 90th Street, Suite 250 Scottsdale, AZ 85258 | 1-800-637-7496
© 2024 InEight, Inc. All Rights Reserved | Privacy Statement | Terms of Service | Cookie Policy | Do not sell/share my information

1. Go to Timesheets >Timesheets
2. From the ribbon menu, click the New icon, and then select Single Project - Weekly.
/Billings Setup_173.png)
3. Click the elipses icon located to the right of the Project field and select the project that this time sheet is for by using the Project Root or Code drop-down list.
/Billings Setup_174.png)
4. The project name is auto-filled. The Region, Division, and Company fields are automatically populated based on the project selected.
/Billings Setup_175.png)
5. If the selected project has been configured to use automatically generated time sheet numbers, skip to the next step. Otherwise, click on the Timesheet # field and enter in the number of the timesheet.
You can leave the Timesheet # field blank, in which case the value in the Timesheet # field is automatically generated by the database and matches the system-generated Timesheet ID.
6. Select the starting date of the time sheet (that is, the first day the work was performed or the first day of the shift).
/Billings Setup_176.png)
7. Adjust the Number of Days on the time sheet if needed.
The Personnel tab includes columns that might normally be hidden. To speed up the process of data entry, it is beneficial for you to include only the necessary columns.
The Bill As, Cost As, and Shift fields automatically populate with the default values specified for the person selected. However, if the person whose time is being entered is to be billed out or cost as another classification, the Bill As or the Cost As field can be changed to the applicable personnel classification to ensure the time sheet is invoiced and costed appropriately.
For example, if a Journeyman is promoted for a day, since it is a temporary change to the classification, the Bill As field can be changed as needed on a single time sheet line or item without changing the person’s default classification.
Press the Tab key to move to the Cost Code field.
Click on the drop-down arrow to display a list of cost codes defined for the selected project node (and any child WBS items). How the project is set up determines how the cost code list shows.
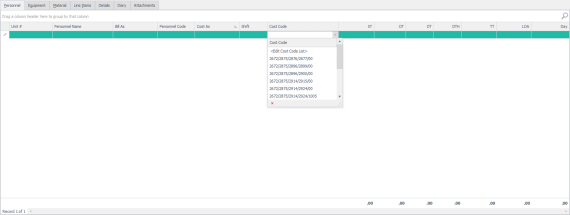
The next set of fields is used to capture the quantity of hours worked per type of hours. Depending on the project contract, personnel hours can be recorded against ST, OT, DT, DTH, TT, Day, and LOA.
If time for multiple persons is being used for the job, click on the Add Row icon located on the ribbon bar to add another row, or use the Tab key to move all the way to the right of the page and press Tab again to generate a row.
Billings automatically copies most of the information from the previous row to a new row. To remove a row, click on the Delete Row(s) icon located on the ribbon menu.
If you are entering the same data for multiple personnel rows, it is more efficient to use the multiline entry dialog box than manually entering individual rows. The multiline entry dialog box lets you select several personnel records and apply same cost codes, quantities, and units of measure to these rows in one step. If you select multiple cost codes, multiple rows are created for each personnel record and cost code record selected.
You can follow the same functionality to enter equipment on the Equipment tab, and materials on the Material tab that you followed for the Personnel tab.
/Billings Setup_183.png)
Some columns are normally less used so they must first be added to the Timesheet layout before data can be entered into them. Right-click any column header, and then select Column Chooser to view this list. You can then drag and drop any of the additional fields into the Timesheet view or remove any fields that are not required.
You can control where the new column displays on the page by dragging and dropping the column header to the desired location.
/Billings Setup_177.png)
The Line Items tab offers the flexibility to enter any other items related to the timesheet but that do not neatly fall into the predefined categories of Personnel, Equipment or Materials. This can include expenses, surcharges, premiums, allowances, or other additional fees that are related to the time sheet.
If required, you can assign a line item to a person (for example, small tools allowance, or equipment rentals, premium, or allowance), a piece of equipment (for example, repairs or additional charges), material (for example, hauling charge), or entered as an Other line item.
/Billings Setup_184.png)
The Line-Item grid lets users:
Allot a Custom Description to the item
Charge it to a cost code (required)
Attach it to an applicable PO#
Assign a unit of measure
Track the quantity
Key the rate instantaneously
Track the item against Project Commitments (See Assigning Commitments to Projects section of this guide)
Right click any column header and select Column Chooser to view this list. You can then drag and drop any of the additional fields into the time sheet view or remove any fields that are not required.
You can control where the new column will be displayed in the grid by dragging and dropping the column headers in the desired location.
/Billings Setup_185.png)
Right click on the column header that you wish to rename and select My Column Caption option. If you wish to use the default name, blank out the custom name.
Once you have created a layout with the columns relevant for data entry, save the layout by selecting the Layout drop-down from the top, right side of the tool bar. If this is a new layout, select Save As. If you are saving changes to an existing layout, select Save.
On the Details tab, you can capture any field notes associated with the time sheet, and enter data into any custom timesheet fields set up by the application administrator.
/Billings Setup_186.png)
You can capture additional time sheet details on the Diary tab.
/Billings Setup_170.png)
Upon completion of time sheet data entry, click Apply or OK at the bottom right of the page to save your changes.
/Billings Setup_171.png)
The Park and Close fields affect time sheets that need to be put on hold or closed.
1. Right click any column header on one of the timesheet grids and select Column Chooser to view a field list.
You can then drag and drop any of the additional fields into the time sheet view or remove any fields that are not required.
You can control where the new column will be displayed in the grid by dragging and dropping the column headers in the desired location. You can also select My Column Caption to rename the column headers.
2. You can control where the new column shows on the page by dragging and dropping the column headers to the location.
You can also select My Column Caption to rename the column headers.
3. After you have created a layout with the columns relevant for data entry, you can save the layout by selecting the Layout drop-down from the top right side of the ribbon bar.
4. Click Save As.
The Save Layout As dialog box opens, and you can name the layout.
This layout is specific only to the user logged into Billings. It will not be available to other users unless it is shared by the user or an Administrator.
5. After the layout has been saved, the user can select Set Default which will be the default view when they access the Timesheet page in the future.
/Billings Setup_190.png)
/Billings Setup_179.png)
When saving a layout, it is best practice to modify all the tabs (that is, Personnel, Equipment, Material, and Line Items) that will be used in the specific layout being saved.
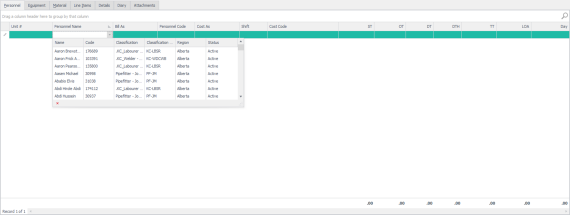
6. After the layout has been modified, click into the Personnel Name field on the page and either begin typing the resource last name or use the drop-down list to pull up a list of personnel resources.
When entering time sheets into Billings, it is time effective for you to use the Tab key to move from column to column. When using the Tab key at the end of the last row, Billings automatically creates a new row and jumps to the first column in the new row, copying values from the last selected row.
To view the Timesheets tab and all time sheets that have been created, go to the menu list and expand the Timesheets option, then select Timesheets.
Additional Information
9977 N 90th Street, Suite 250 Scottsdale, AZ 85258 | 1-800-637-7496
© 2024 InEight, Inc. All Rights Reserved | Privacy Statement | Terms of Service | Cookie Policy | Do not sell/share my information