Products
Solutions
Resources
9977 N 90th Street, Suite 250 Scottsdale, AZ 85258 | 1-800-637-7496
© 2024 InEight, Inc. All Rights Reserved | Privacy Statement | Terms of Service | Cookie Policy | Do not sell/share my information

User access to Lots is controlled at a Lot Type level.
To create Lot Types and assign/manage the users who can access each Lot Type:
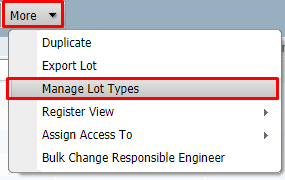
Click the More button from within the Lots Register then select Manage Lot Types.

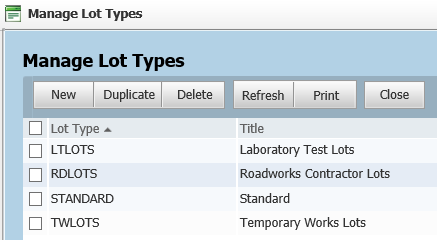
Choose New to create a new Lot type.

Next, within the Lot Types window, enter the Lot Type, Title and select the Modules to be included for that specific Lot Type then click the Save button.
Click on the Security tab to manage user access to the Lot Type.
Select All Users to give all users on this project view this Lot Type (subject to personal and security group settings in relation to lots in general).
Alternatively chose the Selected Companies and Users option then click the Add Companies button (which will become enabled) to grant access to this Lot Type by company.
Click the Add Users button to select the users to have access.
Back at the Edit Lot Type window, click the Edit option against any company and/or user who will need permission to make changes to this type of Lot. View access is granted here by default.
Click Save once complete. Document asks if you want to update lot security or modular access for already created lots.
If you click Yes, the user is given access to all existing and new lots of that type.
If you click No, the user is given access to only new lots created of that lot type.
Access to Lot Types can be defined as “view” or “edit” at an individual or Company level from the Manage Lot Types section of InEight Document.
The Edit option will allow the users / companies to update Lot information such as information on the Lot page (based on their user security) and add / remove items that have been added to the Lot.
There might be circumstances that access to an existing lot cannot be provided. A message shows with the lot numbers and the reason why access will not be granted.
You can configure lot types to automatically notify users when a lot is in a specific status.
Setting up status distribution lets users know when a lot is in a specific status. When a lot is in the specified status, Document automatically notifies the users or roles of the status, saving the users time from having to check the lot regularly or running a report.
Click the Actions button in the Lots Register then select Manage Lot Types.
Click the Edit icon for a lot to open the Status distribution dialog box. The Status Distribution dialog box opens.
Select a status from the Status drop-down list.
Select either User or Contract groups, and then select specific user names or groups.
Click Save.
Additional Information
9977 N 90th Street, Suite 250 Scottsdale, AZ 85258 | 1-800-637-7496
© 2024 InEight, Inc. All Rights Reserved | Privacy Statement | Terms of Service | Cookie Policy | Do not sell/share my information
