Products
Solutions
Resources
9977 N 90th Street, Suite 250 Scottsdale, AZ 85258 | 1-800-637-7496
© 2024 InEight, Inc. All Rights Reserved | Privacy Statement | Terms of Service | Cookie Policy | Do not sell/share my information

You can define contact roles for your organization. Roles are used throughout Document to represent a group of people with the same responsibilities. Roles can be configured as contact groups that you can use as a distribution list when you create mail or a transmittal.
Click the Module Menu, hover over Address book, and then select Contacts.
Click Actions, and then select Roles. The Manage Roles dialog box opens.
Enter the role ID and title.
To make the role available as a contact group for distribution lists, check the Display as contract group check box.
If the role is specific to a company that has already been defined, select the company.
Click Save.
When you select the contract group for the To field of a mail or transmittal, the names of the people in the group populate the To field.
You can add, remove, or replace users in roles in bulk in the contacts address book.
Add a user to multiple roles.
Remove a user from multiple roles.
Replace a user in multiple roles.
From the Actions menu in the address book, select Roles . The Manage Roles dialog box opens.
Select one or more roles.
Expand the Actions menu, and then select Replace users.
The Replace users dialog box opens.
Select the user name for the current user, and then select the user company and user name for the replacement user.
Click Replace.
Summary: You can edit a role when you want to change the title of the role or the users in the role.
From the Manage Roles dialog box, double-click the role you want to edit. The Edit Roles dialog box opens.
What's next: You can view the role history on the History tab.
Summary: View the role history when you want to see changes made to a role.
Consideration: Only changes made after 25 September 2024 are available in the role history.
From the Manage Roles dialog box, double-click the role you want to view. The Edit Roles dialog box opens to the Details tab.
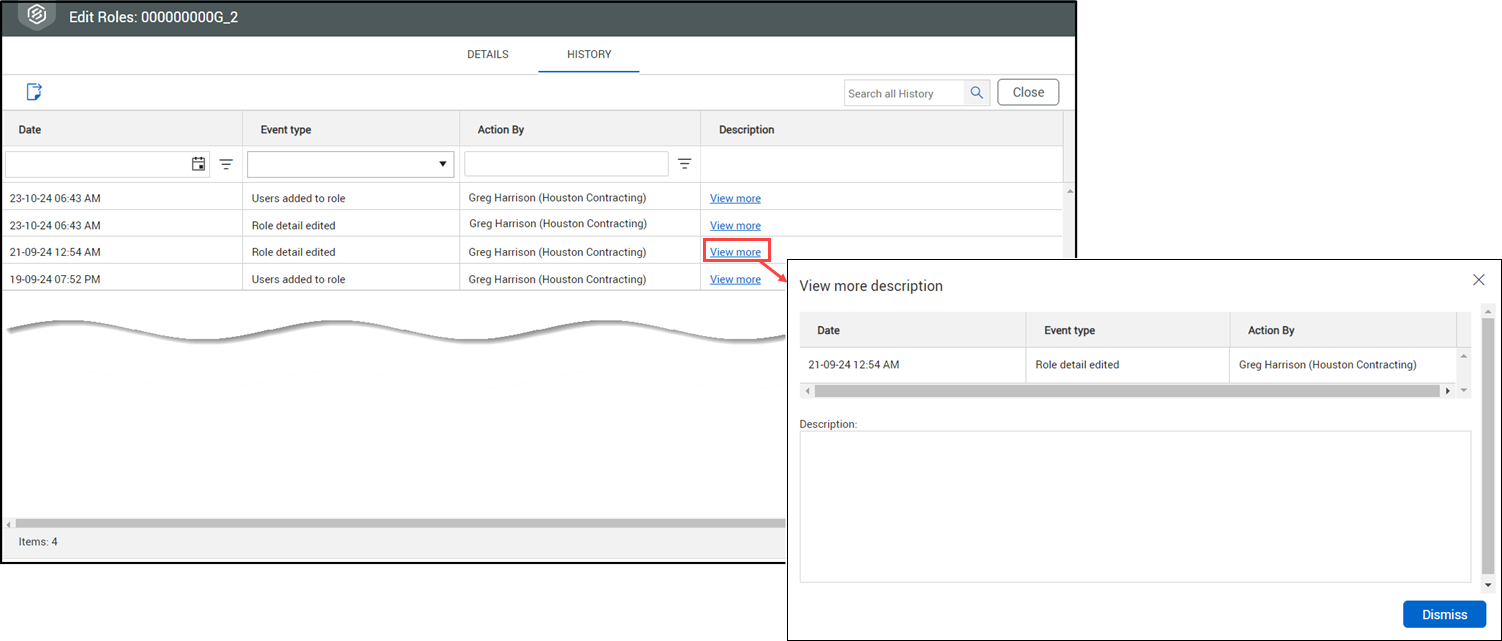
Click the History tab to view the role history.
To view additional details, click View more. The View more description of the change is shown.

Additional Information
9977 N 90th Street, Suite 250 Scottsdale, AZ 85258 | 1-800-637-7496
© 2024 InEight, Inc. All Rights Reserved | Privacy Statement | Terms of Service | Cookie Policy | Do not sell/share my information
