Products
Solutions
Resources
9977 N 90th Street, Suite 250 Scottsdale, AZ 85258 | 1-800-637-7496
© 2024 InEight, Inc. All Rights Reserved | Privacy Statement | Terms of Service | Cookie Policy | Do not sell/share my information

You can use central user management to search for users across the projects you have access to instead of signing into each project. After you find contacts, you can perform actions, such as managing their security groups, adding or removing users as administrators, or making them inactive.
Because these actions can take place for many projects and users at the same time, the process runs in the background, and you will be notified of any errors.
Summary: When you are signed in to a project, you can use central user management to search for contacts across all projects you have access to.
Considerations: Only projects that you have access to show on the central user management page.
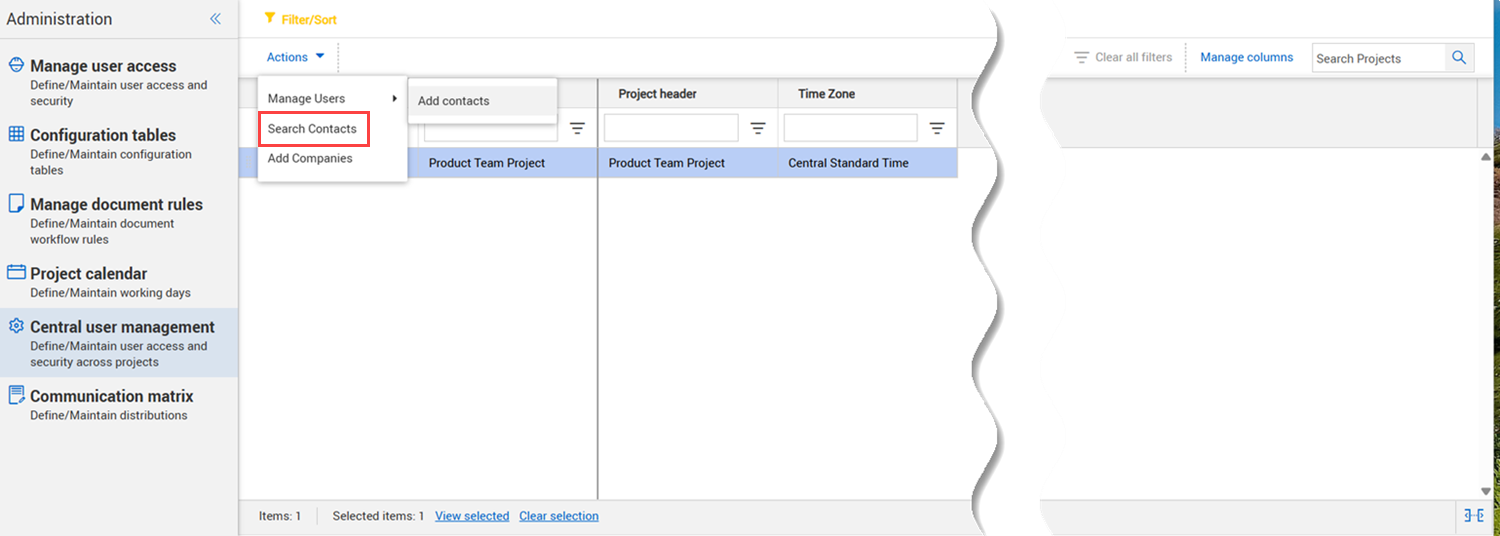
From your project, open the Admin section, and then select Central user management. The Central user management page opens with a list of projects you have access to.
Select one or more projects from the list that you want to search.
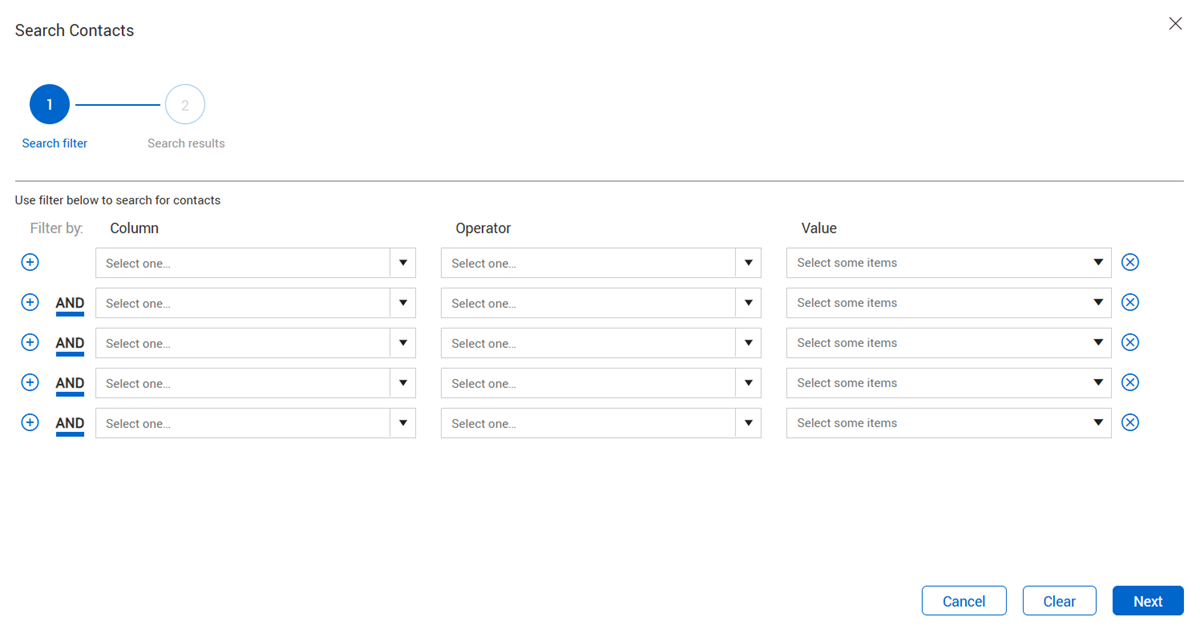
Expand the Actions menu, and then Search contacts. The Search contacts wizard opens.
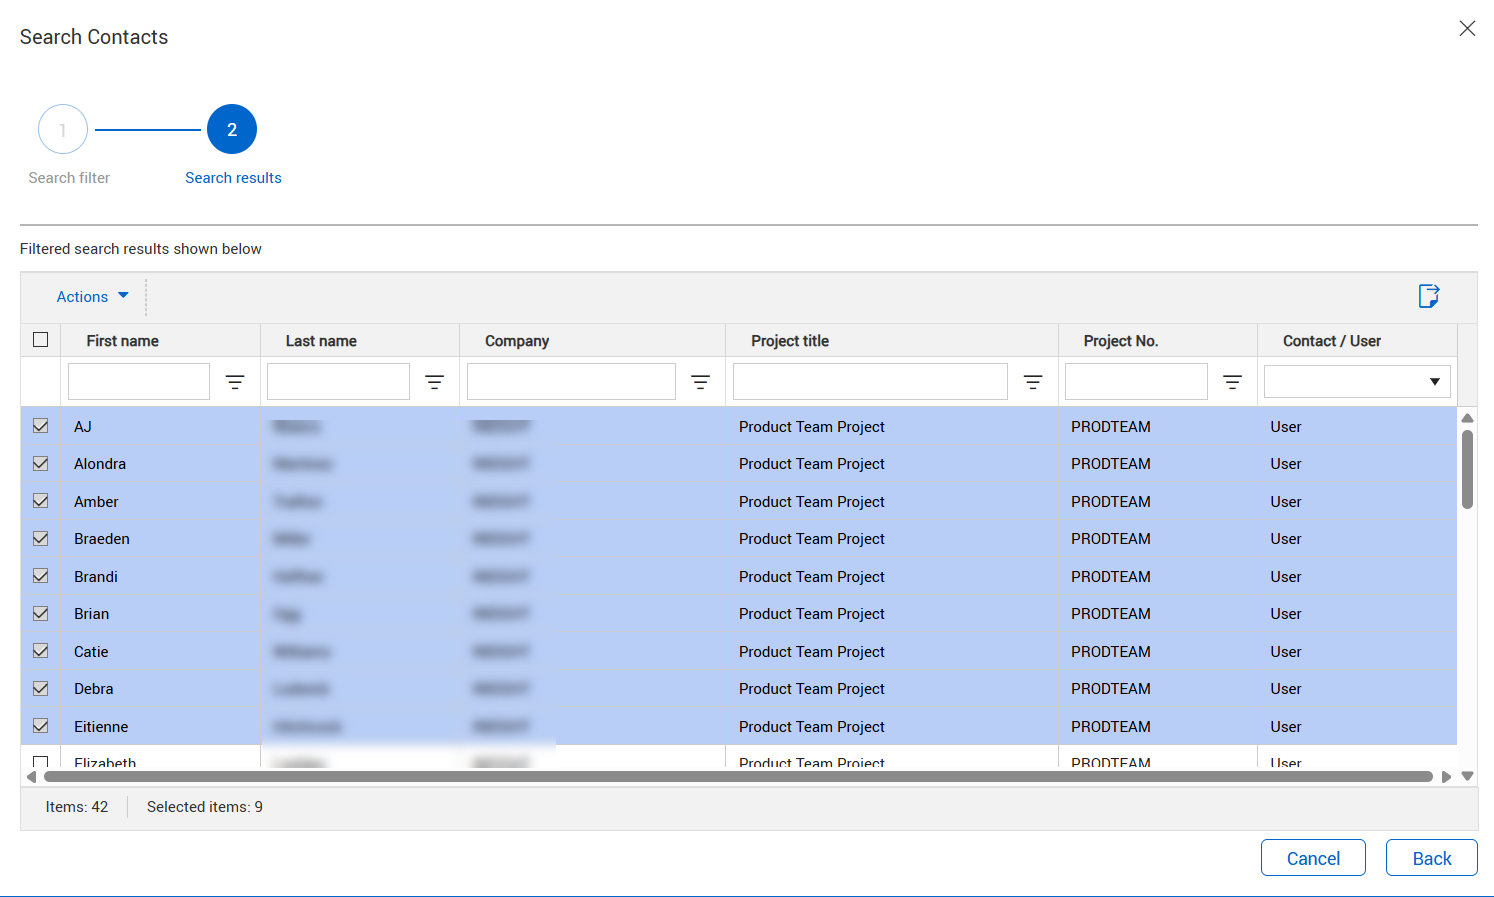
Enter the search filter criteria, and then click Next. The Search results page shows.
What's next: You can manage selected users' security groups, add or remove them as administrators, or make them inactive. You can export the search results to a Microsoft Excel spreadsheet for more viewing and sorting options.
Summary: Manage security groups for multiple users across projects using central user management.
Considerations: Only projects that you have access to show on the central user management page.
Search across projects for contacts. See the step by step Search contacts across projects for more information.
From the search results, select the contacts you want to manage.
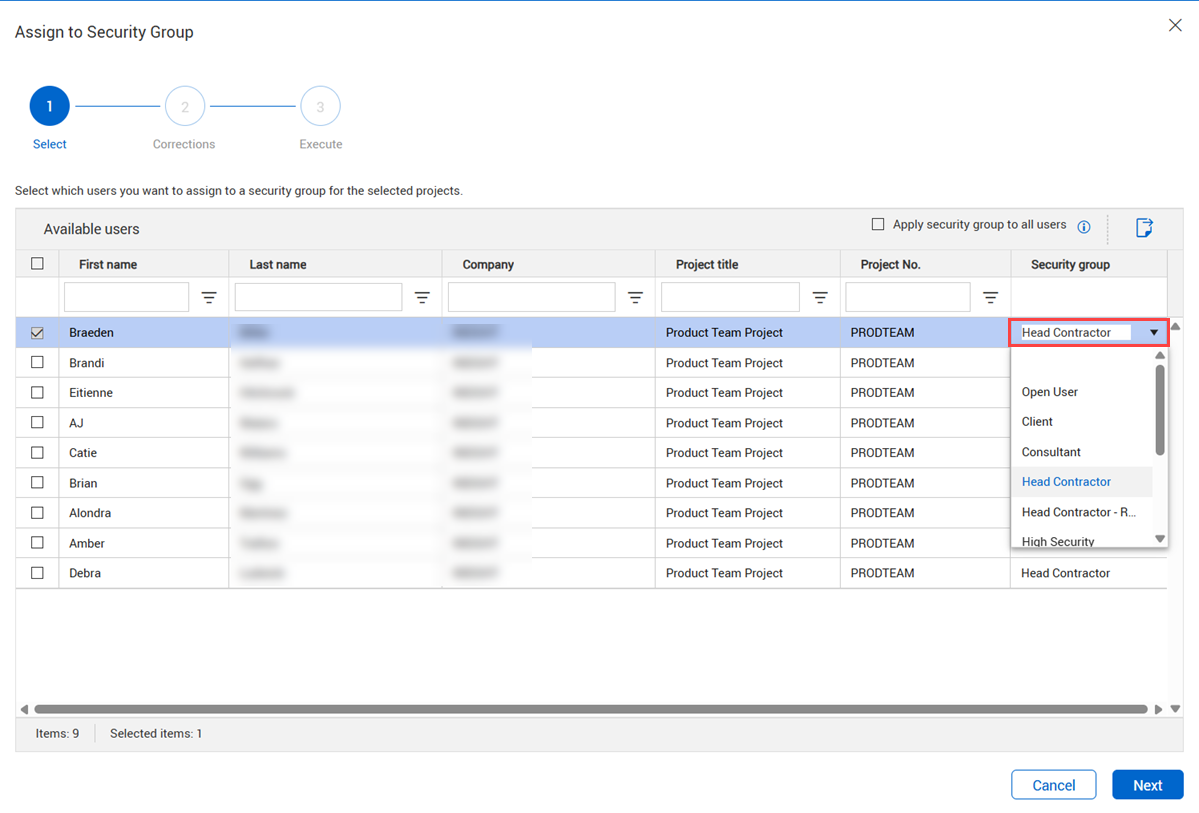
Expand the Actions menu, and then select Manage security groups. The assign to Security Group wizard opens.
Select a user, and then expand the Security group drop-down list to select a security group.
Repeat for each user. If you want all users to be in the same security group, select the user that already has the security group assigned, and then select the Apply security group to all users check box.
Select all contacts that have changes to their security groups. Alternatively, you can select the check box in the first column of the table heading to select all contacts.
Click Next. If there are no issues with the contacts, the Execute page shows. If there are issues with any of the contacts, the Corrections page opens with a list of all contacts that need corrections. You can make corrections as needed, and then click Next to advance to the Execute page.
Summary: Add or remove contacts as administrators from central user management.
Search across projects for contacts. See the step by step Search contacts across projects for more information.
From the search results, select the contacts you want to manage.
Expand the Actions menu, and then select Add administrator or Remove as administrator. The respective wizard opens.
Select the contacts you want to add or remove as administrators, and then click Next. If there are items that need corrections, the Corrections page opens. The Reason column shows the reason each item needs attention. Otherwise, the Execute page opens.
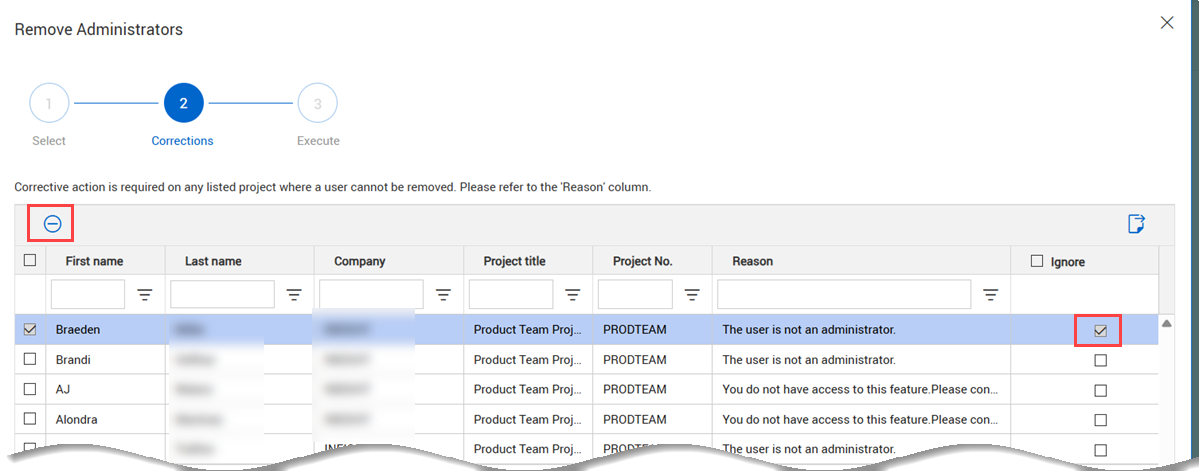
Make corrections as needed.
Use the Ignore check box to prevent the contact from being added or removed in the next step.
Use the Remove rows icon to remove the row from the Corrections page to reduce visual clutter.
Summary: Make contacts inactive from central user management.
Search across projects for contacts. See the step by step Search contacts across projects for more information.
From the search results, select the contacts you want to manage.
Expand the Actions menu, and then select Make inactive. The Inactivate Users wizard opens.
Select the contacts you want to make inactive. If you want the inactive user in filters, select the Include inactive contacts in filter check box.
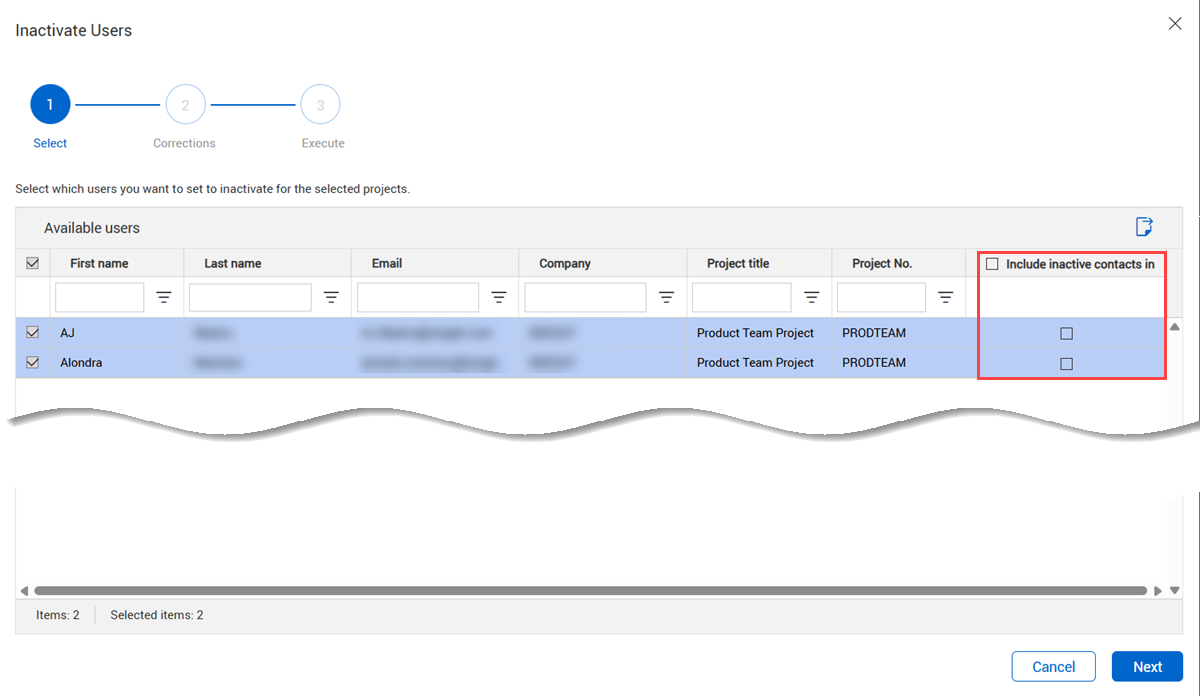
Click Next. If there are items that need corrections, the Corrections page opens. The Reason column shows the reason each item needs attention. Otherwise, the Execute page opens.
Verify that the names are correct, and then click Save.
Summary: Remove contacts from security groups using central user management.
Search across projects for contacts. See the step by step Search contacts across projects for more information.
From the search results, select the contacts you want to manage.
Expand the Actions menu, and then select Remove from security group.
Select the contact you want to remove, and then click Next. If there are items that need corrections, the Corrections page opens. The Reason column shows the reason each item needs attention. Otherwise, the Execute page opens.
Verify that the names are correct, and then click Save.
Additional Information
9977 N 90th Street, Suite 250 Scottsdale, AZ 85258 | 1-800-637-7496
© 2024 InEight, Inc. All Rights Reserved | Privacy Statement | Terms of Service | Cookie Policy | Do not sell/share my information