Products
Solutions
Resources
9977 N 90th Street, Suite 250 Scottsdale, AZ 85258 | 1-800-637-7496
© 2024 InEight, Inc. All Rights Reserved | Privacy Statement | Terms of Service | Cookie Policy | Do not sell/share my information

You can update the project administrator when a new administrator joins the project. The administrator can be in the existing administrator company or a new administrator company.
Summary: Update administrator when you want to replace the current administrator or add additional administrators in the same company.
Considerations: Additional project administrators must be from the same company. A project can have more than one administrator but only one primary administrator
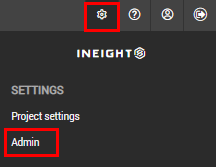
Click the Settings icon, and then select Admin.
Select Manage administrators. The Manage administrators page opens.
Select the company from the drop-down menu.
Select the contact and click the arrow icon.
If the contact is to be the primary administrator, select the Primary check box. Document asks whether you want to change the primary administrator.
Click Yes to make the contact the new primary administrator.
If you want to administrator to control access to all documents, select the All Doc Access check box.
Click Save.
The project administrator normally has access to all project documents in the document module. InEight can change the primary administrator’s access to be the same as all other users. In this case the option to define automatic distribution rules is also disabled. Contact InEight for more information on this.
Summary: When a different company takes over as the administrator company of the project, you can add a contact from that company as the project administrator.
Considerations: When you change the administrator company for a project, the ownership of the existing security group stays with the original company unless it is transferred to the new administrating company.
Click the Settings icon, and then select Admin.
Select Manage administrators. The Manage administrators page opens.
Select the new company from the drop-down menu.
Select a contact and click the arrow icon. The Manage Administrator dialog box opens. The dialog box warns you that the names of the existing administrators are cleared in the operation. It also gives you the option to transfer ownership of the existing security groups to the administering company.
Select the check box to transfer ownership of the existing security groups, if needed. If you continue without selecting this box, ownership remains with the original company. Click Yes.
Click Save in the Manage administrators page.
Additional Information
9977 N 90th Street, Suite 250 Scottsdale, AZ 85258 | 1-800-637-7496
© 2024 InEight, Inc. All Rights Reserved | Privacy Statement | Terms of Service | Cookie Policy | Do not sell/share my information
