Products
Solutions
Resources
9977 N 90th Street, Suite 250 Scottsdale, AZ 85258 | 1-800-637-7496
© 2024 InEight, Inc. All Rights Reserved | Privacy Statement | Terms of Service | Cookie Policy | Do not sell/share my information

You can configure a form workflow from the Forms register.
Summary: Configure a workflow form.
Considerations: The history of the specific form will not be visible to any user with None set as their access.
From the Forms register, click Actions.
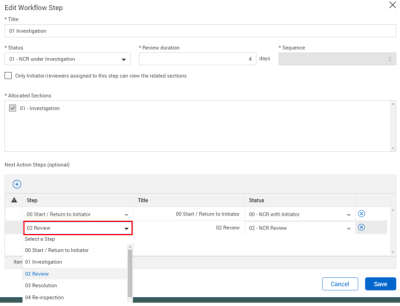
For each step, complete the following:
Title - indicates the name of the step in the Workflow, can be the name of Section in the form e.g. 01 Investigation
Status – Indicates the Status that will be assigned to this step.
Review duration – specify how many work days for completion. Once it has gone past the number of days allocated this will appear as an overdue item in the Dashboard widget.
Sequence – automatically allocates the next Step in the sequence, once saved cannot be edited
Repeat adding steps for each Section of the Form.
Specify Next Action steps, either one or multiple. Click the plus icon and select your options from the drop-down menu. 
It is possible to define the Next Action to be the same step multiple times, but a different status must be assigned each time. For example, the step might be Sent for Resolution; however, the Status might indicate Allocated to 3rd Party or Internal resolution.
Click Save.
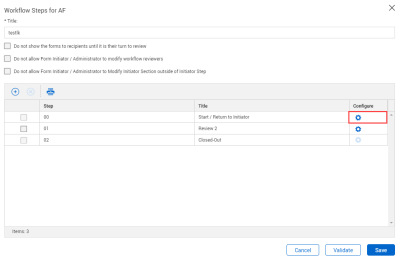
Select the following review rules, if applicable.
Do not show the forms to recipients until it is their turn to review
Do not allow users to modify workflow reviewers
Do not allow Form Initiator / Administrator Section outside of initiator step
Specify the number of days before and after the due date that reminder notifications are sent to reviewers.
Additional options are available to the workflow configuration, such as restricting viewing a step to only the form initiator and reviewers. Click the Configure icon.
Click Save.
Additional Information
9977 N 90th Street, Suite 250 Scottsdale, AZ 85258 | 1-800-637-7496
© 2024 InEight, Inc. All Rights Reserved | Privacy Statement | Terms of Service | Cookie Policy | Do not sell/share my information
