Products
Solutions
Resources
9977 N 90th Street, Suite 250 Scottsdale, AZ 85258 | 1-800-637-7496
© 2024 InEight, Inc. All Rights Reserved | Privacy Statement | Terms of Service | Cookie Policy | Do not sell/share my information

Manage the order, titles and visibility of columns by clicking Manage columns.

On the left, Available columns lists all columns you can add to your Register.
On the right, Selected columns lists all columns currently in your Register.
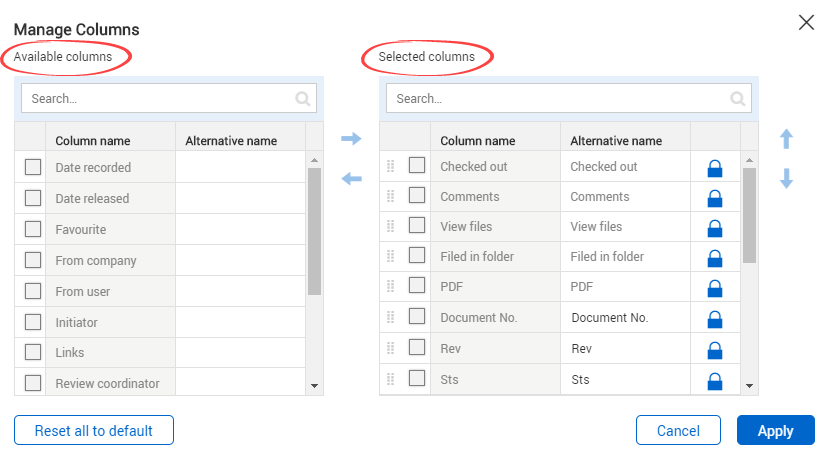
To lock a column so that it will always be shown in the Register, click the lock icon next to the column name in the Selected columns list.
You can filter columns to drill in on key information pertaining to your specific needs. You can filter multiple columns.
Click the text box in the column header.
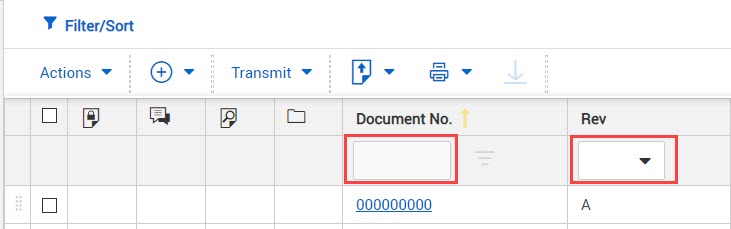
Enter filter information.
For free-text boxes, as shown in the Document No. column in the image above, enter text.
For drop-down list boxes, as shown in the Rev column in the image above, click the arrow, and then select a value.
Operators let you expand column filters by including or excluding information. For example, you can limit the filter to items that are greater than a specific value or do not contain a specific string of characters.
Click Filter/Sort in the upper right of the register. The filters slide-out panel opens.
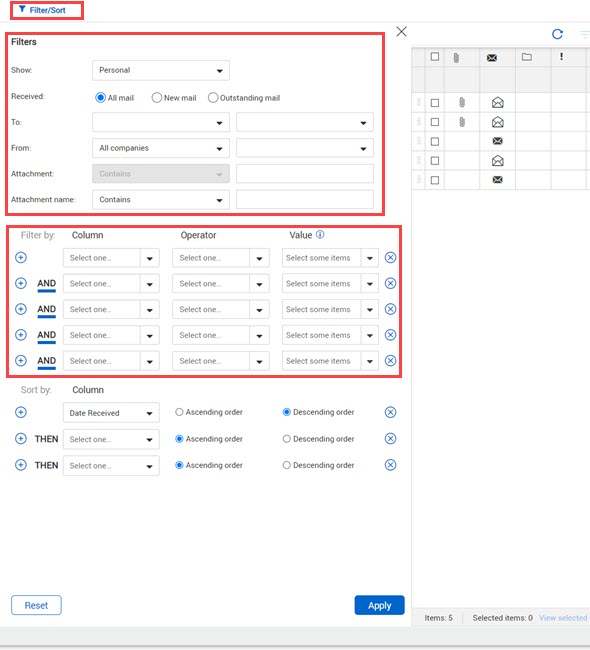
In the Filters section, enter information about the items you want to search through. This section varies by register. For example, the Mail register lets you specify whether to show personal or company mail, new mail, who the mail is to or from, and attachments.
In the Filter by section, select a column from the Column drop-down list.
The Documents register contains the Modules column that lets you filter based on the metadata of a linked deliverable or purchased item.
Select an operator from the Operators drop-down list, and then enter or select a value in the Value column. For example, for a Priority column, you could select the operator Greater than and the value 3 to show items with priority 1 or 2.
Optionally enter sort criteria to change the order of the entries.
Click Apply.
Click Clear all filters in the left toolbar to clear all filters in the register.
![]()
You can also click the Reset button on the Filters slide-out panel to clear filters.
You can also change the row density for each Register.
Click the arrow icon.
Select the row density from the drop-down menu.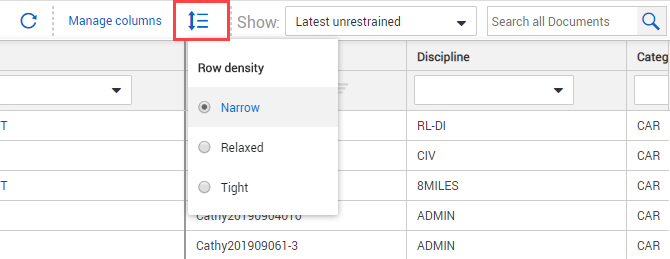
Additional Information
9977 N 90th Street, Suite 250 Scottsdale, AZ 85258 | 1-800-637-7496
© 2024 InEight, Inc. All Rights Reserved | Privacy Statement | Terms of Service | Cookie Policy | Do not sell/share my information