Job Properties
When you create a new project, the Job Properties form automatically displays. This is where you can enter basic information about the project. To open the Job Properties form at any other time, on the InEight Estimate landing page, select the Setup tab and click Job Properties.
Overview Tab
The Job Properties form opens to the Overview tab.
|
Name |
Description |
|
|---|---|---|
|
1 |
Job Code and Description |
Contain the information you entered on the New Job dialog.
|
|
2 |
Status |
Indicates where in the process this project is (e.g., Bidding, Awarded, etc.) • When searching for jobs in the Job Folders list, you can filter and sort jobs by their status • These job statuses can be adjusted to fit your company requirements in the Jobs Register, Tools Menu, Job Statuses. |
|
3 |
Notes |
Used to document project specifics.
|
|
4 |
Job created by |
Indicates the user or entity that initially created the job. |
| 5 | Source Job | The name of the original job that the job was copied from. |
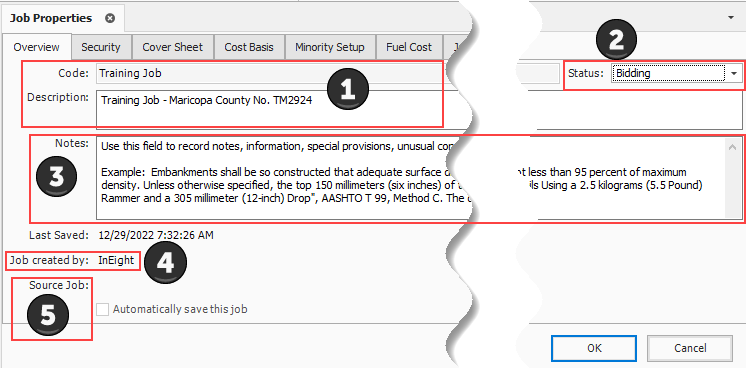
When you copy a job, the new job shows the name of the person who created the copied job, and the name of the source job the job was copied from.
Security Tab
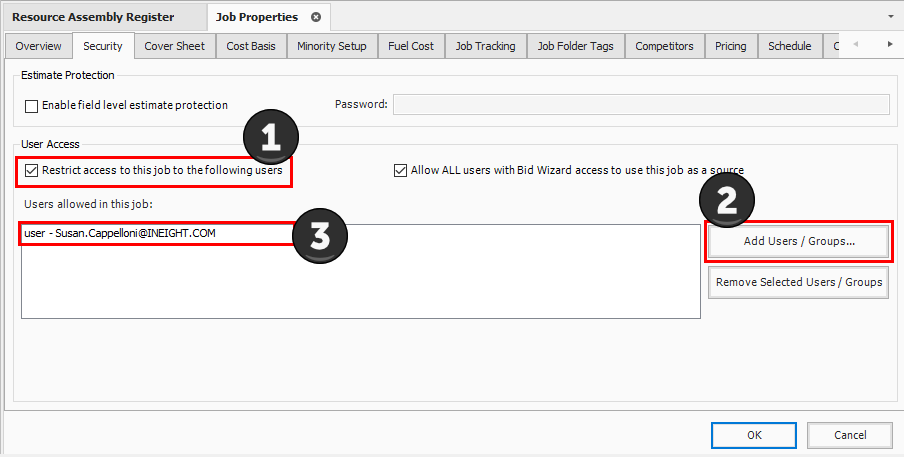
When you set up the job, you can secure it so only those working on the estimate will have access. You can adjust security at the field level or at the job level.
The following steps walk you through how to set up security. For now, you will leave the Security tab as is without making any specific selections; however, the following steps guide you through making any security changes when needed in the future.
Step by Step — Set Up Job Level Security
-
On the Job Properties > Security tab, select the Restrict access to this Job… check box.
-
Click the Add Users / Groups button to add users.
-
In the Select Users or Groups dialog, type the Email Addresses for those that need access and then click OK. (If you don’t know the email address, you can type the name of the user, and click the Check Names box to find the appropriate user.)

Cover Sheet Tab
The Cover Sheet tab is where you can define much of the general information about the project. It includes fields to identify the job’s location, contacts, and bid details.
The following fields are available:
-
Job Location
-
City, County, Country, Province/State
-
Job Type
-
Engineer
-
Owner
-
Architect
-
Forecast Start and Forecast Finish
-
Bid Date and Bid Time
-
Bid Location
-
Estimator
-
Opening Type and Proposal Type
-
Liquidated Damages (if applicable)

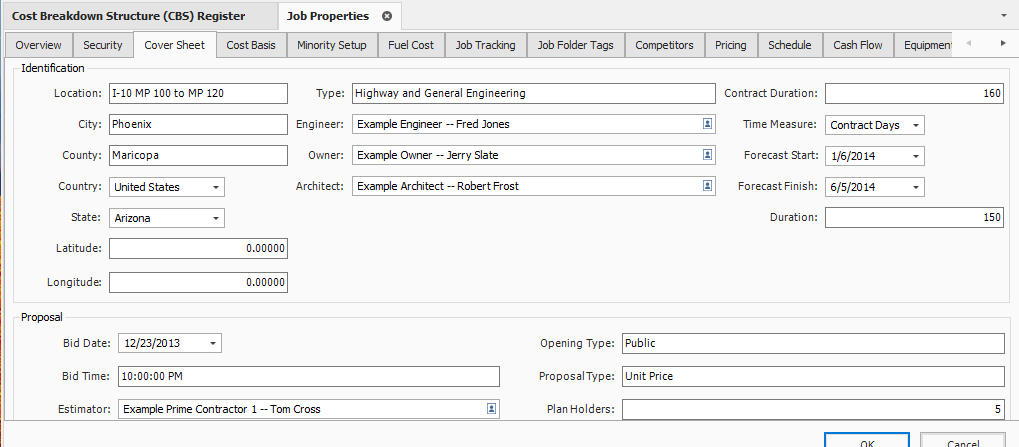
The fields on this tab can be helpful for historical reference and job classification. It is good practice to complete as many of these fields as possible, so you can reference and find the project later. These fields can be updated as needed at any time.
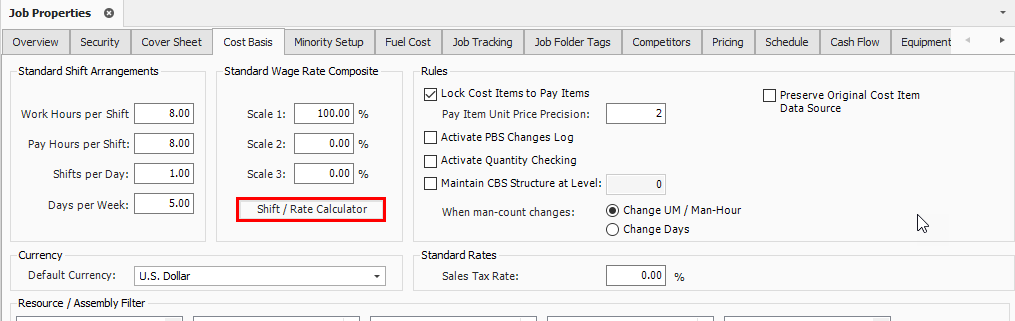
Cost Basis Tab
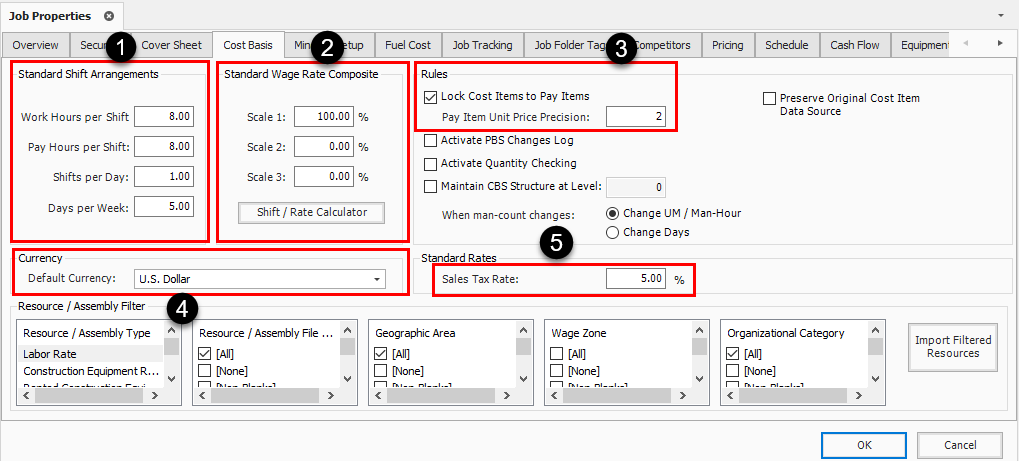
The Cost Basis tab has some important settings that will affect how costs are calculated in your estimate. The settings reviewed below are the ones you need to consider.
|
Name |
Description |
|
|---|---|---|
|
1 |
Standard Shift Arrangements |
The default standard shift arrangements are set up as 8 hours per shift, 1 shift per day, and 5 days per week; this can be changed if a project requires a different standard shift arrangement. |
|
2 |
Standard Wage Rate Composite: |
Allows you to indicate what percentage of your labor hours will be regular time (Scale 1), overtime (Scale 2) or double time (Scale 3). You can enter these percentages manually, or you can use the Shift Rate Calculator to obtain a more accurate figure. |
|
3 |
Lock Cost Items to Pay Items: |
For this sample job, you will check this box. When Cost Items are locked to Pay Items, your level 1 estimate structure is controlled by your list of pay items. |
|
4 |
Default Currency: |
The default will be set to U.S. Dollar, but this can be changed if needed. |
|
5 |
Sales Tax Rate: |
This field is not required but may be used to automatically apply a sales tax to all your material and rental items. The default is set to zero. |
Cost Basis Tab Overview
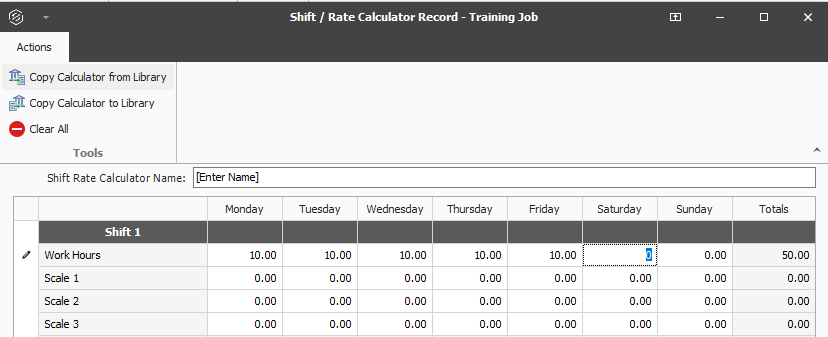
Shift Rate Calculator
Take a closer look at calculating your shift rates using the Shift Rate Calculator. For this example, you will walk through setting up 2 shifts for your project.
Step by Step — Shift Rate Calculator
-
On the Job Properties > Cost Basis tab, select the Shift Rate Calculator button.

-
For Shift 1, type a number value of hours in the Monday through Friday Work Hours fields.
- You can enter up to three shifts for the project
- For Shift 1, type a number value of hours in the Scale 1 fields.
- Scale 1 will be your regular time and Scale 2 will be any overtime
- Enter a number value for hours in the Scale 2 fields (just Monday through Friday).
- For Shift 2, type a number value for hours as you did above in Step 3.
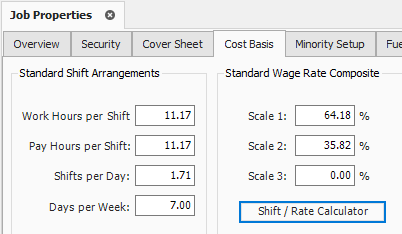
- Click OK.
- Now you have a blended shift arrangement, and your labor rates are a blend of 64.18% straight-time and 35.82% overtime

Import Filtered Resources
You may have noticed the bottom portion of your Cost Basis tab called the Resource Filter.
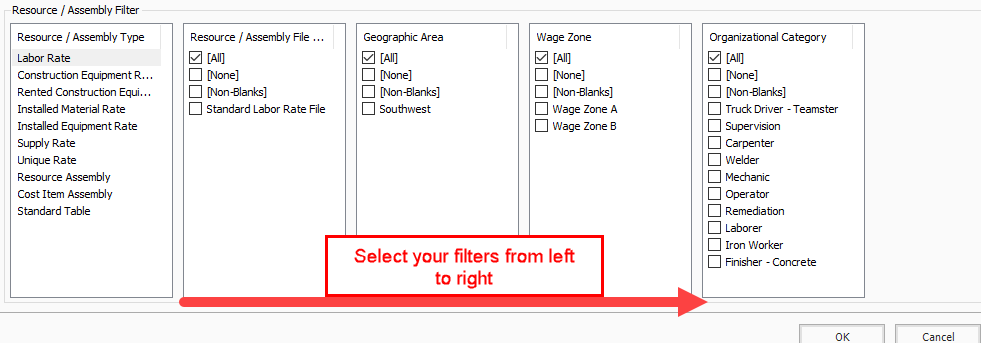
The Resource Filter portion of the Cost Basis tab is the most important part of Job Properties. You use it to import your labor, equipment, and materials from the Library. Until you import filtered resources, you have no resources (labor, equipment, materials) in your project.
Updated resource rates can be imported into the Library on a regular basis. It is important to update and have the “Latest & Greatest” rates available to import into your estimates.
You will import the rates you need using a set of four filters called Resource Attributes. Especially for labor rates, filtering by these attributes allows you to pare down the master list to just the resources you need.
Each of the resource filter categories are open for use as determined best by your business. The following are examples of common uses:
|
Resource Attribute Filters |
|
|---|---|
|
Name |
Description |
|
Resource File Description |
This attribute can be used to designate the rate type or the year to which the rates pertain. |
|
Geographic Area |
This attribute is used to designate regions, cities, or provinces based on geographical location of a project. |
|
Wage Zone |
This attribute is typically used specifically for labor resources. For example, it may designate the trade and union agreements your labor resources belong to. |
|
Organizational Category |
This attribute can be used to designate what trade or work type your resources pertain to. |
Resource filters become more specific from left to right, so it makes sense to start with Resource File Description and end with Organizational Category. The geographic area, wage zone and organizational category attribute titles can be changed to meet your business needs for filtering resources.
You can sort the filter lists by clicking on the filter category titles.
The following steps walk through using the Resource Filter to import resources.
Step by Step — Import Filtered Resources
-
In your job, go to the Job Properties > Cost Basis tab, select the Labor Rate resource type.
-
Under Resource File Description, select Standard Labor Rate File.
-
In the Geographic Area, select an Area.
-
For Wage Zone (Work Center), select a Wage Zone.
-
For Organizational Category, select All.
-
Follow the same steps for the remaining resource types.
-
Select the Import Filtered Resources button to bring your selected resources into the job.
-
For this example, we'll select the following filters for the Labor resource type:

-

You must select “Import Filtered Resources” to import your resources. Clicking OK on the Job Properties form will not import your resources.
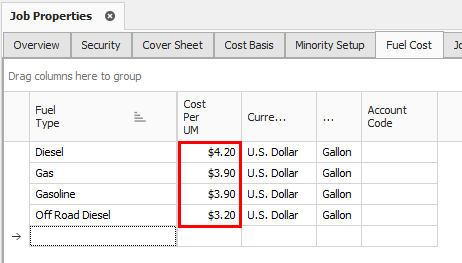
Fuel Cost Tab
On this tab you can enter the cost for fuel (or other energy sources). These unit cost will be multiplied by the consumption rates entered on each equipment record to define the fuel operating cost of each piece of equipment. The Cost per UM fields default to $0.00.
Step by Step — Enter Fuel Costs
-
In your job, open the Job Properties > Fuel Cost tab.
-
In Cost Per UM column, enter a dollar amount into the following:
-
Diesel
-
Gas & Gasoline
-
Off Road Diesel
-
-
Currency should read U.S. Dollar and UM should read Gallon.

Job Folder Tags Tab
On this tab, you can enter tag fields to label your project, so you can reference it later.
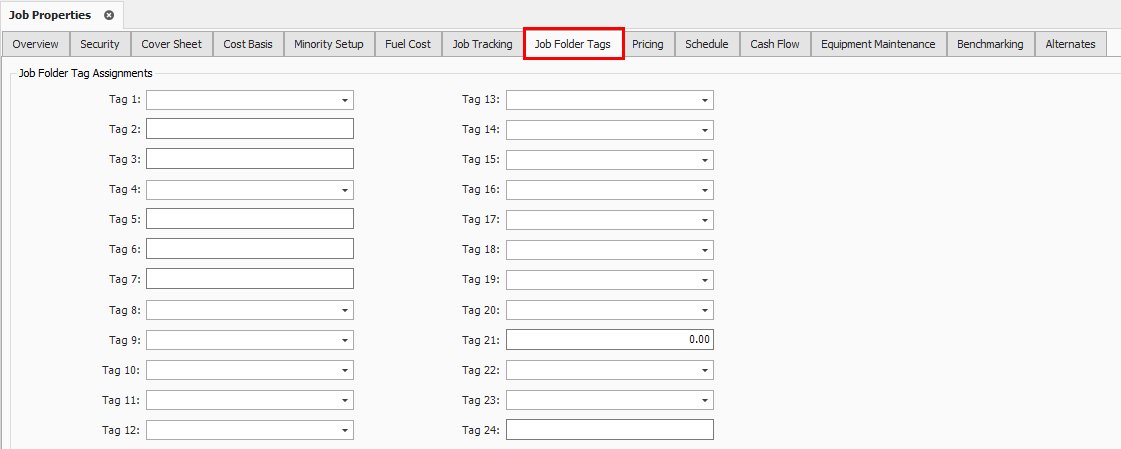
Many of these fields are validated fields, meaning you can choose from options in a drop-down list. The names of these tags and the drop-down values are defined at a master level within the Library Foundation Setup Data. Some job folder tags are setup to be date fields or numerical fields. These tags are used to sort and filter the job register as well as for selecting which past estimates to utilize for benchmarking.
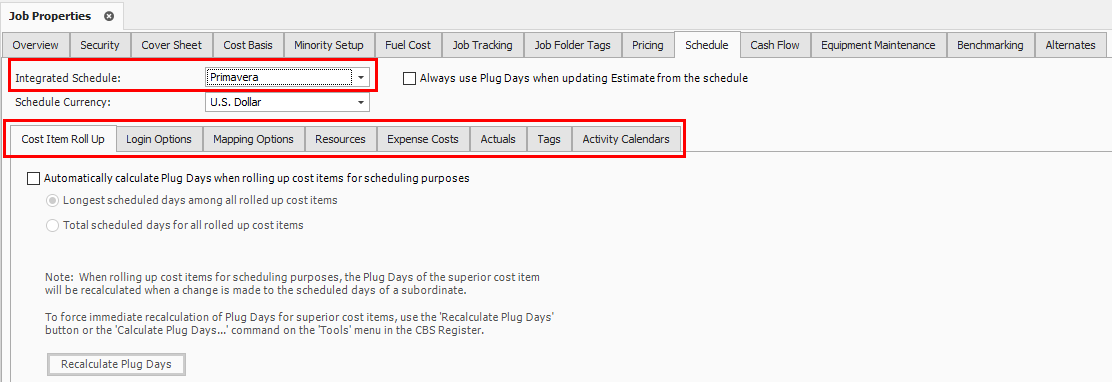
Schedule Tab
The Schedule tab is used to define the scheduling options for the integration between InEight Estimate Primavera or Microsoft Project. The settings you define here determine what information is sent to your scheduling tool, and how it will be structured.
-
At the top of the Schedule tab, the Integrated Schedule can be set to Primavera or Microsoft Project or Manual
-
You will need to confirm the proper settings are defined on each of the Schedule sub-tabs. These settings are defined in detail in Lesson 12 – Schedule Integration

Other Job Properties Tabs
There are several additional tabs on the Job Properties form. The other tabs will not be discussed here because they are either used for project controls, or they will be covered at another time.
|
Other Job Properties Tabs |
|
|---|---|
|
Name |
Function |
|
Minority Setup |
Used to set up minority participation goals (for example, DBE or MBE) and you want to track minority participation goal attainment status during the bid process, |
|
Job Tracking |
Used to select the code that will be used when tracking job progress, define the planned production calculation, define the percent complete calculation, define the forecast methods, and define markup rates for calculating earned revenue on Time and Expense pay items. |
|
Pricing |
Used to define how you want the Balanced Unit Price for each of the job's pay items to be calculated when using the AutoPrice feature. You can also choose form several options in determining how markup is defined. |
|
Cash Flow |
Defines the cash flow rules (payment terms) that are used in the calculation of Job Financing and cost/revenue realization to generate the curves that display on the Cash Flow form. |
|
Equipment Maintenance |
Used to define the calculation of maintenance labor man-hours based on equipment utilization, to capture the impact on total man-hours when changes are made that affect the job's total value. |
|
Benchmarking |
Used to establish the historical data to be used for benchmarking the current job, and to define the default benchmark graph display and calculations. |
|
Alternates |
Used to define Alternate Scenarios, to assess the impact of those scenarios. |