Products
Solutions
Resources
9977 N 90th Street, Suite 250 Scottsdale, AZ 85258 | 1-800-637-7496
© 2024 InEight, Inc. All Rights Reserved | Privacy Statement | Terms of Service | Cookie Policy | Do not sell/share my information

After the Excel file opens from the download, you can copy the tags you need into a Word or Excel version of your change order document, inserting them in the header, footer, and body of your change documents. Refer to the Instructions tab of the Excel file for information about using tags and building a template.
A sample Word template is provided for you as an existing template record on the Details Template page.
You access this template by either the Organization level settings or Project level settings. Click the Download sample template icon, and then select Download Word template or Download Excel template to access the download sample template in Word or Excel, respectively.

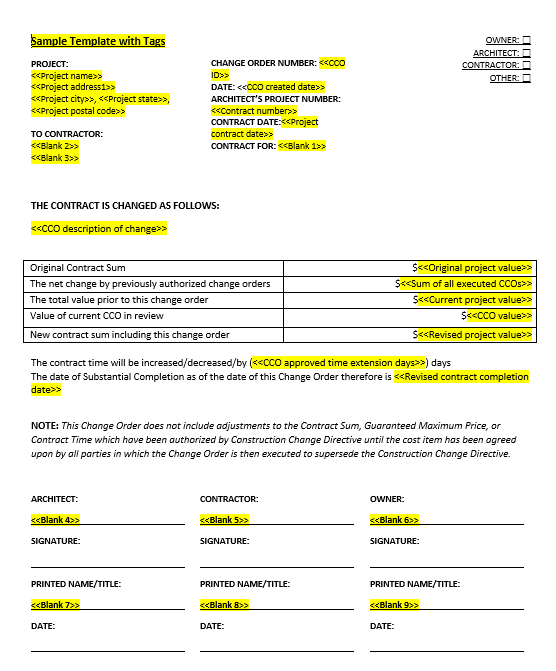
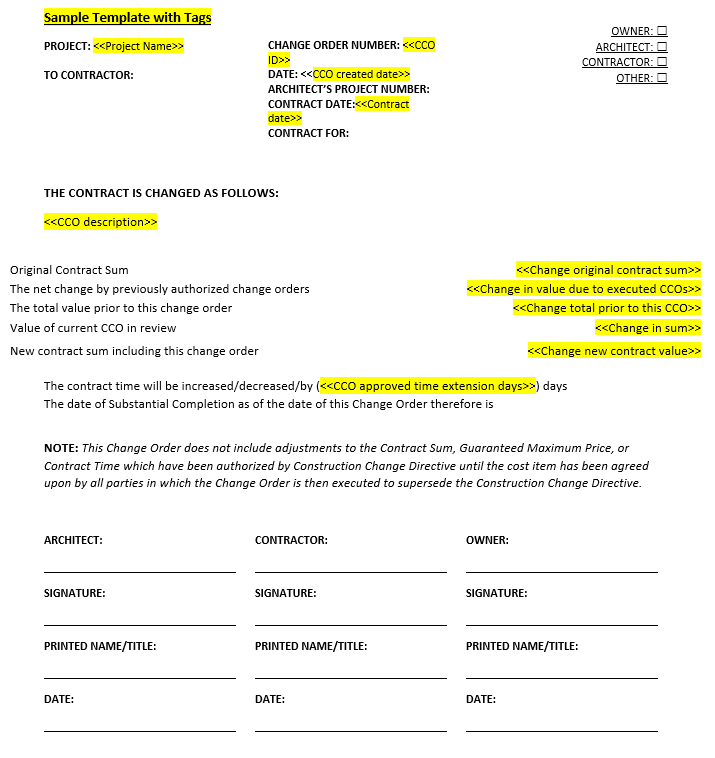
Tags must be inserted exactly as they appear in Tag Name. After all tags are inserted into the Change-related Microsoft Word document, save it as a .docx file. Change writer template can be named the same at the Organization level as those in the Project level. Below is an example of a document with the tags inserted. Everything in yellow are the highlighted tags.
Name the template and save it as an MS Word (.docx) document.
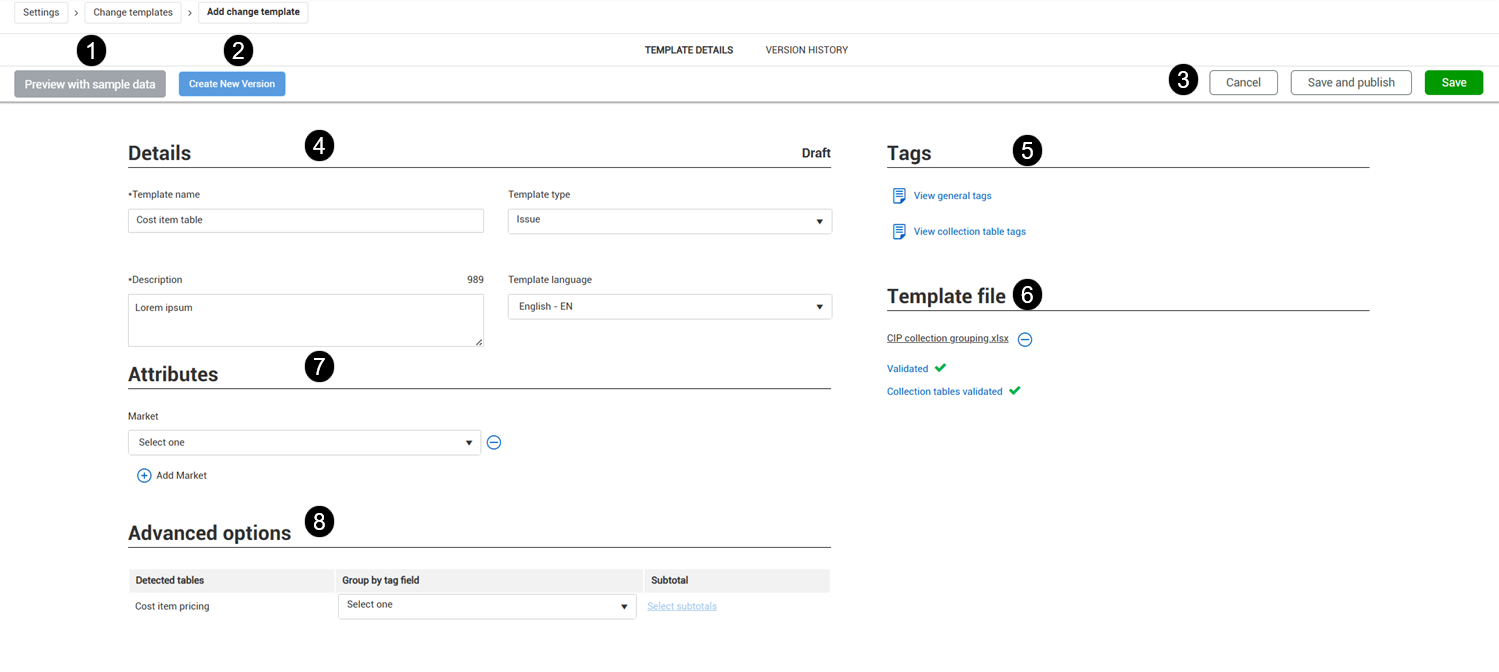
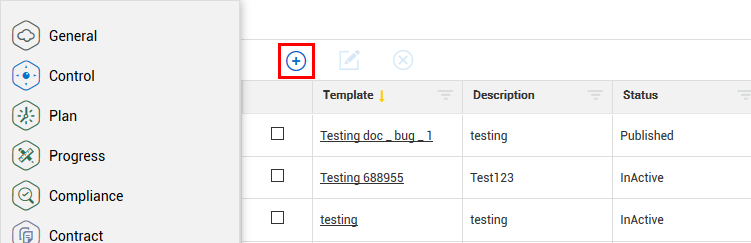
Returning to the Change template register, select the Add  icon to create a new Change template. This opens the Change template details page.
| Item Number | Name | Definition |
|---|---|---|
| 1 | Preview with sample data | Opens a preview of your template using the default sample data. |
| 2 | Create new version | Creates a new version of the template. This feature lets you update the version of a template rather than inactivating it and then creating a new one. |
|
3 |
Control buttons |
Lets you to cancel the template creation, save and publish or only save to access later. |
|
4 |
Detail area |
Lets you name the template, specify the template type and language, and add a description of the template. |
|
5 |
Tags and sample template |
Area where you can view and download the general or collection table tags. |
|
6 |
Template file |
Attach the template file which was created with the downloaded tags. |
| 7 | Attributes | Lets you add one or more market attributes that provide additional ways to filter templates. Organization-level templates associated to markets are automatically switched to On for Project use on any project with the same market listed in the Project details. When a market is added to the project details, the templates with the associated market are enabled for the project. |
| 8 | Advanced options | When Change detects a cost item pricing collection table in the uploaded template, the Advanced option section shows. This section lets you select how you want data to be grouped in the cost item pricing table in the generated document. You can select a field and the columns you want subtotaled in each section. See Cost item pricing table grouping for more information. |
New templates appear in the Change templates list in both Organization settings and Project settings.
After you upload a template to the Template details page, Change detects the cost item pricing collection table and then shows the Advanced options section.
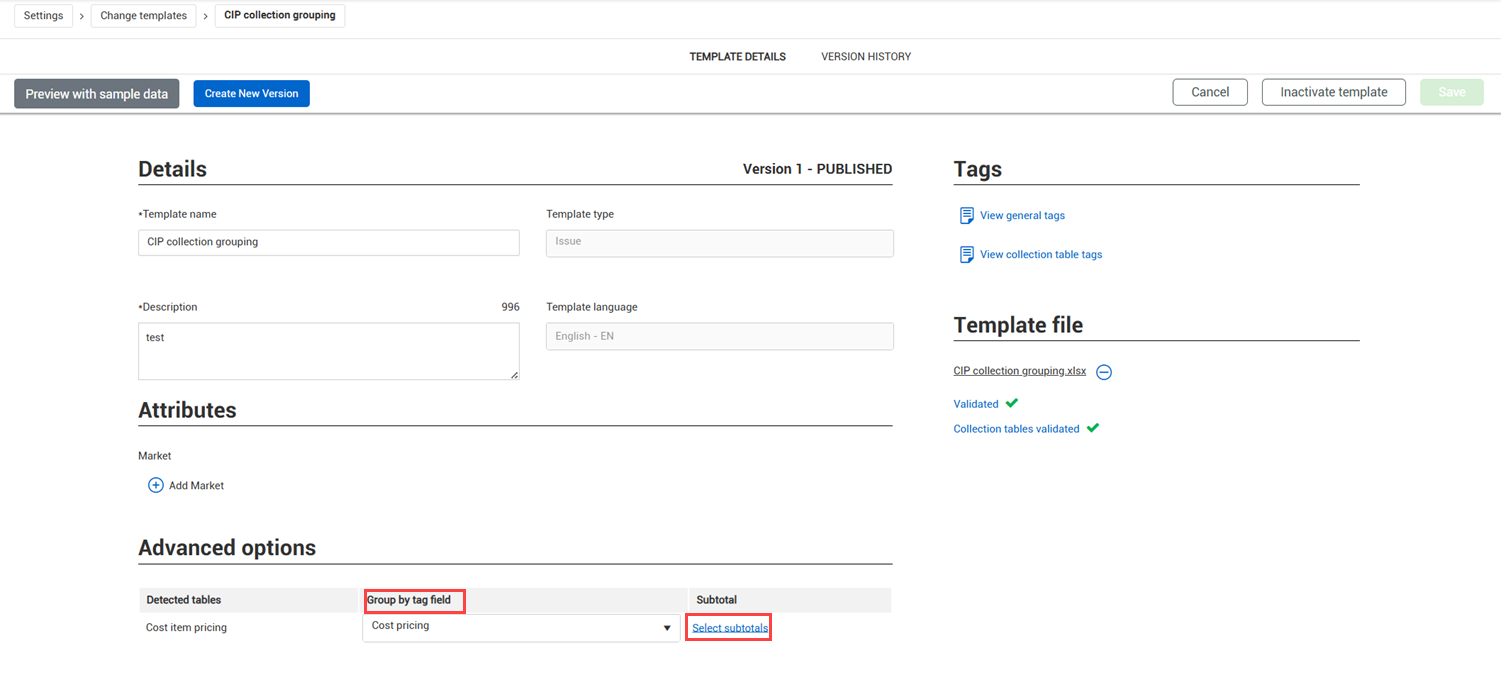
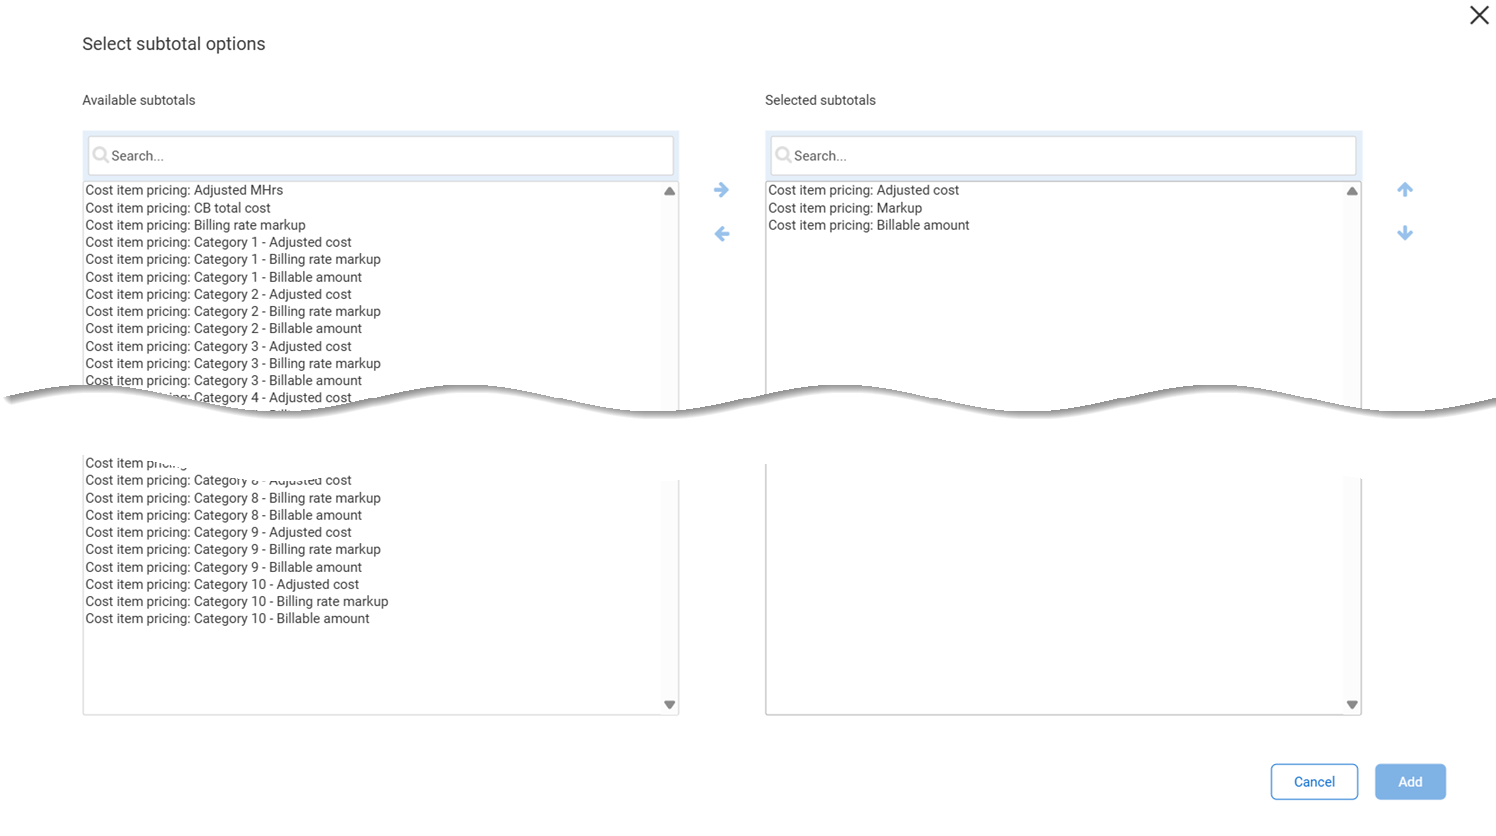
You can then select the field you want to group entries by using the Group by tag drop-down list. If you want to show subtotals for the group, click Select subtotals. The Select subtotal options dialog box opens showing all field tags that can be subtotaled. Use the arrows to move the fields between the Available subtotals and Selected subtotals list as necessary.
When you generate the Change document, the cost item pricing table shows the data in the specified group. Subtotals within the group are also calculated.

When you update templates with additional information, you can create a new version of the template instead of deactivating it. The Create new version button is enabled when you edit a template.
When you create a new version, the version numbering starts after the previous version. The new template version starts in the draft state. You can edit any of the fields except the template type and language. You can then attach the new file. Only one draft version can exist for a template at a time.
Only one version of a template can be active at a time. After you publish a new version, the previous version becomes inactive and is removed from the Templates register.
The Version column of the Templates register lets you see the template version number. When you click the version number, the template version history is shown. The template names are linked to the Template details page, so you can quickly view the detail information.
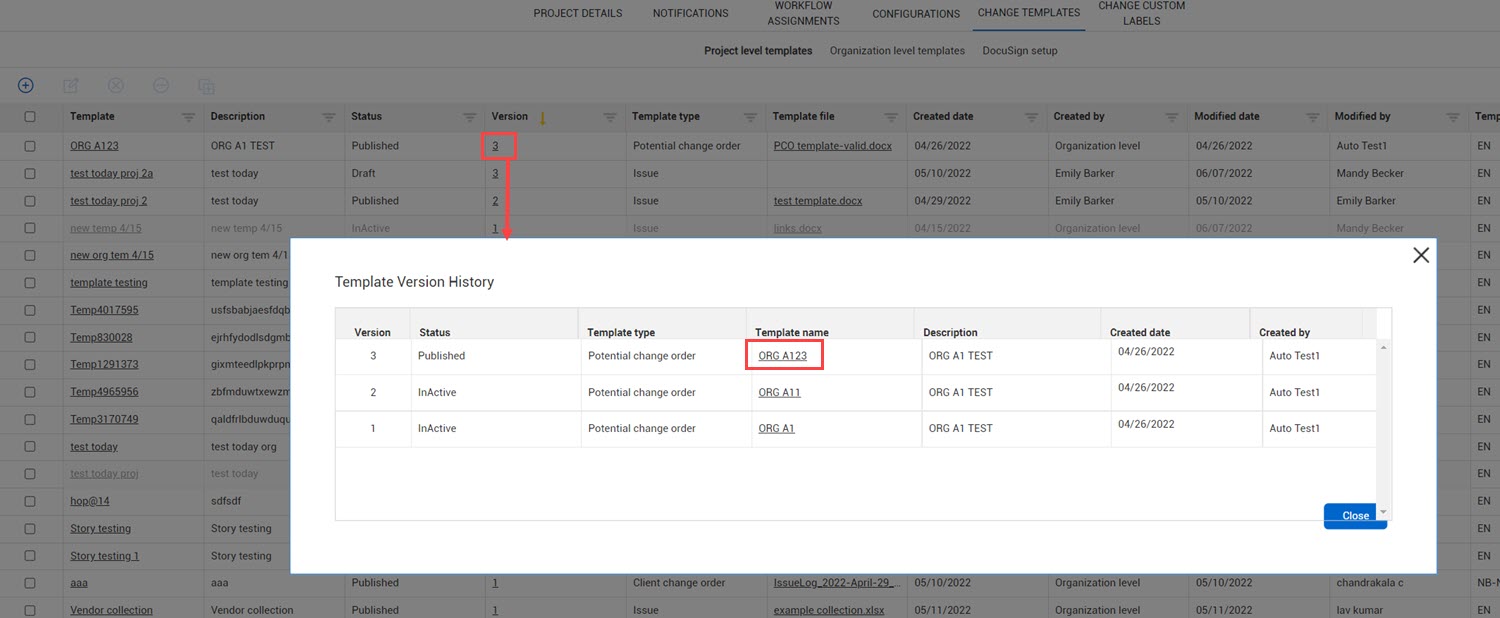
The Version history subtab contains links to previous versions of a template. The version history shows all versions in descending order, including inactive versions.

Versions of organization-level templates are available for use at the project level, but you can only create a new version of those templates at the organization level.
From the Organization settings page, select Change Templates.

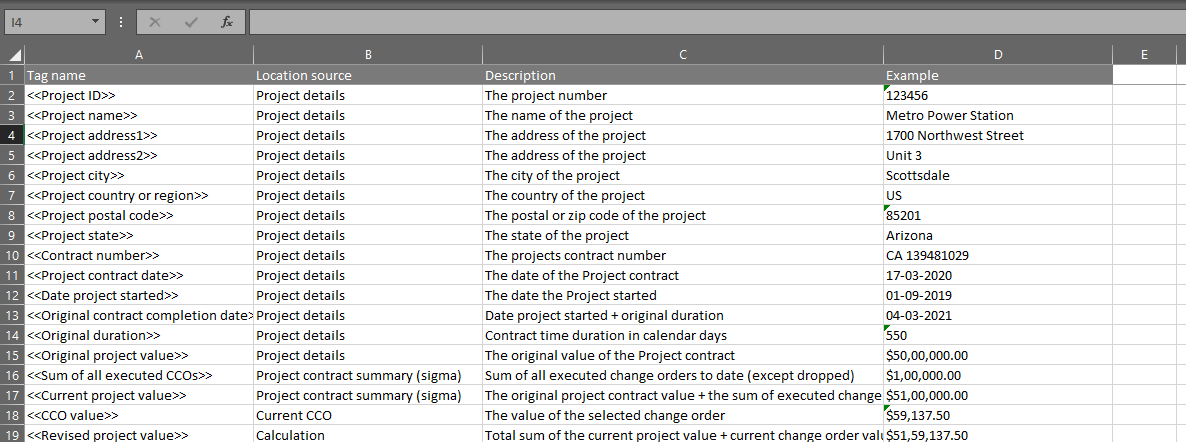
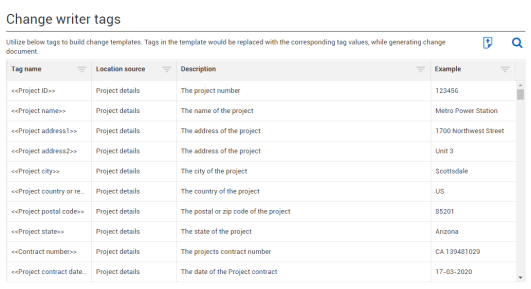
Click the View available tags icon, and then select General tags to view the tags.
Save the exported file.

Open the Excel file you just saved. The value in the Applicable for column indicates the template type that can use the tag.
Copy and paste the tags into the Word or Excel document you are creating as your new Change document.
When adding tags for DocuSign, change the font color to white, so the tag name does not show in the generated document.
If needed, you can insert one or more collection tables that are applicable to the template type. Refer to Collection tables for information about building a collection table.
Save it as a Word (.docx) or Excel (.xlsx) file.
Return to the Change templates tab, and then select the Add template icon.
In the Add a new template dialogue, fill in the fields with the following:
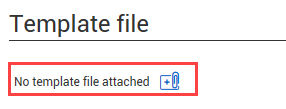
Under the Template file section, select No template file attached.
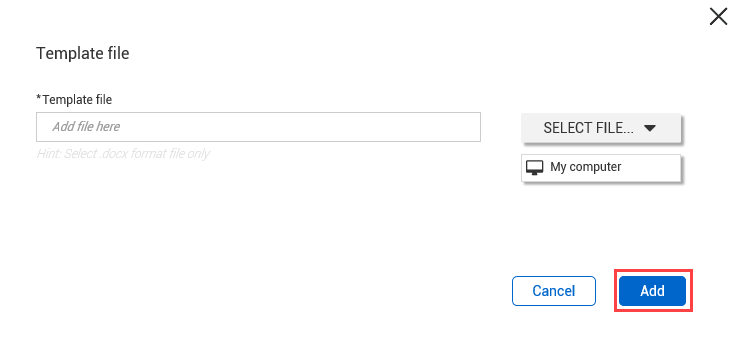
After the contract template is uploaded, click Add.
A validation notice is shown.
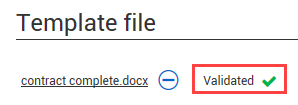
The file can be closed and published with invalid tags. During change order generation, invalid tags are not replaced with contract data. The invalid tag displays in the generated contract as it was inserted.
Click Save.
| Item number | Name | Definition |
|---|---|---|
|
1 |
Template |
The name you gave as the changed template. |
|
2 |
Description |
The description you used when creating the template. |
|
3 |
Status |
The status of the template after created. The status will show Draft, Published or Saved. |
| 4 | Template type | The type of change document that can use the template. Valid types are Client change order, Potential change order, Issue, and Other. |
|
5 |
Template file |
Name of the file which was uploaded into the contract writer. |
|
6 |
Created date |
Date that the contract template was created. |
|
7 |
Created by |
Name of person who created the template. |
|
8 |
Modified date |
Date that the last modifications were made to the template. |
|
9 |
Modified by |
Name of the person who made the last modification to the template. |
| 10 | Template language | The language of the tags in the template. |

Additional Information
9977 N 90th Street, Suite 250 Scottsdale, AZ 85258 | 1-800-637-7496
© 2024 InEight, Inc. All Rights Reserved | Privacy Statement | Terms of Service | Cookie Policy | Do not sell/share my information