Products
Solutions
Resources
9977 N 90th Street, Suite 250 Scottsdale, AZ 85258 | 1-800-637-7496
© 2024 InEight, Inc. All Rights Reserved | Privacy Statement | Terms of Service | Cookie Policy | Do not sell/share my information

Checklist Template class registration is important because the Preservations module references the Template Class as opposed to the Checklist Template. This allows a Project Admin revise the checklist template in the application without first having to delete the existing preservation.
Follow this step-by-step to register checklist template classes.
From the Excel Plugin, query the following tables:
Checklist Template Class
This table may be blank is data does not exist.
Checklist Template
Copy and then paste the Template Namecolumn from the Checklist Template table into the Name column of the Checklist Template Class table.
If editing the Checklist Template ID is all that is needed, use of the drop-down selection in the CHECKLIST TEMPLATE ID column.

Copy and then paste the Template Name column from the Checklist Template table to the Current Template ID column in the Checklist Template Class table.
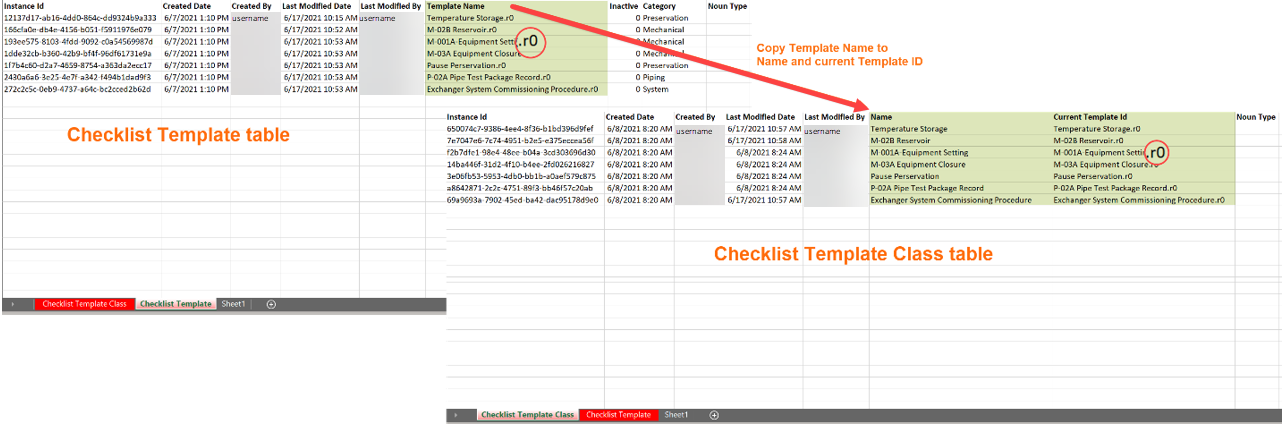
As a best practice, add a revision number to each Template Name, similar to the circled labels in the screenshot above, in the checklist Template table. Then in the Checklist Template Class table, remove the revision number from the Name column and keep it in the Current Template ID column.
| Copy | From | To |
|---|---|---|
| Table | Checklist Template | Checklist Template Class |
| Column | Template Name | Name and Current Template ID |
Similar to the Question Template Worksheet, there is a column in the Checklist Template Class table called Noun Type. This column is used to indicate a Checklist or Preservation.
If you do not specify a Noun Type, the template is then accessible in both the Checklist and Preservation modules. This is identified in both tables because there may be times that a checklist may not contain a checklist template class, but the admin still wants to make the checklist visible in only one of the modules.
Additional Information
9977 N 90th Street, Suite 250 Scottsdale, AZ 85258 | 1-800-637-7496
© 2024 InEight, Inc. All Rights Reserved | Privacy Statement | Terms of Service | Cookie Policy | Do not sell/share my information