Products
Solutions
Resources
9977 N 90th Street, Suite 250 Scottsdale, AZ 85258 | 1-800-637-7496
© 2024 InEight, Inc. All Rights Reserved | Privacy Statement | Terms of Service | Cookie Policy | Do not sell/share my information

Assuming Project Values have already been created at the root level in Master Data Libraries > Project Value Types you can add project value types to your project with the following steps.
1. Click on a project > Project Settings > Assigned project value types
2. Click Assign Project value types to project
3. Click the + sign next to the desired project values
• Options to choose must have been previously created in Master Data Libraries > Project Value Types
4. Click Add.
With project value types created, you can add values into each project value type.
1. Click on a project > Project Settings > Project values
• Assigned values appear in the left panel.
2. Click on the desired Available project value.

3. To manually add project values, click the + sign.
4. Type in an ID, Name, and Description.
5. Select the Status from the drop-down list.
6. Click the Save icon.
7. Repeat as necessary.
1. Click on a project > Project Settings > Project values
• Assigned values appear in the left panel.
2. Click the Export icon.
3. If data already exists, click With data. If not, click Template.
4. Pull up the Excel file from your download folder.
• Instructions are available on the first tab, if needed.
5. Open the Project Values tab.

• If you clicked Template, an empty template appears
• If you clicked With data, existing project rows per type are already populated.
6. Add additional rows of data as explained within the Instructions tab.
7. Click File > Save.
If the Project Values template was previously created:
1. Click on a project > Project Settings > Project values
• Assigned values appear in the left panel.
2. Click on the desired Available project value.
3. Click the Import icon.
4. Browse and select the file to import.
5. Click Import.
• Refresh your screen to view the import list.
6. Repeat for each desired Available Project value.
At this point you have Project Value Types and Project Values, but no hierarchy or structure created.
1. From the Project Values page, click Go to project structure.
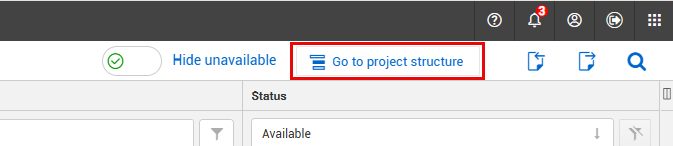
• Alternatively, you can access this via a project’s > Project Settings > Project Structure.

2. Assuming no project structure has yet been created, the Project definition appears. Click on the drop-down arrow.
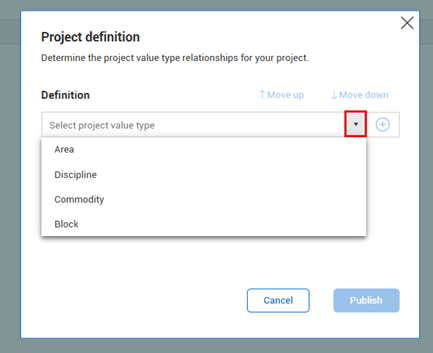
3. From the drop-down menu select the project value from the list that you want at the top, for example System.
4. Click the + sign, and select the next level project value, for example, Sub-system.
5. Continue selecting next level project values, as desired.
6. Click the + sign after the last project value type is selected.
7. When complete, click Save.
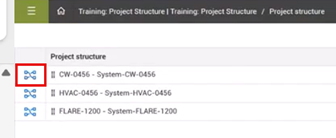
1. From the Project Structure page, click Structure definition to view the existing Project Structure.

2. To add a project value type to the bottom of the hierarchy, select the drop-down arrow.
The only option is to add a new item to the bottom, you cannot reorganize the hierarchy.
3. Select the project value from the list.
4. Continue selecting next level project values, as desired.
5. Click the + sign after the last project value type is selected.
6. When complete, click Save.
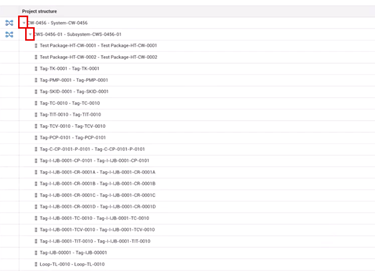
1. From the Project Structure page, click the Assign Node icon to the left to the first Project Structure item.
2. Select the checkboxes to the left of each available segment you want to add.
3. Click the right arrow button to assign it/them.
4. Repeat as necessary.
5. Click Assign to save.
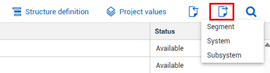
1. From the Project Structure page, click the Export button.
2. At an individual level, select the desired option to export.
3. Open the Excel file.
• Instructions are available on the first tab, if needed.
4. Open the Project Structure tab.
5. Build the Child and Parent using IDs based off your Project Structure.
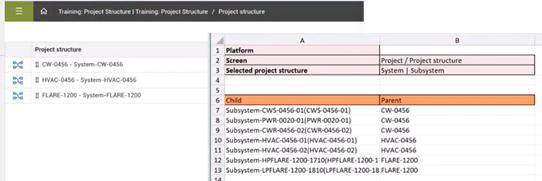
6. Click File > Save.
7. Returning to the Project Structure page, click the Import button.
8. At an individual level, select the desired project structure option to import.
9. Click Import.
10. As a result, by clicking on the down arrow(s), the entire tree appears.
InEight Platform Project Value Types
Additional Information
9977 N 90th Street, Suite 250 Scottsdale, AZ 85258 | 1-800-637-7496
© 2024 InEight, Inc. All Rights Reserved | Privacy Statement | Terms of Service | Cookie Policy | Do not sell/share my information