Products
Solutions
Resources
9977 N 90th Street, Suite 250 Scottsdale, AZ 85258 | 1-800-637-7496
© 2024 InEight, Inc. All Rights Reserved | Privacy Statement | Terms of Service | Cookie Policy | Do not sell/share my information

Create a master preset to capture and save the context or state of your project through a filtered lens or camera angle. Navigate between master presets to help you effectively manage your model and share your perspective with other users.
Master presets are created on a project level. After master presets are created, anyone can use or edit them.
From an open model(s), navigate to the view that you want to save as a master preset. When ready to capture that viewpoint, navigate to View and select Master Presets. Then, select Add and select your preset preferences.
![]()
Once selected, Model Visibility will not show any new model streams that may be added to the project. To set or adjust model visibility settings, open the Object panel or right click menu to view the show/hide and selection options.
Selected Objects shows any objects you have selected on the model
Style Set shows any styles already assigned to the visible objects of your model
Object Visibility saves the objects’ states so that any objects already hidden remain hidden
Workspace saves the user interface configuration, their location, and current screen resolution
Selecting Workspace may cause undesirable results for users with different screen resolutions and configurations. Avoid selecting the Workspace when working in a shared preset.
When a custom Workspace is necessary, create and label a folder in your master preset panel where you can save that preset. Add your Workspace selection (and parameters, if possible) to the master preset description.
Using Archive, you can bookmark pages within a document so that users open to a specific page while viewing the project from your master preset.
Sectioning shows any planes or sections of your model(s) that are visible
Camera Transition Time, with the Camera option selected, allows you to adjust the speed of the camera’s transition time. The default Camera Transition Time is 1,000 milliseconds
If Camera is not selected, you cannot adjust the Camera Transition Time.
If a master preset has messed up your workspace, you can reset your workspace by going to the Settings and selecting Reset Workspace.
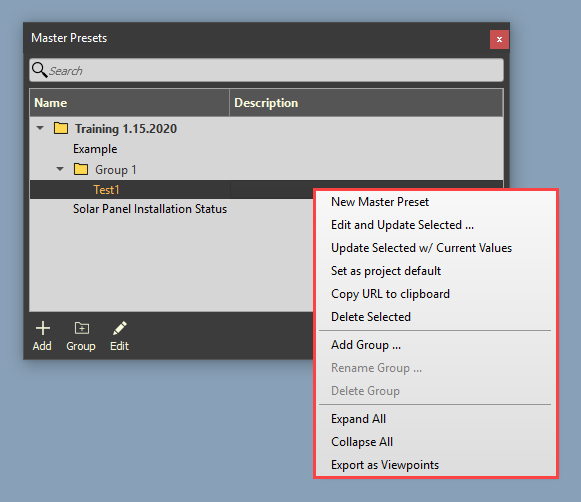
Quickly access additional master preset options by right clicking within the Master Preset panel.
Update Select w/ Current Values updates a Master Preset with the current model view configuration without opening the Master Preset Editor
Copy URL to Clipboard copies the master preset of your project to share with other collaborators
Add Group … allows you to add a group from the right click menu
Delete Group deletes any selected group(s)
Collapse All collapses all folders in the master preset panel
Additional Information
9977 N 90th Street, Suite 250 Scottsdale, AZ 85258 | 1-800-637-7496
© 2024 InEight, Inc. All Rights Reserved | Privacy Statement | Terms of Service | Cookie Policy | Do not sell/share my information