Products
Solutions
Resources
9977 N 90th Street, Suite 250 Scottsdale, AZ 85258 | 1-800-637-7496
© 2024 InEight, Inc. All Rights Reserved | Privacy Statement | Terms of Service | Cookie Policy | Do not sell/share my information

Vendors master data is used by the following InEight applications: Billings, Compliance, Completions, Contract, Control, Design, Estimate, Plan, and Progress.
In the InEight applications, vendors can be defined as contractors, subcontractors, or suppliers your company works with to complete work on a project. The master list of vendor records and their associated details are stored in the Vendors master data library. The InEight applications use the master list of vendors for multiple purposes, including both as a tag for filtering, reporting and correspondence, and to give vendors access to perform specific functions in the applications. For more details about how vendors are used by other InEight applications, see Use cases.
To access the master vendors list from the Main menu, select Master data libraries > Vendors. The Vendors page consists of two tabs for vendors and vendor types. When vendor master data is used in the InEight applications, it is typically shown in a drop-down list of vendors and as needed can also show vendor-related fields.
With the applicable permissions, you can add, edit, and assign master data vendors. Permissions are configured in Roles and permissions > Master data libraries > Vendors.
| Permission Name | Description | Level |
|---|---|---|
| View vendors | Allows the user to view the vendors list. Allows the user to add new vendors. Allows the user to edit vendors. Allows the user to delete vendors. | Base user |
| Add vendors | Allows the user to view the vendors list. Allows the user to add new vendors. Allows the user to edit vendors. Allows the user to delete vendors. | Account Admin |
| Edit vendors | Allows the user to view the vendors list. Allows the user to add new vendors. Allows the user to edit vendors. Allows the user to delete vendors. | Account Admin |
| Delete vendors | Allows the user to view the vendors list. Allows the user to add new vendors. Allows the user to edit vendors. Allows the user to delete vendors. | Account Admin |
On the Vendors tab, you can add, edit, and delete vendors using the icons in the toolbar. The Import and Export icons allow you to add and export your vendors in bulk. When a vendor is selected, you can click the Show information details icon to view the vendor’s details in the slide-out panel, without having to open the vendor’s record.

Vendor records can include an address and phone number for correspondence, as well as other useful information, such as payment terms and incoterms.
| Field Name | Description |
|---|---|
| ID | Unique identifier for the vendor. |
| Name | Name of the vendor. |
| Alternate name | An additional identifier that can be used for custom purposes. For example, a simplified name for the vendor. |
| Vendor type | A validated field populated with values from the Vendors > Vendor types tab. Used to further classify vendors for sorting, filtering, and reporting purposes. |
| Vendor tax ID | Official identifier used by the vendor for tax purposes. |
| Vendor tax jurisdiction | Geographic area where the vendor is registered for tax purposes. |
| Status | Set the status to Available to allow the vendor to be used. If the status is set to Unavailable and the Hide unavailable toggle is On, the vendor does not show in the list on the master data page. |
| Default currency | Type of currency associated with the vendor by default. The values from this validated field are populated from the Currencies master data library. |
| Default payment terms | Payment terms associated with the vendor by default. The values from this validated field are populated from the Payment terms master data library. |
| Default incoterms | Incoterms associated with the vendor by default. The values from this validated field are populated from the Incoterms master data library. |
| Default incoterms location | Incoterms location associated with the vendor by default. |
| Address-related fields | Includes Country/Region, Address, City, State, Postal/Zip code, Phone number, and Fax number fields available under three separate tabs for primary, remit to, and additional. |
One of the attributes available to define in the vendor details is the vendor type. You can use the vendor type field to further clarify what kind of vendor it is such as a, subcontractor, equipment rentals, goods supplier. Because the list of vendors for a company can contain numerous entries, vendor type can be a useful label for filtering the vendors list.
To maintain a consistent list of vendor type values, the Vendor type field is a drop-down list of pre-defined values. With the applicable permissions, you can add, edit, or delete vendor type values on the Vendor Types tab of the Vendors master data library page.

Depending on project arrangements, your company might give vendors access to perform certain functions in InEight applications (see Use cases). User access is given to a vendor by creating a user record in InEight Platform and associating it with a vendor and can be done either from the User management page or when editing a vendor record in the Vendors master data library.
You can add users by selecting Main menu > Suite administration > User management. When adding a user, you can associate it with a vendor from the Vendor field drop-down list in the user details. To learn more about creating a user record under User management, see User Management.
Do the following to add a user from the Edit vendor record in Vendors master data library.
In the Vendors master data library, select the vendor check box, and then click the Edit icon to open the vendor record.
On the Edit vendor page, select the Users tab.
Click Add users to open the Add users slide-out panel.

Complete the information for the user details, and then click Next.
Assign the user to the applicable role, and organization or project from the drop-down lists.
Click Save.
When a user in logged in to an account that is associated to a vendor, the following conditions are applied by the system:
The Home page defaults to the Vendor view.
Access to projects is automatically filtered to include only those linked to their assigned vendor.
Access to some data is restricted based on vendor assignment. For example, if you are signed in with a vendor account in the Operational resources master data library, your view is restricted to operational resources associated with that vendor.
Users that are associated with a vendor can still have access to InEight applications and even organization and project settings, depending on the roles and permissions assigned to them. It is important to make sure vendor access is restricted through the role assigned, so the vendor only has access to the functions they need to do their work.
Contacts can be assigned to a vendor, for use in the Estimate and Contract applications.
In the Vendors master data library, select the vendor check box, and then click the Edit icon to open the vendor record.
On the Edit vendor page, select the Contacts tab.
Click the Add contact icon. The Add contact slide-out panel opens.

Complete the information for the contact details, and then click Next.
Add any additional details as needed for the contact, and then click Save.
You can also add vendors and contacts from the address book in the InEight Estimate application. For more information on the use of vendors and contacts in Estimate, see Library Address Book.
There are some InEight applications such as Design, Contract, and Progress that allow access for a vendor to perform limited functions in those applications. To use the applications and perform any functions in them, a vendor must first be assigned to the applicable project.
From the Main menu, select All projects & organizations to open the list of projects.
Click the project name link to open it.
On the Project home page in the left menu, select Assigned vendors. The Assigned vendors page opens.
Click the Assign existing vendors to the project icon. The Add vendors to project dialog box opens.
In the Add vendors to project dialog box, click the Add icon for the vendor or vendors that you want to assign to the project.
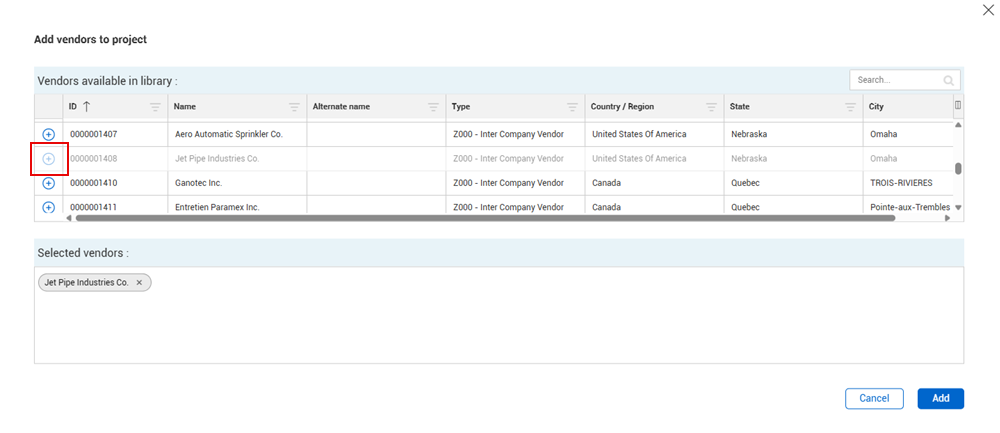
Click Add. The vendor or vendors show in the list on the Assigned vendors page for the project.
Vendors are used throughout InEight applications for different purposes.
The Billings application uses vendor information to indicate which clients to bill on a project. For more information, refer to Billings Managing companies (vendors) for more information.
Vendors are used in Compliance and Completions for informational purposes. When building a form template, you can use an integrated list question type to add a series of cascading questions that must be answered by selecting from drop-down lists, where the values on those lists come from a master data library in Platform, including the Vendors master data library. For more information about the use of vendors in Compliance and Completions, refer to Integrated list.
Contract uses the Vendors master data library to award vendors to bid packages and assign vendors to contracts. For more information about the use of vendors in Contract, refer to Overview tab > Adding Information and user assignments and Contract details > Vendor.
Also, users with a vendor assigned to them and with the applicable vendor-related permissions can have limited access to submit invoices in the Vendor contract summary page of Contract. When vendors log in, the home page includes a Contracts tile, where they can select from the list of contracts they have with the contractor to submit invoices. For more information, refer to Vendor submission setup.
There are two columns in Control related to vendors: Assigned vendor and Actual vendor MHrs (to date). For more information about the use of vendors in Control, refer to Assigned vendors and Vendor work hours from Progress.
If you are using Design for engineering work, you could be collaborating with third party vendors, such as an Engineering firm, to design work on a project. As design work progresses, you might need vendors to participate in the review or development of the designs, and you can give them access to claim against the design steps they are working on. For more information about the use of vendors in Design, refer to Vendor access to scope items.
The Vendor and Contact master data libraries in Platform serve as the single repository for all InEight applications including Estimate. Entries in the Estimate library address book populate automatically via integration with Platform. Entries in the address book are then used in Estimate for managing quotes and filling out project details in the Job Properties form. For more information about the use of vendors in Estimate, refer to Library address book for more information.
In Plan, vendors are used for informational purposes. When a contract component is created automatically in Plan from a schedule of value item in Contract, it includes component details from the schedule of value item it relates to, including the name of the associated vendor. This vendor name can be used on the components page or in Plan-related reporting to sort and filter your components.
![]()
Progress uses the Vendors master data library for a multiple use cases.
• As an owner or contractor to track hours of a third-party vendor. For more information about vendor associations, refer to Daily Plan from scratch and the Tracking Vendor Hours video.
• As a vendor given access to Progress daily plans to track their own hours. For more information about tracking vendor hours, refer to Vendor use of daily plans.
• To associate vendors to issues on a daily plan. For more information about association vendors to issues, refer to Completing a daily plan.
Additional Information
9977 N 90th Street, Suite 250 Scottsdale, AZ 85258 | 1-800-637-7496
© 2024 InEight, Inc. All Rights Reserved | Privacy Statement | Terms of Service | Cookie Policy | Do not sell/share my information