Products
Solutions
Resources
9977 N 90th Street, Suite 250 Scottsdale, AZ 85258 | 1-800-637-7496
© 2024 InEight, Inc. All Rights Reserved | Privacy Statement | Terms of Service | Cookie Policy | Do not sell/share my information

When you create a new schedule, there are two key sections to fill out: Details and Outline.
To start, click Add New Schedule in the Schedule register. This opens a window so that you can begin to fill out the schedule details.
The Details section is the first stage for creating a new schedule.
In the details section, complete the following information:
| Field | Description |
|---|---|
| Schedule ID | Unique ID used for schedule identification. |
| Schedule Name | Official name of the schedule. |
| Project Workspace | Grouping of multiple schedules. |
| Start Date | Date the project starts. |
Select Next.
The second stage in creating a schedule is Context. Context lets you select existing project codes and UDFs to apply on a newly created schedule. These selections help with Knowledge Base suggestions throughout the Schedule application.
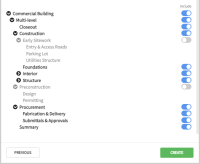
The third stage in creating a schedule is Outline. In this section, you select an existing Knowledge Library Schedule as reference for the new schedule being built.
Select a schedule to bring in the work package structure from the Knowledge Base project.
You can select all or parts of the structure levels to use in the schedule being created. This is done by selecting a level from the Include Levels drop-down or by manually toggling work packages in the Include column.
Turning off a Superior work package will turn off its subordinates.
Also, the include Risk Register toggle lets you specify whether to include risks, and if so, the level of risk to include.
Any risks assigned to the Knowledge Library schedule are brought into the new schedule. Include Risk Register brings in the risk register items from the Knowledge Library Schedule into the new schedule.
The available risk levels are configured at the organization level.
Additional Information
9977 N 90th Street, Suite 250 Scottsdale, AZ 85258 | 1-800-637-7496
© 2024 InEight, Inc. All Rights Reserved | Privacy Statement | Terms of Service | Cookie Policy | Do not sell/share my information
