Products
Solutions
Resources
9977 N 90th Street, Suite 250 Scottsdale, AZ 85258 | 1-800-637-7496
© 2024 InEight, Inc. All Rights Reserved | Privacy Statement | Terms of Service | Cookie Policy | Do not sell/share my information

A Completions event is an occurrence that has already happened; it therefore refers to forms that have already been filled out. Because events are part of a workflow, you can add more information to events, review existing data in the event, or move the event through the workflow.
The Events page shows a repository of forms in various statuses such as pending, with claims manager, manager review, and complete. The Task page is also a repository of forms that provides the same functionality as the Events.
The following are common column headings and their descriptions:
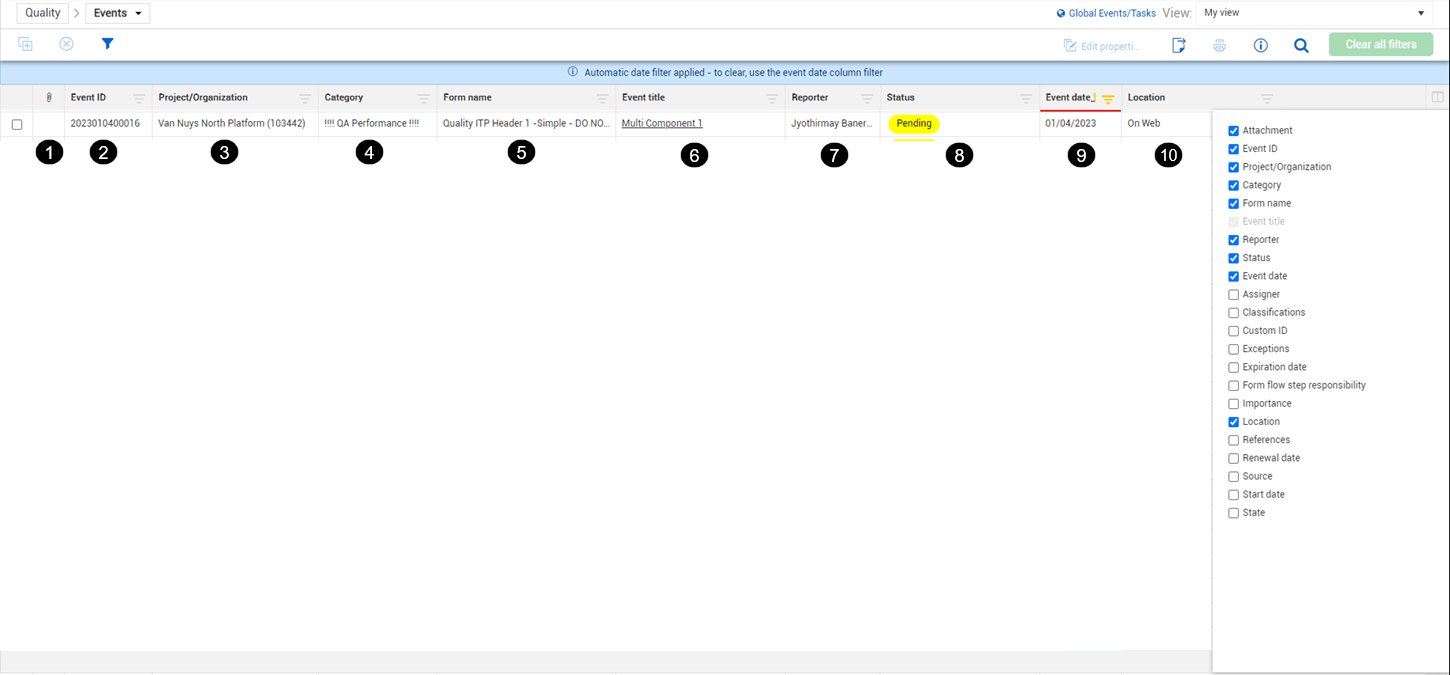
| Title | Description | |
|---|---|---|
| 1 | Attachment | Indicates whether an event or task has attachments. Click the icon to see the attachments. |
|
2 |
Event or Task ID |
The unique value assigned to each event or task. |
|
3 |
Project/Organization |
The project or organization associated with the event or task. |
|
4 |
Category |
The category associated with the event or task. It is specific per module and defined by the organization. Allows the module to be partitioned into smaller areas and assigned permissions. |
|
5 |
Form or Task name |
The name of the form or task template. |
|
6 |
Event or Task title |
The title given to the event or task by the user or generated by the system. |
|
7 |
Reporter or Responsible party |
For events, the user who initially submitted the form. For tasks, the responsible individual. |
|
8 |
Event date or Due date |
Date the event occurred or the due date of a task. |
| 9 | Location |
Shows whether the event or task location is On web, On mobile or checked out. When an event or task is scheduled and synced to a mobile device, a lock shows next to the Task title. |
|
10 |
Status |
Four default statuses are provided, Complete, Pending, Scheduled, and Canceled. Admins can create sub statuses under each that best align with their business processes. |
You can access events or tasks by going to the module landing page, and then selecting All events or All tasks.
The event ID and Event title are shown on the Events page. The Event's status is also shown, and changes based on the state of the event.

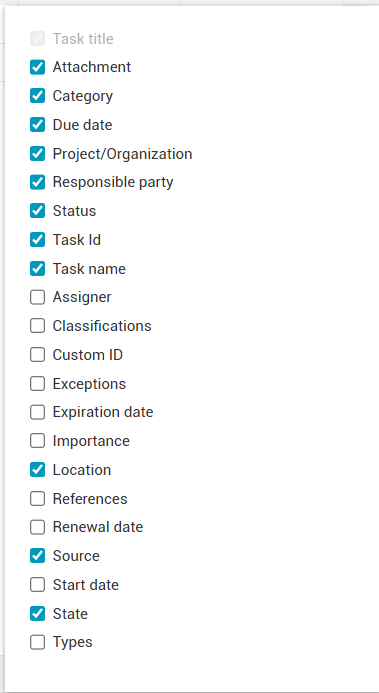
The Tasks page also shows columns such as Task ID, Project/Organization, Category, and Status. Columns unique to the Tasks page include Task name, Responsible party, and Due date. Tasks automatically become overdue when the assigned due date expires. The Tasks page shows a visual indication of overdue states. Sorting and filtering capability in the lists lets you to quickly associate tasks to individuals, categories, status, etc.

In the Tasks page, like the Events page, you can update columns by clicking the Column chooser icon, and then selecting or deselecting the check boxes for columns you want to add or remove.
When a task is assigned, the responsible party receives an email with a link to complete the task.
Sorting or filtering by the Assigner and/or Responsible party, may be helpful.
In the Completions landing page, click All events or All tasks.
Click the Column chooser icon.
Select Assigner and/or Responsible party.
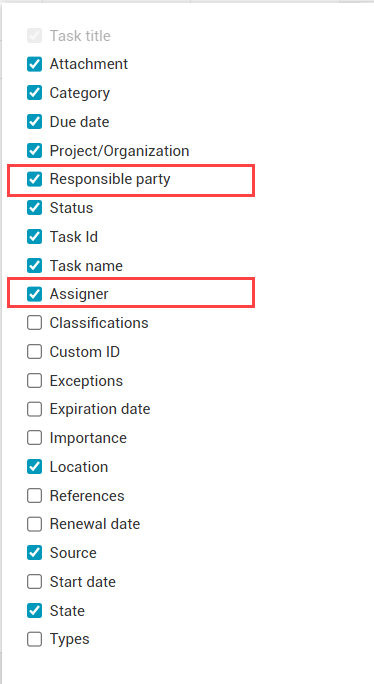
You are now able to sort or filter the selected columns.
You can use the following functions in the All events and All Tasks pages:

| Icon | Description | |
|---|---|---|
| 1 | Edit properties | Edit properties of one or many selected events or tasks. All the selected events or tasks must be from the same template and you must have permission to edit them. |
| 2 | Notifications | Send notifications with messages to specific users, and roles for the specific project you are navigated to. This is available only at the project level. |
| 3 | Export events or tasks | Export data from the Events or Tasks list to Excel, with an email generated once the file export is completed. |
| 4 | Print a PDF report of the selected event or task. | |
| 5 | Information | Open a slide-out panel to the right that outlines data about a specific EventID or TaskID. If applicable, you can also see Attachments and References. |
| 6 | Search | Open a slide-out panel to search all columns in your view for specific terms. |
| 7 | Clear all filters | Revert the listing to its unfiltered state if filters have been used. |
In the All events or All tasks list page, select events or tasks by clicking the check boxes.
Click the Edit properties button.
The Edit properties dialog box opens.
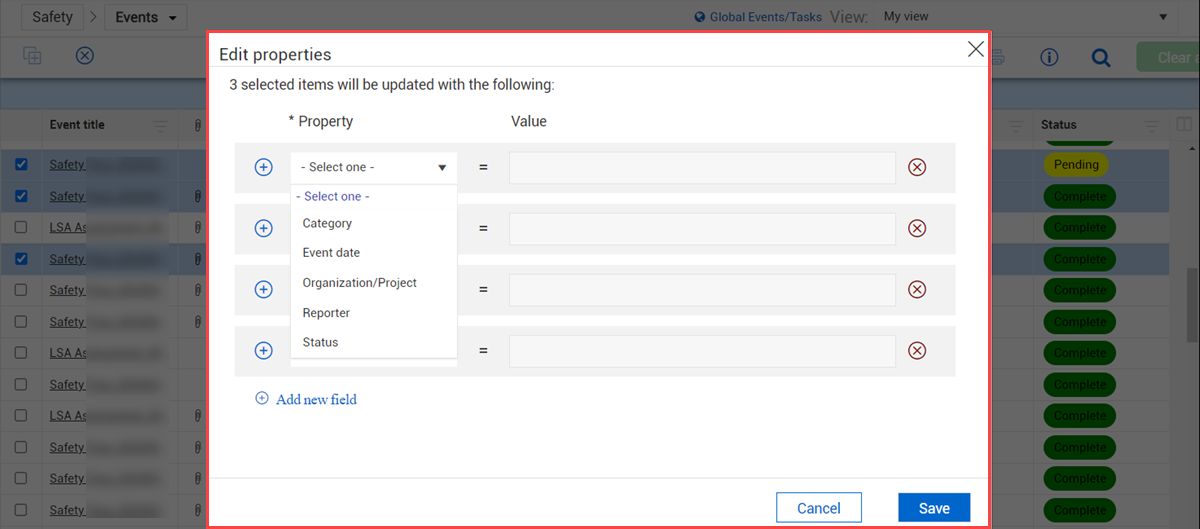
After making your changes, click Save.
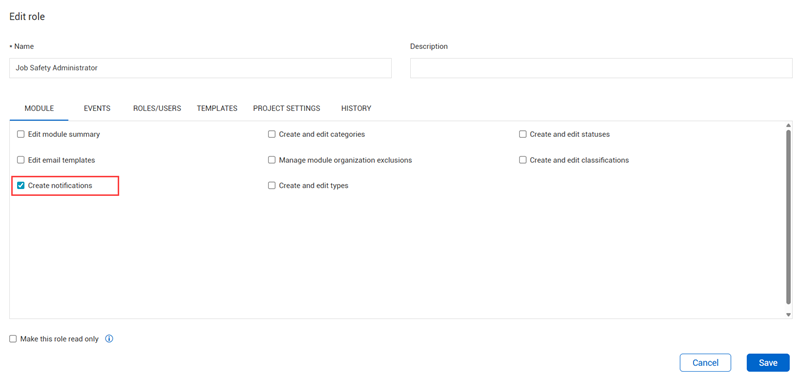
As an administrator at the system level, you can control the ability to send notifications to roles and user in Organization home > Settings > Compliance > Module > Roles tab. You can also restrict users to send notifications to their assigned projects only.
At the project level, click the Notifications icon.
The Notify users dialog box shows.
Select Roles or Users recipients, and then use the drop-down lists to select recipients.
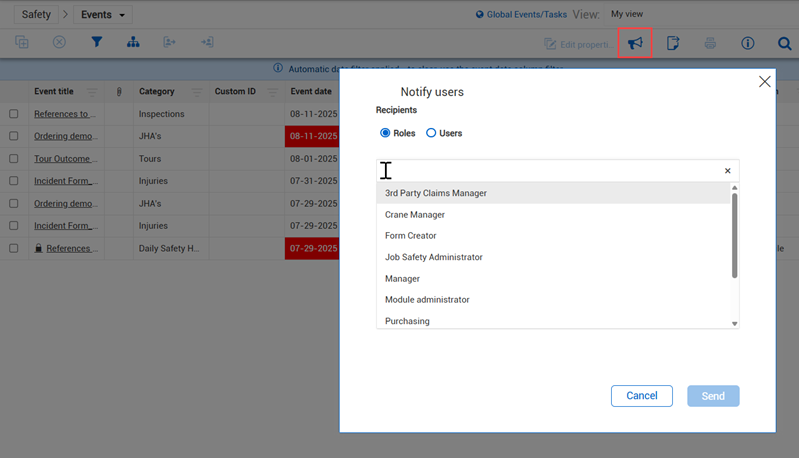
Enter your message in the Message box. Messages can be up to 2000 characters.
Click Send when complete.
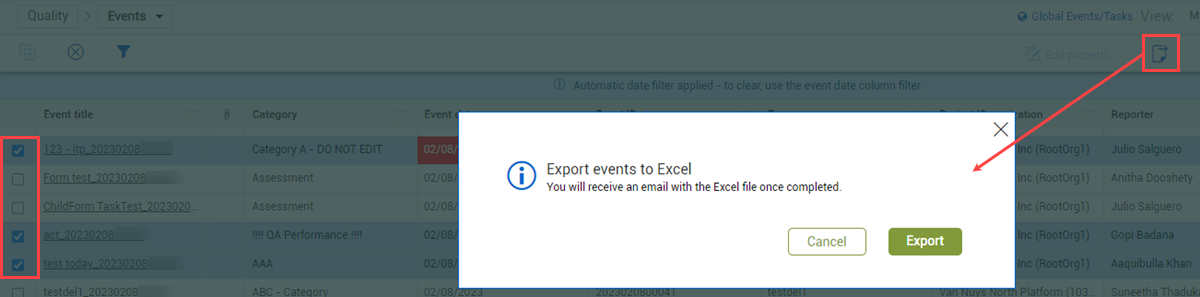
In the All events or All tasks list page, click the Export icon.
The Export dialog box opens.
Select Export to export all items.
The export contains the filtered grid set that shows in your view. You can also export selected events or tasks by checking each item’s check box, and then clicking the Export icon.
You can print a report of an event or task that has been enabled to be printed. Print functionality can be enabled in the template's Properties tab. See Template Properties for more information.
In the All events or All tasks list page, select an event or task.
Click the Print icon to print the event or task.

A PDF of the report will open for the selected item in a new browser tab unless attachments exceed 25 MB. If the file exceeds 25 MB, the process will run in the background. When completed, you will receive an email with a link to download the PDF file.
The Print feature only works for one event or task at a time. To print in bulk, you can use InEight Report.
You can view data, references, and history changes of an event or task and edit their properties in the Form or Task information slide-out panel.
In the All events or All tasks list page select an event or task, and then click the Form information icon.
The Form or Task information slide-out opens where you can view the form data.
Click Edit properties.
The editable fields show so you can edit them.
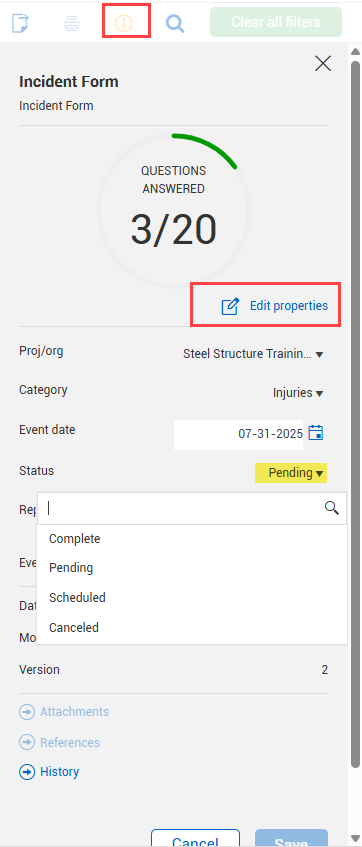
After editing any fields, click Save.
You must have permission to open the Form information panel.
You can also view attachments, references, and form history using the buttons at the bottom of the slide-out.
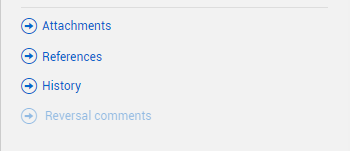
If applicable, you can view and edit attachments for and event or task.
In the Form information slide-out, click Attachments.
The attachments dialog box opens.
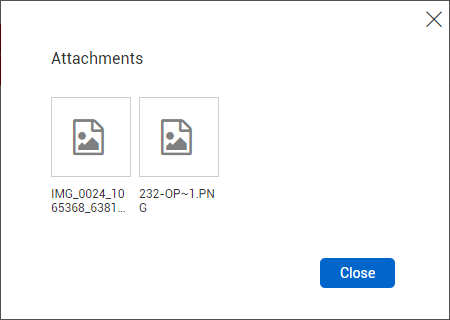
Click an attachment to view.
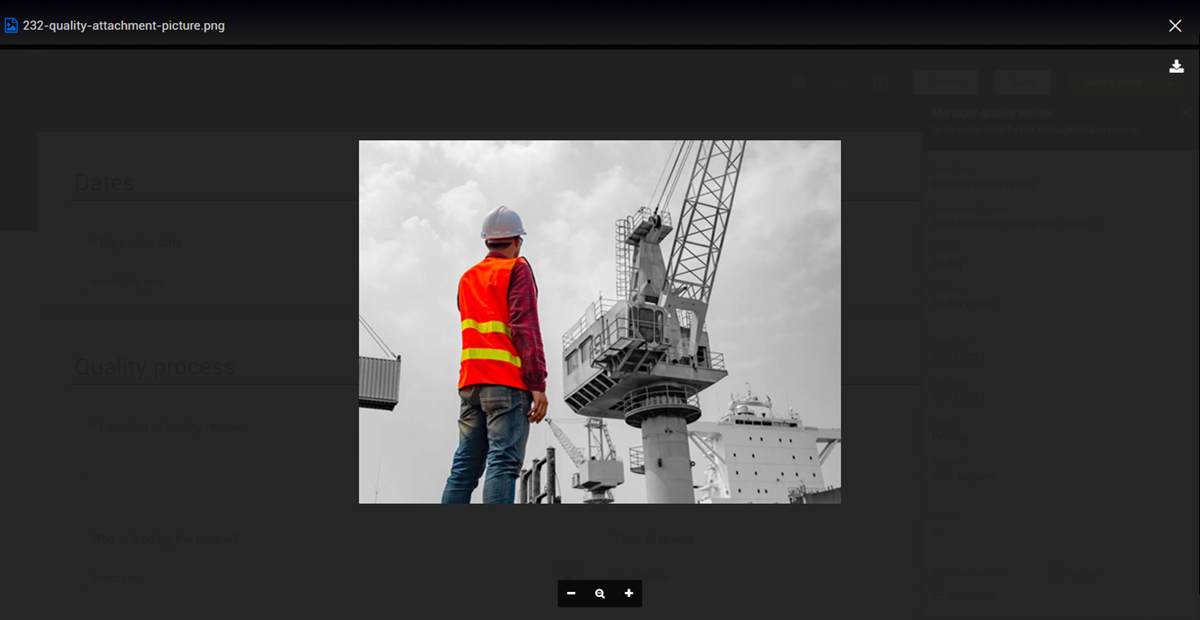
You can zoom in or out using the Zoom icons.
You can click the Download icon in the upper right to download the attachment to your computer.
To close the attachment, click the Close icon in the upper right.
Click Close to close the Attachments dialog box.
The Attachments button is greyed out when there are no attachments in the form.
You can also view an event or task's attachments by clicking the attachment icon in the Attachment column on the Events or Tasks pages.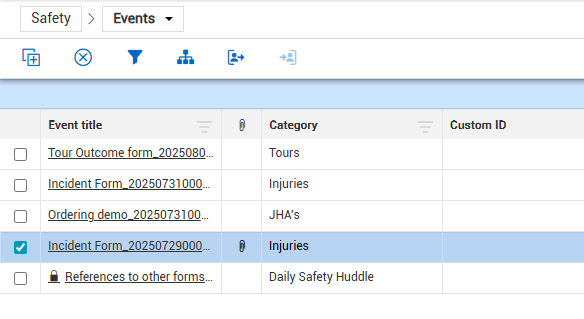
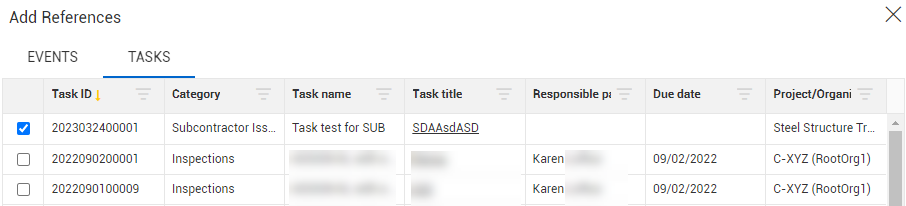
You can view other events and tasks referenced in a certain event or task.
In the Form information slide-out, click References.
The References dialog box opens where you can view and add references.
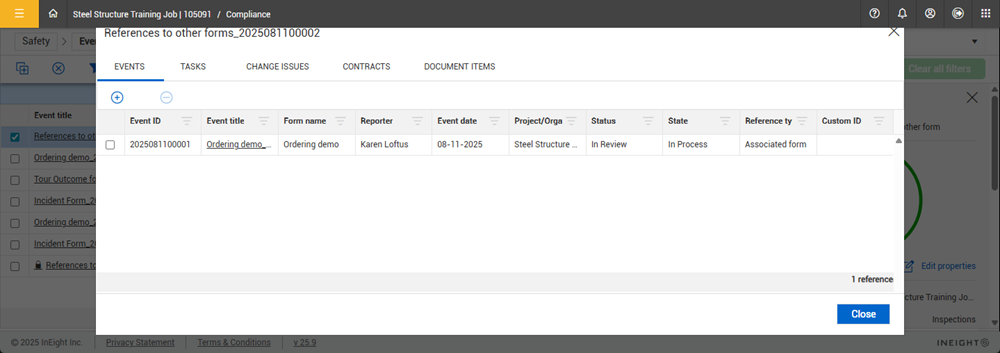
To add a reference, select Events, Tasks, or other available tabs, and then click the Add References icon.
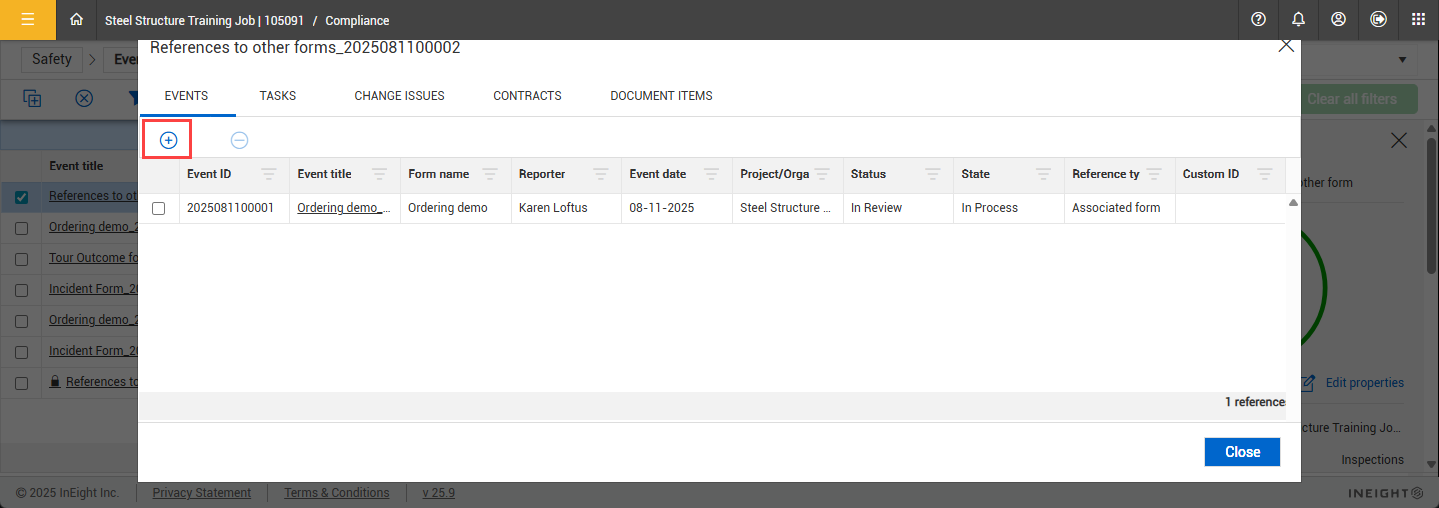
Integration is available with InEight Change, InEight Contract, and InEight Document.
The Add References dialog box opens.
Select the Events or Tasks or other available tabs, and then select events or tasks to be referenced.
To remove references, select the reference, and then click the Remove references icon.
After editing references, select Close.
In Tasks, you can use the Delete task option to delete tasks.
In the References dialog box, a column named Reference type will show information on the reference association.

The Reference type column can have the following values:
Associated form – Started from a form or task button from within the form or task.
Internal reference – Associated with a reference question.
External reference – Associated by using the Add References button in the reference dialog box.
You can view the history of changes for events or tasks. You can sort and filter the list view.
In the Form information slide-out, click History.
The history page opens where you can view changes made to the event or task.
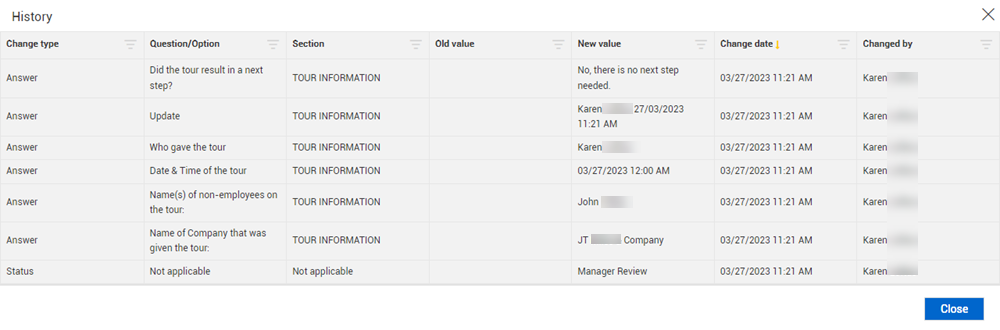
Click Close when done viewing.
You must have permission to view the History dialog box.
The check-in and check-out options make it easy to manage who is working on an event or task. You can check out any event or task, no matter it's status, to any user on the project as long as their permissions allow it. Checking out will lock the item which means only the user who checked out can make updates. When the work is finished, it can be checked back in so it's available for other crew members.
If something is left checked out by accident or you can't get back into the project, anyone with the right permissions can force check in to unlock it.
For events that include a form flow, you can also send them directly to the SQC mobile app to be completed. For more information, see Filling out an Event or Task.
The options for the check-in and check-out of events and tasks can be found under the All Events or All Tasks tab.
1. Select an event by checking the box to the left of the event title and select the checkout to mobile user option.

2. A dialog box will ask if you are sure you want to check out the selected events, click Yes to select a user to checkout the event to.
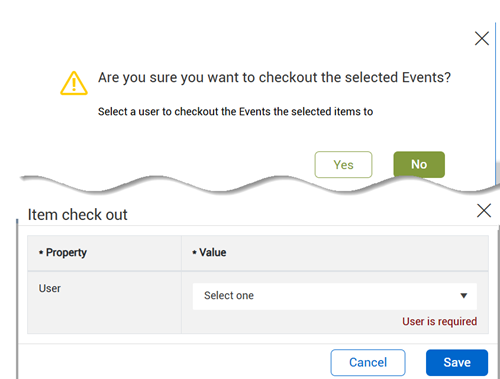
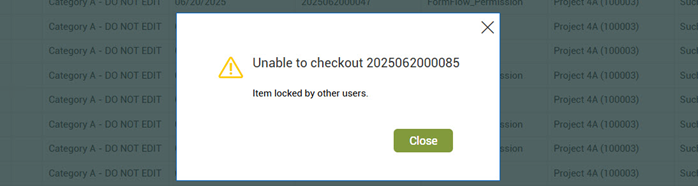
When an Event or Task is checked out, the location column shows who it's checked out to. When attempting to checkout an item that is already checked out by another user, an alert shows stating the item is locked by other users. Locked items remain locked unless you force a check in, complete the form or manually check the item in.
When you hover over the check in icon, you have the option to remove checkouts from the events or tasks. This action removes the items from the users devices and all changes made on the device will be discarded and cannot be recovered.
For more information on checking in events or tasks, see Filling out an Event or Task.
To delete an event or task, select events or tasks, and then click the Delete icon.
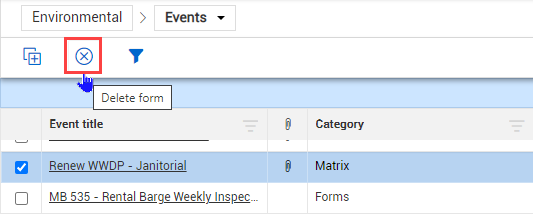
Your role must contain permission to delete.
The ability to copy a task, or an event, along with its associated tasks and attachments, is useful when you have many tasks and attachments that mimic the last event, such as an environmental permit event. You can copy one event at a time or multiple tasks at the same time.
In the All events or All tasks list page select an event or tasks to be copied, and then click the Copy form icon.
![]()
When you copy one or multiple items from All tasks, the copied tasks are created with COPY OF in front of the task title.
When you copy an event from All events, the Copy event page opens to edit form details, attachments, and tasks.
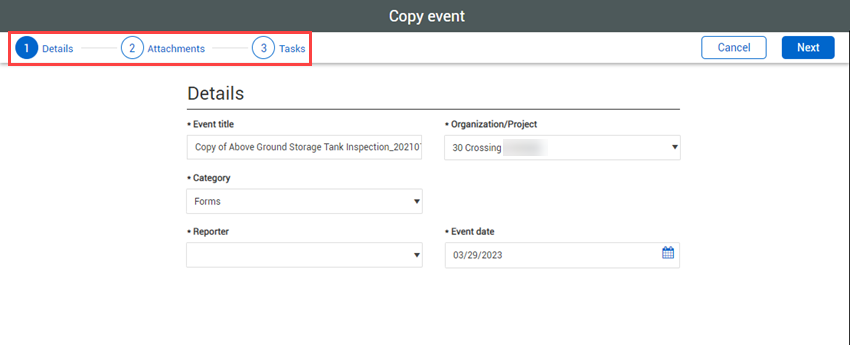
In the Details page, you can edit the copied event, and then click Next.
In the Attachments page, you can uncheck any existing attachments to remove them, and then click Next.
In the Tasks page, you can uncheck any existing tasks to remove them, and then click Next.
Click Copy to create a copy of the form.
The Query builder feature can be used on event and task list pages. It provides a more granular filtering and querying option for events and tasks. These filtering options are an alternative to the options found in the grid page columns.
Click the Query Builder icon.
The query builder dialog box shows.
![]()
In the query builder you can add, edit, delete, and share queries. Your saved queries are listed under the My Query menu, and your shared queries are listed under the Shared queries menu.
Queries can only be shared with users in the same project.
Click the Add icon to add a new query, and then enter the conditions to your query.
Click Apply.
You can then use the Reset, Cancel, and Save Query buttons at the bottom of the query window. If you update an existing query, you can save the new query using the Save Query As
button.
Query builder column condition choices are dependent on events or tasks. For example, if you select Events, you see column choices that are related to events.
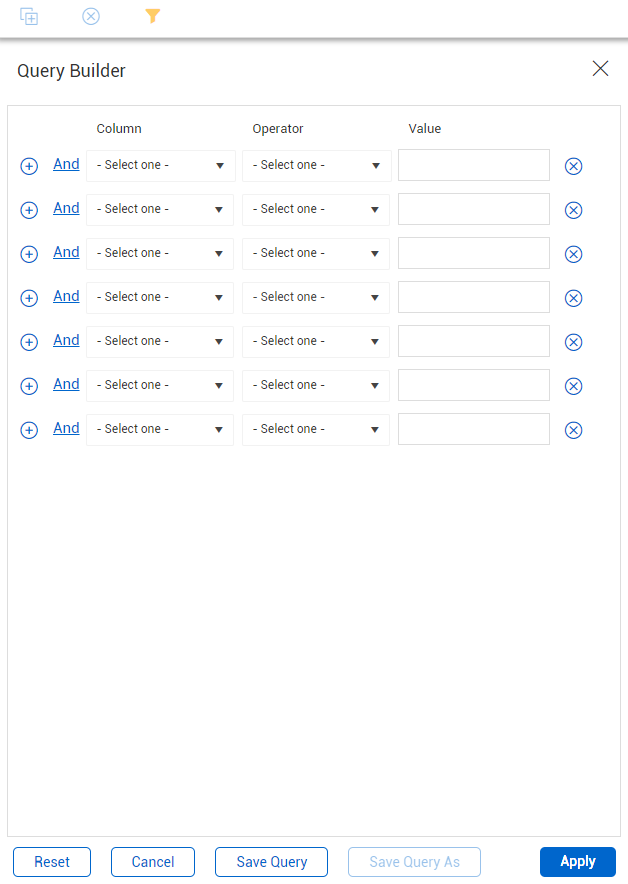
You can enter up to seven conditions in a query.
For more information on how to save and send views and use the Global Events or Tasks option, see Event and Task Views.
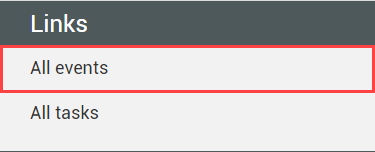
From the Compliance landing page, select a module card.
Select the All events link.
All events and tasks links are shown under Links in the upper left side of the page.
On the Events page, select an event or task that requires additional review based on business process requirements. For example, an event with a pending status.

Advance the event or task to the next form flow step, as required.
The status of the event will u pdate depending on how your form workflow is setup.
Managing tasks follow a very similar process, as shown below.
Select the All Tasks link on the left side of the page.
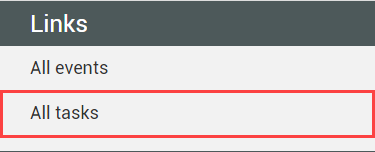
Select a task by clicking on a Task title.
Advance the task to the next form flow step, as required.
You can monitor the events or tasks due dates, states, and status, and their adherence.
From the Completions landing page, click All tasks.
You can also go to All events.
In the tasks page, find the Due date (or Event date for events), Status, and State columns.
Click the Column chooser icon to add the columns if they are not in the view.
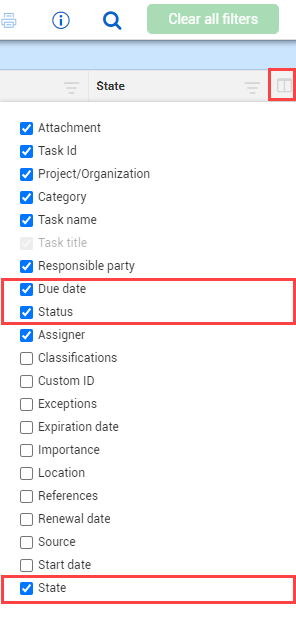
Click the Column chooser again to close.
An overdue event or task will make the Due date and State columns turn red. An overdue email is also automatically triggered.
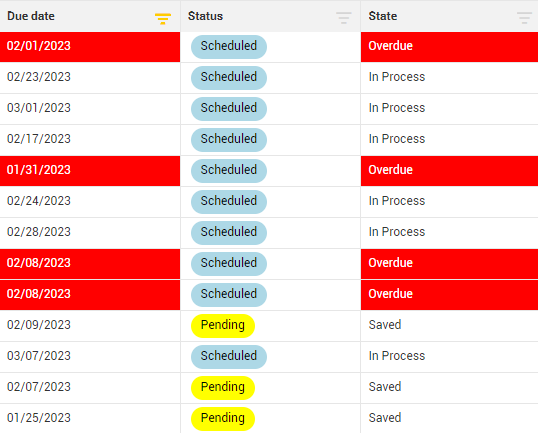
The State column changes to Overdue after the due date.
When an event has an active form flow, you can click its Status column to open a dialog box with detailed information about the current status of the form flow.
The current status box has the following areas:
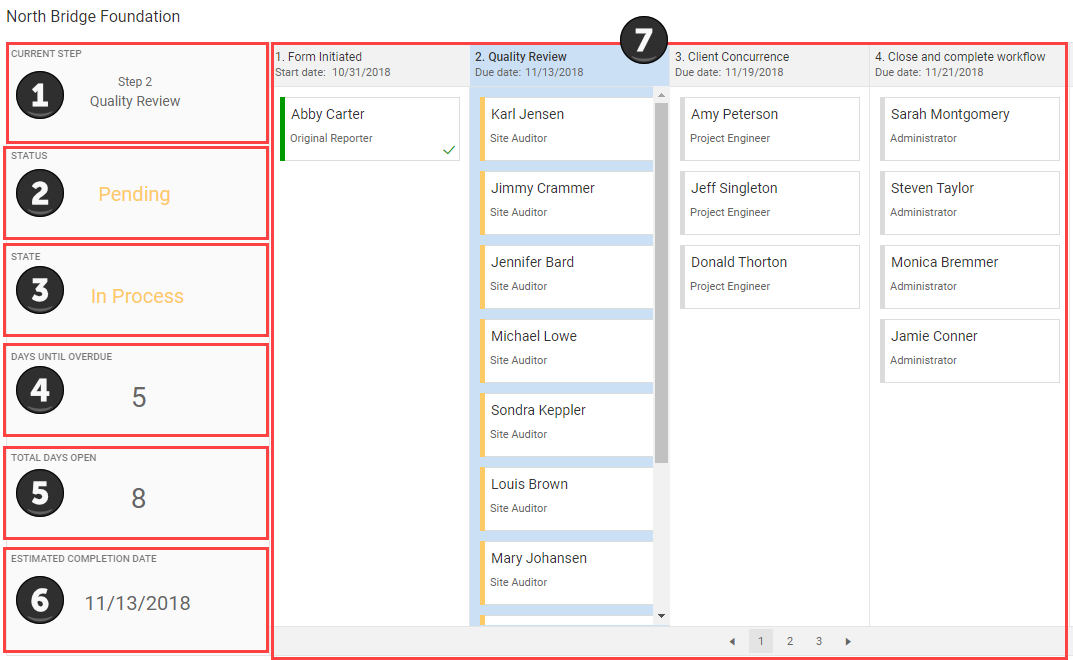
| Description | |
|---|---|
| 1 |
Current step. |
| 2 | Current status. |
| 3 | Current state. |
| 4 | Number of days until the form flow step becomes overdue. |
| 5 |
Total days the form has been open. |
| 6 |
Estimated form completion date. |
| 7 | All steps and their responsible parties. |
For each step you will see the step name, start date, responsible parties, and their roles.
Responsible parties have colored bars according to their sign-off status for each step:
| Color | Sign-off status |
|---|---|
| Green | Complete |
| Yellow | Pending |
| Red | Overdue |
| Grey | Step not started |
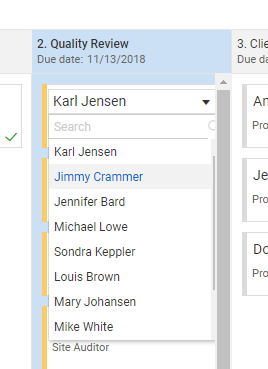
You can select different users to be responsible parties, depending on how a step is set up. The ability to select different responsible parties allows for updating users who no longer participate in the project, their roles have changed, etc.
At the project level, you can give user groups permission to view events or tasks. User groups must first be set up for the project. For information on setting up User Groups, see User Groups.
Open the event or task, and then click the User groups icon in the upper-right of the page.
![]()
In the User groups side panel, select the groups you want to give permission to.
Click Save.
Additional Information
9977 N 90th Street, Suite 250 Scottsdale, AZ 85258 | 1-800-637-7496
© 2024 InEight, Inc. All Rights Reserved | Privacy Statement | Terms of Service | Cookie Policy | Do not sell/share my information