Contract 23.8 Release Notes

Updated 27-SEP-2023

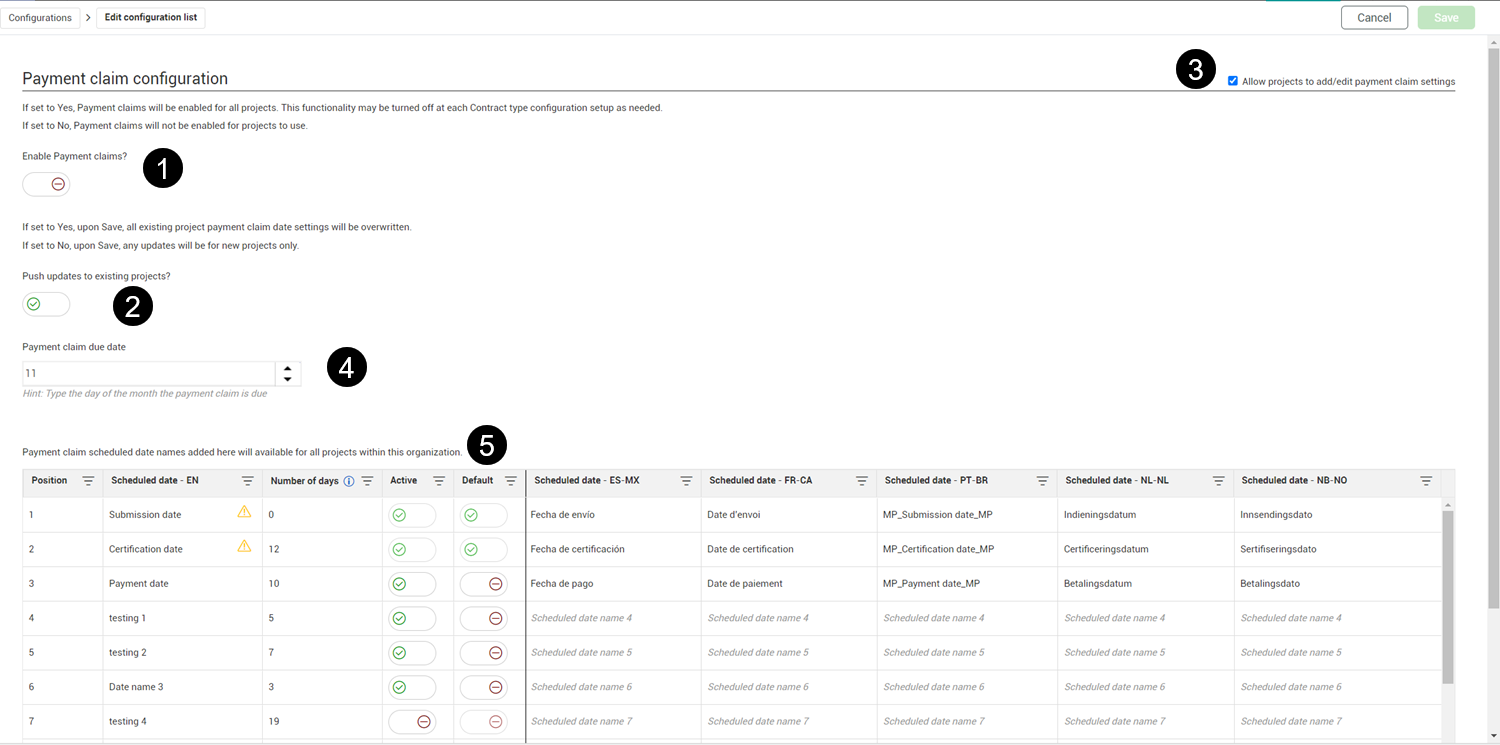
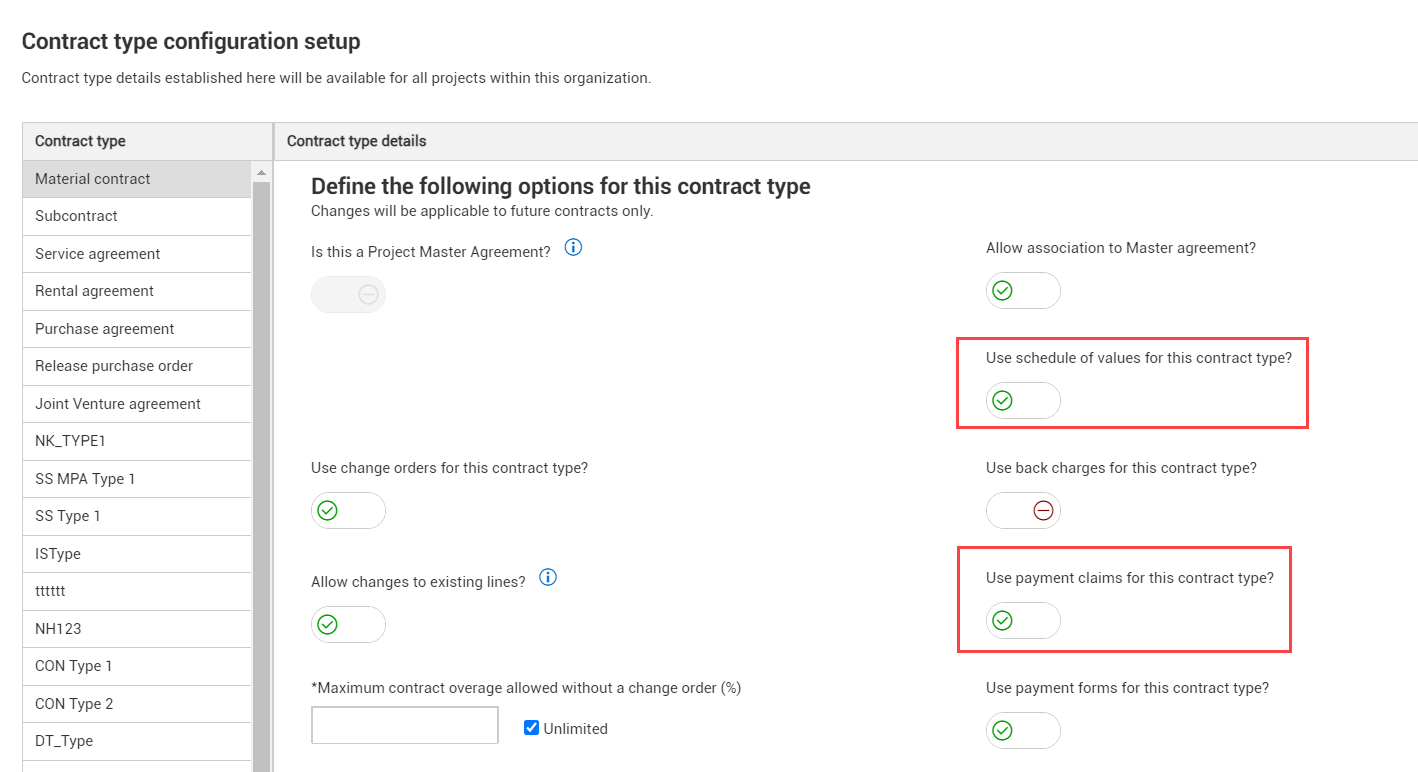
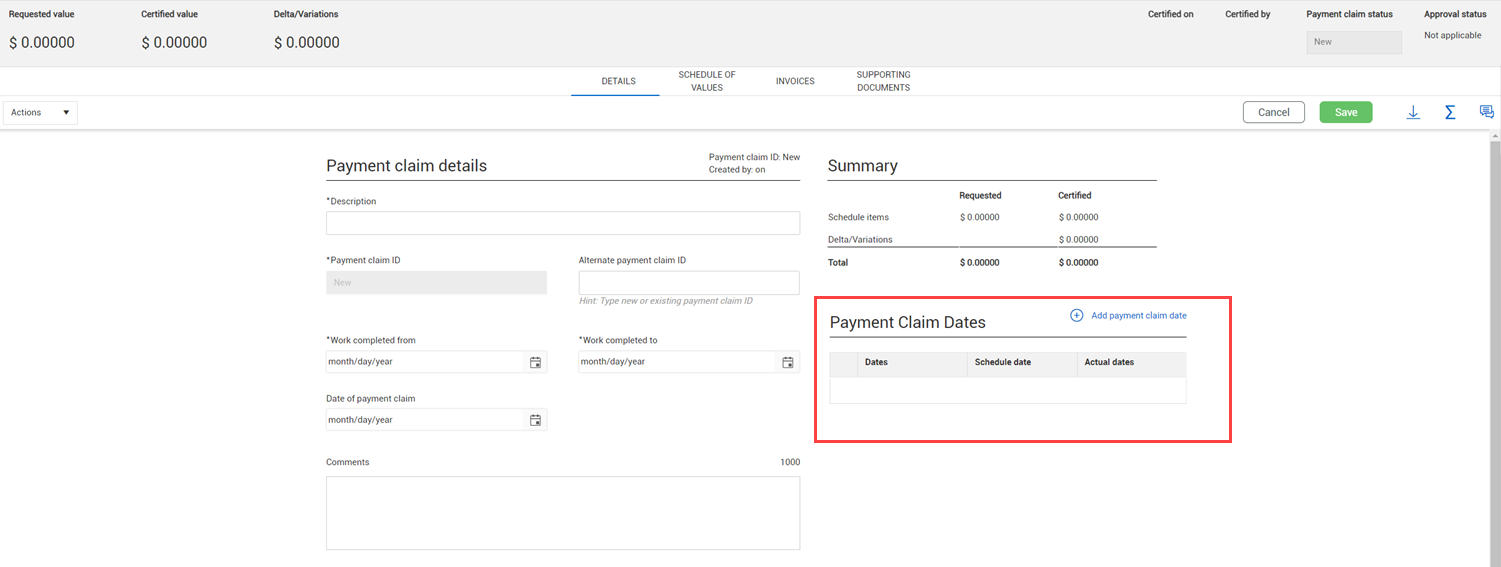
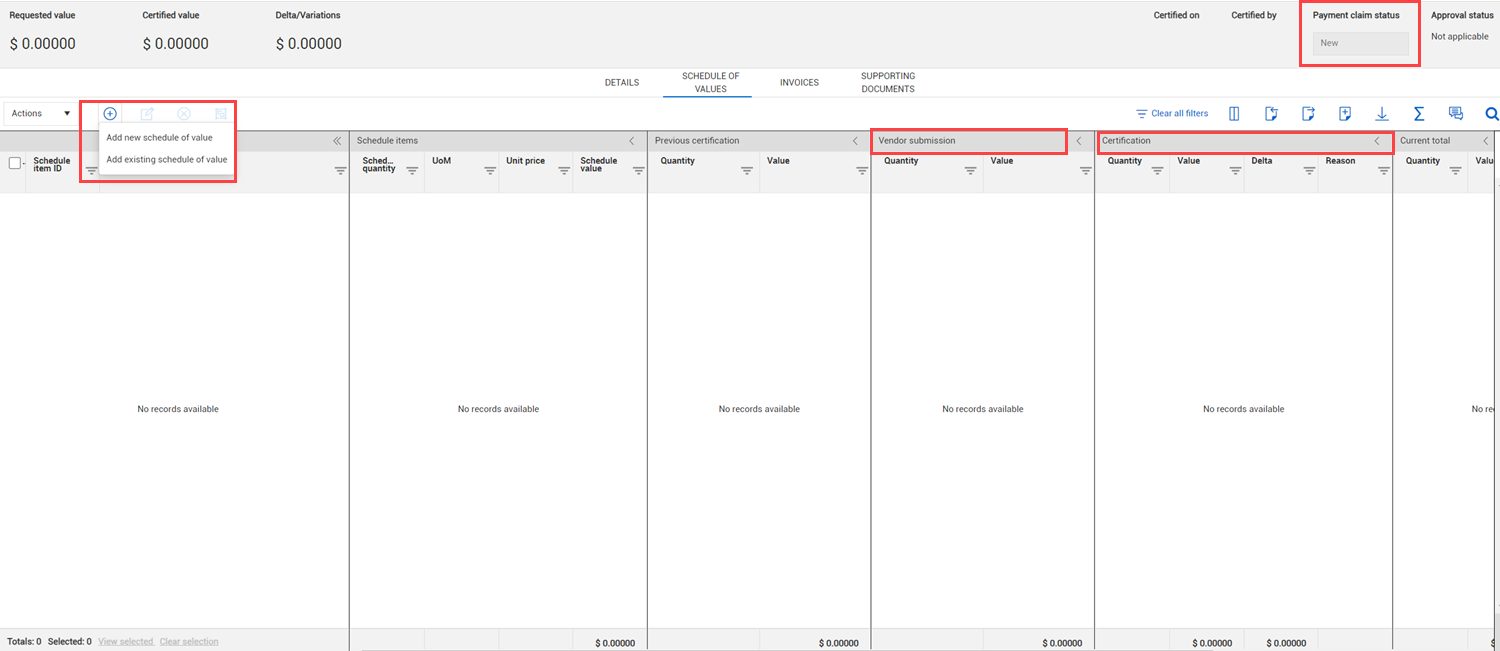
  • Payment claims – You can now manage payment claims in Contract, so you no longer need to maintain additional spreadsheets and documentation. The payment claims function can be used when you are required to certify a vendor's claim of work in advance of receiving an invoice or before the payment form is created. Payment claims track items based on the schedule of values items. ClosedRead more Watch video

    Permissions

    The following permissions were added for payment claims:

    • Add payment claim

    • Edit payment claim

    • Delete payment claim

    Users must also have the Approve/Reject payment form permissions to send a payment claim through workflow.

    Set up

    Payment claims has been added to the organization and project Configurations settings. To use the payment claims feature, the Enable Payment claims toggle in the organization level configuration settings must be set to Yes, or else payment claims is turned off for the entire organization.

    To allow payment claims the Use payment claims for this contract type toggle in the Contract type configuration set up must be set to Yes. When set to No, the Payment claims tab is not visible for the contract type. Because a schedule of values is required for payment claims, the Use payment claims toggle is disabled when the Use schedule of values for this contract type toggle is set to No.

    The Push updates to existing projects toggle lets the payment claim due date and the schedule date names get automatically pushed to all projects. If set to No, the changes are valid for new projects only.

    The Allow projects to add/edit payment claim settings check box lets you indicate whether the organization-level settings can be edited at the project level.

    The Payment claim due date is the day of the month the payment claim is due. It is used to calculate the scheduled dates. You can then use the grid in the lower half of the page to set up a timetable based on the payment claim due date. You can enter positive or negative values. Schedule dates that are marked as Active can also be set to Default. If set to Default, the schedule date is automatically shown on the Payment claims detail page.

    If you want the payment claim to go through approval before it is certified, you can set up a workflow from the Payment claim approval setup tab in the organization and project settings.

    Payment claims tab

    The Payment claims tab has been added at the project and contract levels. Each payment claim has Details, Schedule of values, Invoices, and Supporting documents subtabs.

    Create a payment claim

    You can create a payment claim from either the project- or contract-level Payment claims register. To create a claim, click the Add payment claim icon. The Details tab opens. You can then enter detail information and use the Payment Claim Dates section as a timeline to track your communication with the vendor.

    After saving you can then add schedule of values items. You can add a new or existing schedule item.

    You can use the columns in the Vendor submission section to enter the quantities and values to track information from the vendors. Use the columns in the Certification section to enter the values that you want to certify. If workflow is not enabled, you can change the Payment claim status to Certified.

    If your environment is configured for payment claims workflow, you can click the Save and approve button on the Details page to send the claim through approval workflow. After final approval, the Certified status is enabled, and you can update the payment claim status to Certified.

    After you have certified the claim you can go to the Schedule of values page, and then convert the schedule item to a payment form. If you added a new item, you cannot create a payment form if the value in the Certification section of the Schedule of values is not 0.

  • Schedule of values claimed value and claimed quantity calculation - You now have the option to have Contract not recalculate the claimed value based on claimed quantity and vice versa. Previously, the claimed value was forced to be the quantity multiplied by the unit price. The option to recalculate lets you match the calculation to your business needs. Closed Read more

    This calculation is available when you edit a contract claim and when you import schedule items from a template.

    When you edit the Claimed quantity field, a dialog box asks if you want to recalculate the value based on the entered quantity. If you edit the Changed value field, the dialog box asks if you want to recalculate the quantity based on the entered value. If you choose not to recalculate the value or quantity, you can still save the schedule item, but the values will no longer match mathematically. This allows you to enter values that are rounded without adjusting the quantity if the business process dictates.

    When you import from a template, you can set the Claim Option field in the Import data from template dialog box to Quantity, Value, or Quantity and Value. If you select Quantity, the Value claimed is recalculated regardless of what was entered and vice versa. If you select Quantity and Value, both columns are read regardless of whether they match. You are responsible for maintaining those fields.

    Additionally, the Claimed unit price column and the Scheduled unit price column have been added to the Contract claim history tab for a schedule item, so you can have visibility into pricing. The claimed unit price is the claimed value divided by the claimed quantity. The Scheduled unit price is the unit price of the schedule of values at the time the claim is made.

  • Bid package supporting document types – The Add supporting document dialog box in Bid packages now uses the defined list of document types that are available in Contract instead of using free text. To support this change, The Added on, Subtype, and Expiration notification enabled columns have been added to the Bid package Supporting documents register. Legacy document types have been replaced with Other and documented with a note. For more information, see Supporting Documents Tab .

  • Integration UOMName field changes – The field used to receive UoM items from an ERP system in Contract has been changed to allow use of UOMName or SKFUOM for the Purchase order response, Accrual request, and Goods receipt request integrations. Customers must check their integrations to make sure these changed field names do not cause issues. Refer to the integration documentation for more details.

  • Format large text boxes in Microsoft Word templates – You can now use Word's merge fields to format text boxes with multiple lines, such as the Scope of contract, in a Word template instead of using a tag. Using a merge field ensures the text in the generated document is formatted as it is in the text field. ClosedRead more

    The merge field also lets you format the font as needed. The generated document uses the font specified in the template. Other formatting is taken from the text field. Refer to the instructions in the General tags export list for more information about using merge fields.

    To use the merge fields in existing templates, you must delete the tag and then insert the merge field. You can then save the template as a new version. For information see Template types subtab.

  • Component quantity in schedule of values – The Component Quantity column in the Schedule of values register has been added at both the contract and vendor change order. This column gives you visibility into changes made to the quantity in InEight Plan. ClosedRead more

    The Hide in plan and progress field in the schedule item must be set to No.

    The component quantity value is pulled from the Component quantity in Plan. If the value is modified in Plan by splitting the contract component, a blue dot shows next to the quantity to indicate the component quantity does not match the schedule quantity. For information, see Schedule of Values Tab.

  • Line item updates in vendor change orders and payment forms – A Revised line item icon now shows in the VCO and Payment form Line items pages when a line item has been changed but not published. The icon lets you quickly see that changes have been made to the line item, and you can decide if you want to proceed with the VCO or payment form.

  • Vendor change order tab new columns – The Issue ID, PCO ID, and CCO ID columns have been added to the Vendor change order log at the project and contract levels. These columns let you easily see any associated issues, potential change orders, or client change orders related to the vendor change order.

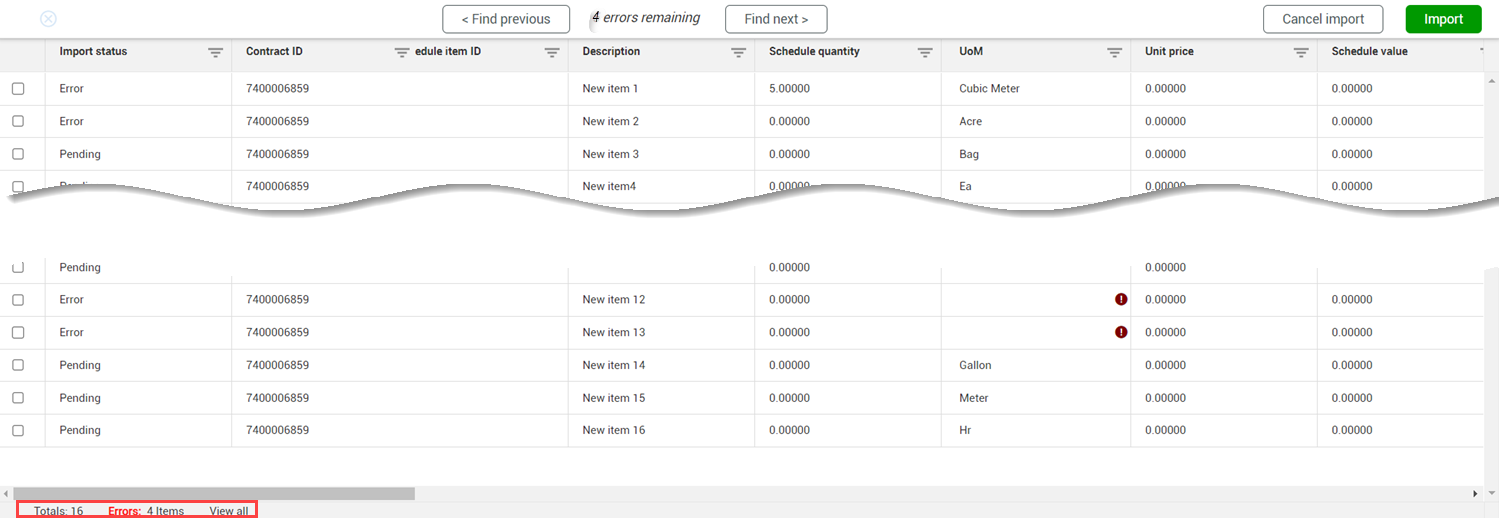
  • Schedule of values import history improvements – The Schedule of values Import history page now includes totals and the number of errors at the bottom left, so you can see how many items are selected and find errors quickly. ClosedRead more

  • Saving a payment form – You no longer need a payment term or a progress estimate to save a payment form when they are required for the payment form. The fields are required only for submittal and workflow. When the status of the payment form is New, a yellow warning icon shows next to the Progress estimate number and Progress estimate billing period fields to remind you that the fields are required for approval and submission. For more information, see Payment Forms.

  • Back charges in Payment form details – When the Use back charges toggle in the contract type configuration is set to No, the Back charges section no longer shows on the Payment form Details page.

  • eSignature correction permission – A new permission, Correct eSignature, has been added. You must have the Correct eSignature permission to correct DocuSign documents. For more information, see Permissions.

  • Global approach to dates – The Payment form Approved, Payment form Rejected, and Supporting Document Expiration emails now use the global date format YYYY-MM-DD.