Library overview
In the Library you can set up and maintain master information that imports into your projects, including resource rates, tags, units of measure, cost item assemblies, and master breakdown structures. It is also where security roles and permissions are configured.
You access the Library from the Backstage view in Estimate. Click the Library button to open.
You can also access the Library by clicking the Library icon on the InEight Estimate landing page.
When the Library opens, ribbons are available under the main menu tabs. Each menu tab has unique sections that hold the necessary forms.
Library tabs
The Library has four tabs which organizes the forms under sections:
-
Setup
-
Estimate
-
System
-
Integrations
The Actions and More Actions tabs show when you open a register and contain functions for the register you have active.

Setup tab
The following image and table show an overview of the Setup tab:
|
Name
|
Description
|
|
1
|
Job Properties
|
The job properties maintained in the library will serve as the default settings for any new estimate that is created from scratch. When creating a new job it will inherit all the job properties set in the master library.
|
|
2
|
Foundation Setup Data
|
A master set of account codes, tags, and units of measure. When a new folder is created, the master set is automatically copied from the Library to the new folder.
|
|
3
|
Address Book
|
Used to store and maintain all information pertaining to the companies with whom you work and contact regularly (subcontractors, vendors, architects, etc.).
|
|
4
|
Trench Calculator
|
Stores and maintains common trench configurations that are used from project to project.
|
|
5
|
Shift Rate Calculator
|
Allows you to set up shift rate configurations that you can access at the project level.
|
|
6
|
Resources
|
Opens the Library Resource Rate Register where you can create and edit all resources and resource cost details available for import into your projects.
|
|
7
|
Most Used Resources
|
For quick access to the Labor, Equipment and Materials tabs of the Master Resource Rate Register.
|
|
8
|
Resource Assemblies
|
Takes you to the Library Resource Assembly Register where you can set up resource assemblies to import into individual projects.
|
|
9
|
Cost Item Assemblies
|
Cost Item Assemblies are predictive models to quickly and accurately estimate elements of a job that can be repetitive in nature on the job or from job to job.
|
|
10
|
Standard Tables
|
The Standard Tables are used to create and/or list job-level table data that is accessible by any of the Cost Item Assemblies that exist in a job. The Standard Table Record allows the user to create and or modify a Table record. The Standard Table Register lists all the job level tables created / available in the project.
|
|
11
|
User Roles
|
Opens the User Roles Register that shows user role names and their description which you can use in the Access Control Register.
|
|
12
|
Access Control
|
Allows you to customize your system permissions by restricting destinations or commands that only designated roles should have access to.
|
|
13
|
Reports
|
Opens the Reports window, where you can access all system reports and configure the default report settings.
|
Estimate tab
The following image and table show an overview of the Estimate tab:
|
Name
|
Description
|
|
1
|
Cost Breakdown Structure (CBS)
|
Opens the Library Cost Break Structure register, where you can define the CBS that will automatically import when a new project is created.
|
|
2
|
Account Code Utilization
|
Used to roll estimate line items into an account code hierarchy and benchmark against historical projects in a way that is consistent across projects.
|
|
3
|
Work Breakdown Structures
|
Opens the Library Work Breakdown Structure register, where you can define additional Work Breakdown Structures that will automatically import when a new project is created.
|
|
4
|
Master Workbook
|
Opens the master Microsoft Excel template which will be embed into each new estimate job folder. The cells in the embed excel workbook can be linked to send information to or from InEight Estimate Fields.
|
|
5
|
Indirect Cost Items
|
Takes you to the Library Cost Breakdown Structure Register where you can edit and define indirect cost items.
|
|
6
|
Job Finance
|
Takes you to the Library Cost Breakdown Structure Register where you can edit the Job Financing cost item.
|
|
7
|
Price % Add On
|
Takes you to the Price % Add On record, where you can define the price % add to be included in the Library CBS.
|
|
8
|
Prime Bond
|
Opens to the Library Prime Bond record where you can define the bond tables that will import automatically when a new project is created.
|
|
9
|
Reports
|
Opens the Reports window, where you can access all system reports and configure their report settings.
|
System tab
In the System tab, you have access to the following sections:
-
Customize Quick Access Toolbar
-
Customize
-
Help
Customize Quick Access Toolbar
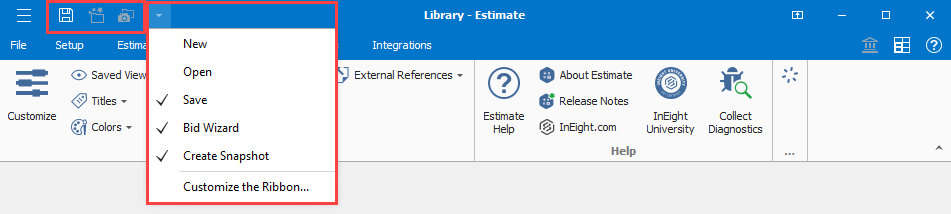
Click the Customize Quick Access Toolbar drop-down icon to select options to show on the top ribbon for quick access. You can select Save, Bid Wizard, and Create Snapshot.
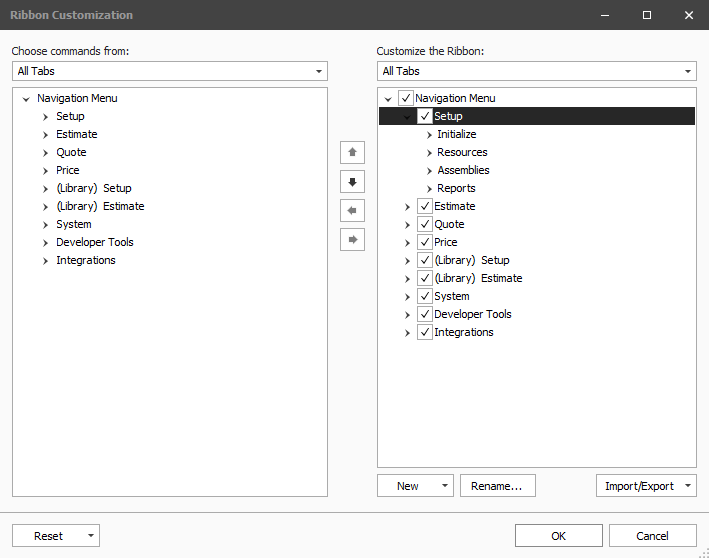
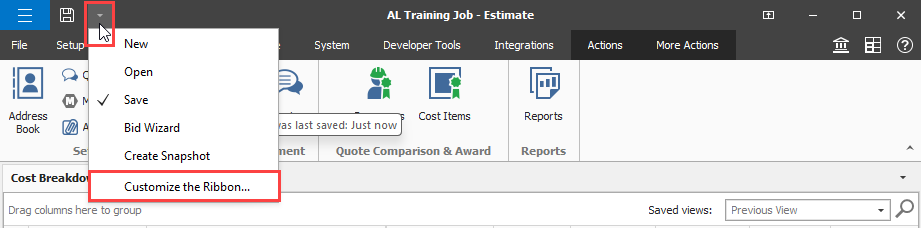
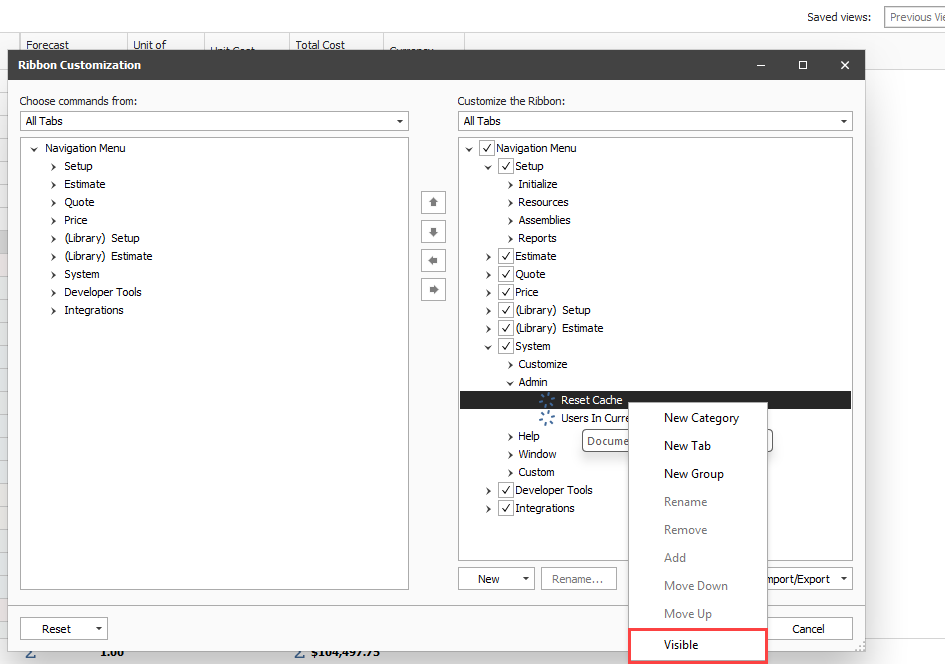
The Customize the Ribbon option opens the Ribbon Customization dialog box where you can customize the ribbon by doing the following:
-
Adding and removing commands
-
Sort commands
-
Rename existing titles
-
Create new categories, tabs, or groups
-
Import or export a customization file
-
Reset customizations to default
Customize section
The following table shows an overview of the Customize section:
|
Name
|
Description
|
|
1
|
Customize
|
Opens the Customize settings page to customize the field titles that are shown throughout various pages in Estimate, including all cost category titles, user-defined tags, and more.
|
|
2
|
Saved Views
|
Save your views onto a disk or load from a disk.
|
|
3
|
Titles
|
Save titles onto a disk or load from a disk.
|
|
4
|
Colors
|
Save your colors onto a disk or load from a disk.
|
|
5
|
Output Settings
|
Save your output settings onto a disk or load from a disk.
|
|
6
|
Quantity Item Settings
|
Save your mapped quantity item source settings to your computer. You can then load the saved mapped settings into your Quantity Item Sources Register.
|
|
7
|
External Reports
|
Menu to not only generate reports created by Estimate, but also to open programs, folders, documents, reports, or Internet resources with the associated program.
|
|
8
|
External References
|
Open programs, folders, documents, reports, or Internet resources with the associated program.
|
Customize feature
The Customize feature allows you to set up roles and permissions based on knowing whether the system settings are established at the system or user level.
|
Titles
|
System/User Level Setting
|
|
Cost Categories
|
system level
|
|
PBS
|
system level
|
|
Job Folder Tags
|
system level
|
|
Man-Hour Factors
|
system level
|
|
Colors
|
|
|
Data Entry Indicators
|
user level
|
|
Hierarchy Levels
|
user level
|
|
Minority Setup
|
user level
|
|
Substitute Quote Ranking
|
user level
|
External reports
The External Reports menu lets you generate reports created by Estimate, and also lets you open program files, folders, documents, or other internet resources.

Each menu item can be added to the External Reports menu. Upon selecting one of the menu items, the associated program, file, folder document or URL will open, as defined by the command entered in the Open column.
To add a new menu text, first select the Add button and enter a name in the Menu Text field, and then type in the location of the new Menu text under the Open field.
Customized Job Folder Tags match the view of the fields in the Job Properties form.
Help section
The Help section offers you links to the following areas:
-
Estimate Help — Opens InEight’s Knowledge Library site where you can find topics, videos, release notes, and resources.
-
About Estimate — Information about Estimate (i.e., version number, system information, tech support, etc.).
-
Release Notes — Opens Estimate’s release notes in the Knowledge Library.
-
InEight.com — InEight’s external website.
-
InEight University — Opens the learning site that contains InEight courses and certifications.
-
Collect Diagnostics — Opens a dialog box to select log and memory dump files for diagnostics.
The Collect Diagnostics option must be added to the ribbon menu using the Customize the Ribbon feature in the Customize Quick Access Toolbar drop-down menu.
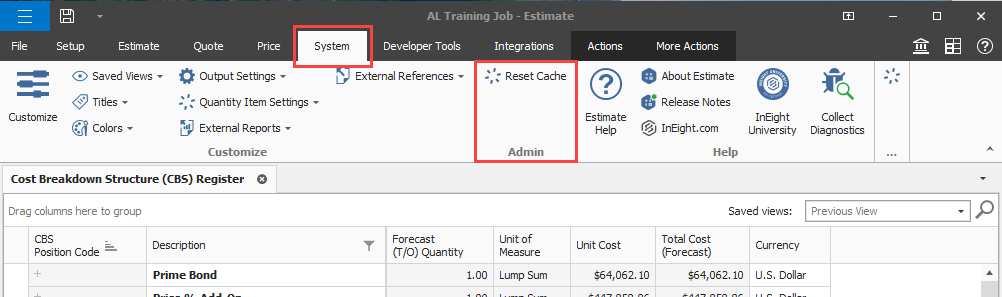
Admin section
In the Admin section, you can use the following administrative functions:
-
Reset Cache — Clear temporary cache job data. For more information, see the Reset cache section in this topic.
-
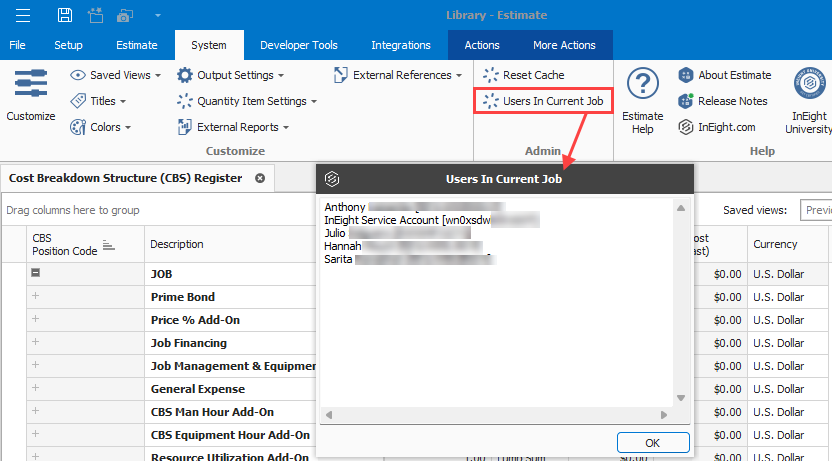
Users In Current Job — Opens dialog box that shows users currently active in the job.
If the Admin section, or a feature is not visible, you must use the Customize the Ribbon feature in the Customize Quick Access Toolbar drop-down menu to add them to the ribbon menu. You must have the applicable permissions.
Reset cache
Cache data is stored in temporary job files that allow Estimate jobs to load faster. Over time, cache data might become corrupted or have conflicts with newer or updated versions, causing the job to not work properly.
Resetting a job’s cache data removes stored temporary files, so the next time you load the job, the cache data is recreated. Your personal or custom settings remain safe and untouched. Reset a job’s cache when you notice data inconsistencies in your job, such as the following:
-
The job’s values do not match current job values.
-
Getting errors, such as an Unhandled Application Thread Exception error.
Estimate’s Reset Cache feature is available to use when you need to reset your job’s cache. You must add the feature if it is not visible in the System tab.
Add the Reset Cache option
-
Click the drop-down menu at the top left of the page, and then select Customize the Ribbon.
-
In the Ribbon Customization dialog box, on the right panel, expand System, and then expand Admin.
-
Right-click Reset Cache, and then select Visible.
-
Click OK to save your changes.
The Clear Cache option now shows in the Admin section of the System tab.
Reset a job’s cache
-
In your job, go to the System tab.
-
In the Admin section, click Reset Cache.
The Job Register opens.
Verify that the job is not selected (does not have a check mark) in the In Use column, indicating that no other users are accessing it.
-
Select a job from the Job Register, and then click OK.
-
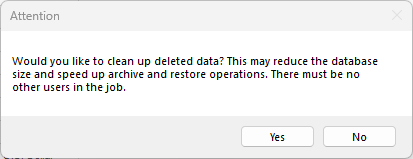
In the Attention dialog box, you have the option to allow clean-up of deleted data. Click Yes to clean up deleted data or No to continue processing without cleaning up deleted data.
The process of resetting your cache may take a few minutes, depending on the size of the job. Allow time for the process to be completed in the background.
Integrations tab
The following image and table show an overview of the Integrations tab:
|
Name
|
Description
|
|
1
|
Publish Estimate to a New Project
|
Publish an estimate job to a new project. This requires the installation of the data provider plug-in.
|
|
2
|
Publish Cost Items to Active Project
|
Publish cost items to an active project. This requires the installation of the data provider plug-in.
|
| 3 |
Publish Cost Items for Change Management |
Publish cost items to InEight Change. This requires the installation of the data provider plug-in. |
| 4 |
App Logs |
Open the Estimate application logs in Project Suite, view log details, and export to Excel. |
App logs
The InEight Project Suite App Log lets you drill down to the Detail level which helps you find, analyze and solve application errors.