Products
Solutions
Resources
9977 N 90th Street, Suite 250 Scottsdale, AZ 85258 | 1-800-637-7496
© 2024 InEight, Inc. All Rights Reserved | Privacy Statement | Terms of Service | Cookie Policy | Do not sell/share my information

The following procedures inform you how to setup resources in InEight Estimate from an excel sheet.
Use of this lesson will draw from other sections of InEight Estimating Manual. Basic understanding of the Sort, Group, Filter, Excel integration functionality in InEight Estimate is required.
You can create resources within the Resource Rate Register. This is the location to build out the structure of those resources.
Open the Job Folder or Library that you’re going to be working in.
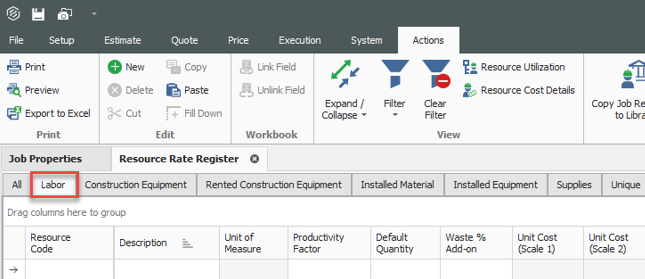
From the Ribbon, select the Setup tab.
Under the Resources section, select Resource Rates. The Resource Rate Register opens.
Select the tab you want to add resources to.
The layout of this register and excel file is up to the organization and the decisions that are made during the detail design phase. A basic excel file will be provided to your organization as a starting point to work from. If that can’t be located, you can easily build one utilizing the views within InEight Estimate.
You can create a view to mirror both the register and excel sheets to easily bring information back and forth from the two applications.
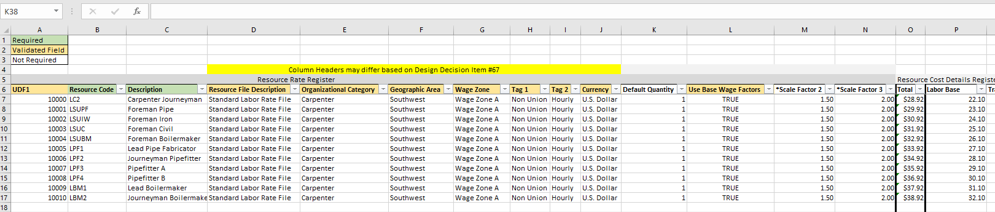
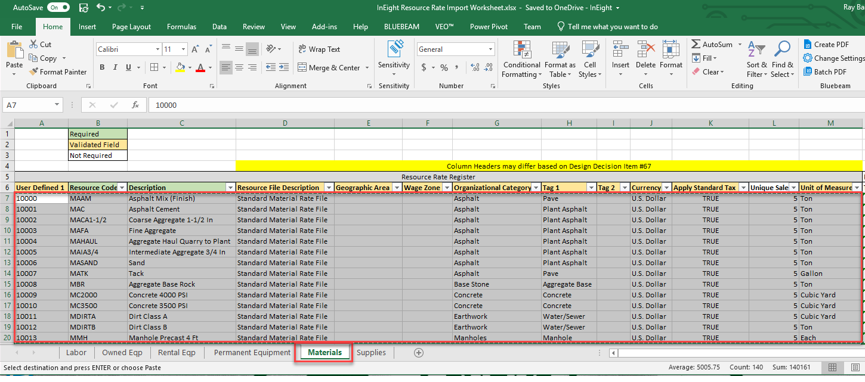
Example of columns:
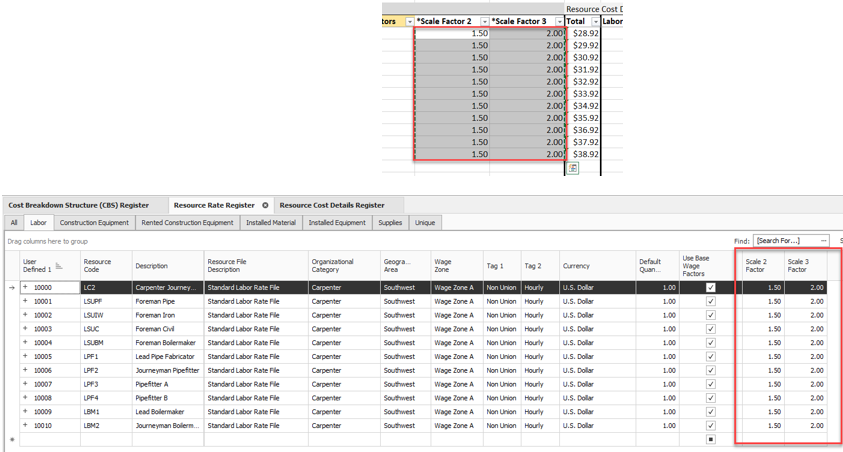
For more information on Validated Tags field, see Validated Tags topic. Scale Factors aren’t required if you are manually applying rates to each cost category scale.
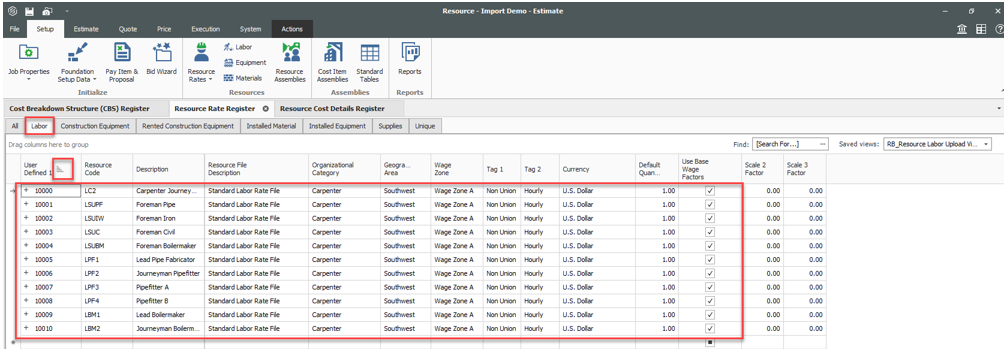
The view should appear as shown below with User Defined 1 in the first column. This field is used for sorting and arranging data accurately moving between Estimate and Excel. You are not limited to UDF 1 and can choose to utilize a field of their choice for sorting.

Go to the Excel sheet and make sure the information in the columns shown in the screenshot are filled out. Basic concepts to keep in mind regarding the excel file:
Sort Code - This column needs to have a high sequential number such as 10000. This is very important to assign as it will help us authenticate all the labor rates.
Resource Code - A unique Naming convention to be assigned to every labor resource. In this example we have all labor resource starting with a L followed by the letters that represent the resource description.
Labor Base - The base wage of the labor resource is entered here. Estimate does not allow $ sign to be pasted, which is why the cells for the Base column are formatted to Number.
Follow this procedure once you have information filled out in excel.
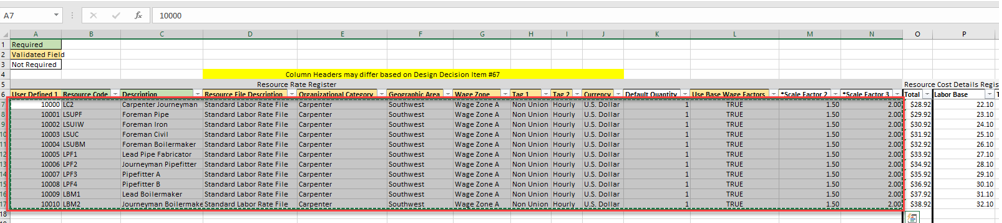
Open the excel file.
Sort the sheet by sequential number in the Sort Code field.
Highlight the cells you want to bring into the estimate.
Copy the cells using right click and selecting Copy from the context menu.
Open Estimate to the Resource Rate Register.
Select the User Defined 1 column in the Labor tab of the Resource Rate Register.
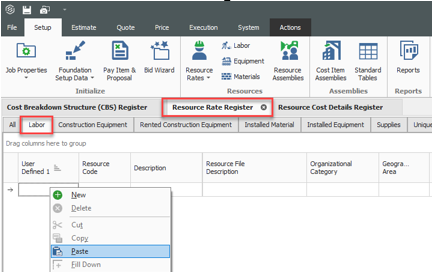
Right click the empty cell and select Paste from the context menu. A pop up will appear asking Are you sure you want to insert the selected values?
Select Yes to confirm inserting the selected values.
The cells you copied from the excel sheet are now copied into the Resource Rate Register. The Sort code data is pasted in the User defined 1 column. Resource Code & Resource description data is pasted as well.
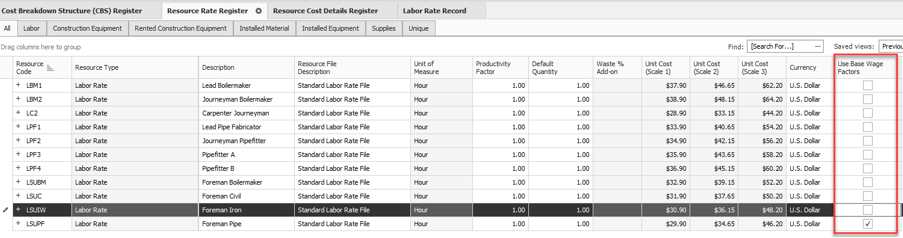
For Make sure the sorting is on User Defined 1 column. This allows us to see the information being sorted similar to our data in excel file. Base Wage Factors need to be flagged to turn on with the check box. Your first copy and paste should have activated them. You need to copy and paste again in order to apply the factors.
Labor resources are now in the system a user can apply rates to those resources.
From the Ribbon, select the Actions tab.
Under the View section, select the Resource Cost Details option. The Resource Cost Details Register opens.
Create a view to mirror the accompanying excel sheet or create one to bring in the associated resource cost in the details register.
From the Saved views drop down, select the Labor view to filter down to only labor resources.
Right click a column header and select Column Chooser.
Drag and drop the columns into the view identified below.
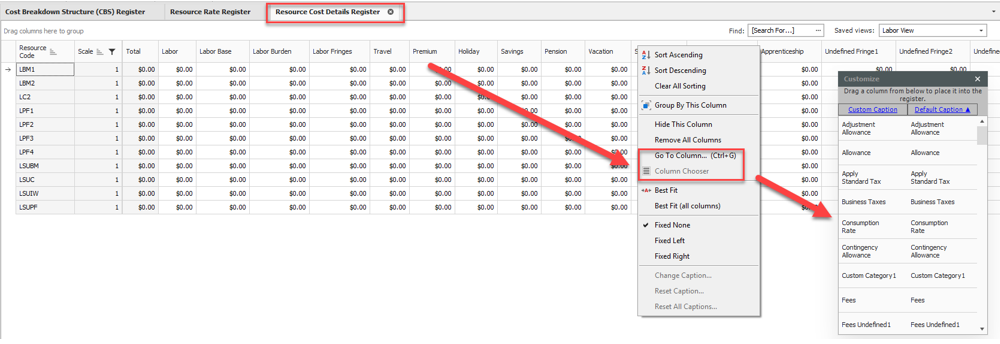
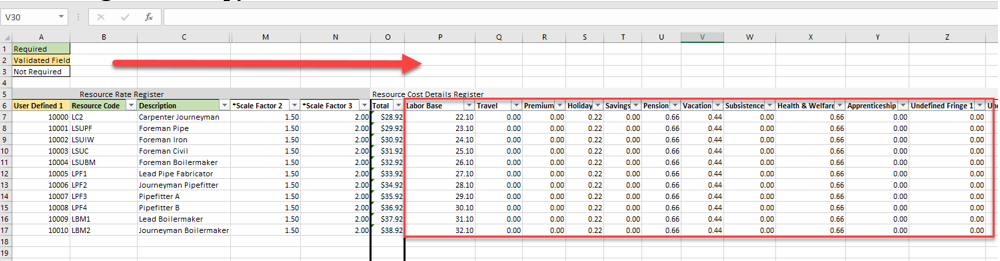
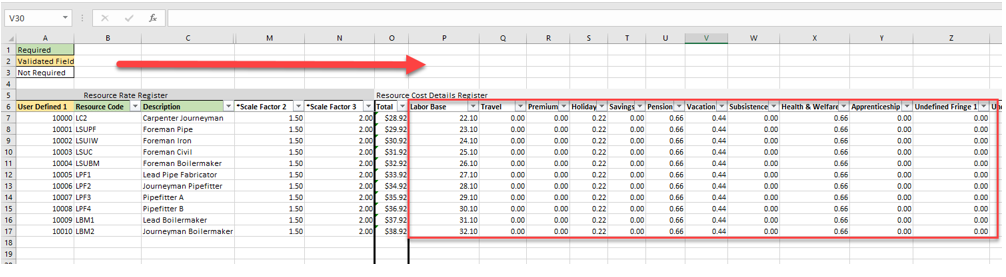
Example of columns – The level of detail and utilization of specific cost categories is a decision for each organization:
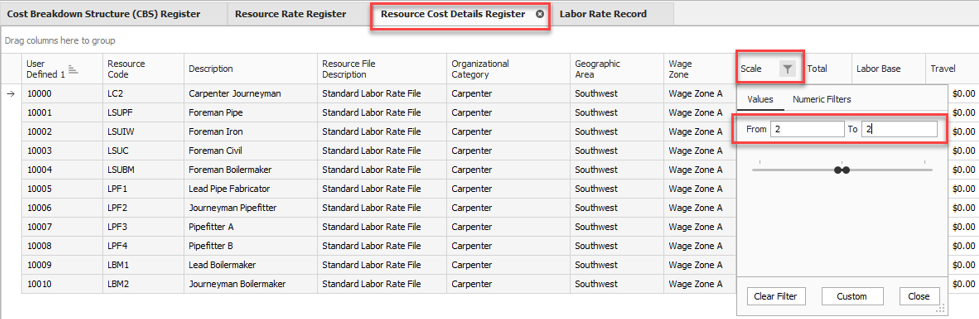
The Labor upload view brings in the columns required to enter Labor base, burdens etc. Every Labor resource has three rows created with Scales 1,2,3. The Scale Column is used to setup Straight time, Over time, Double time.
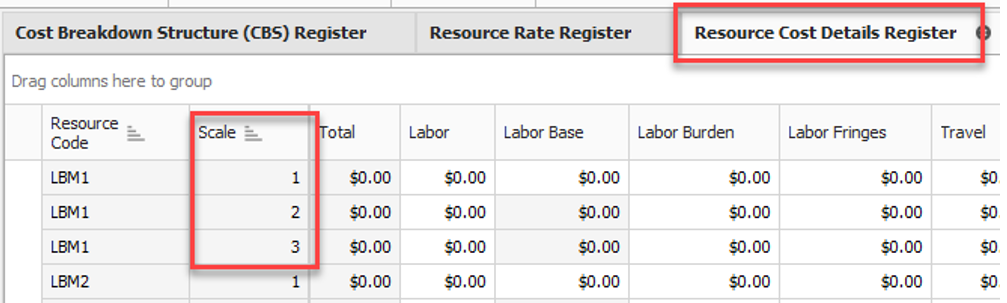
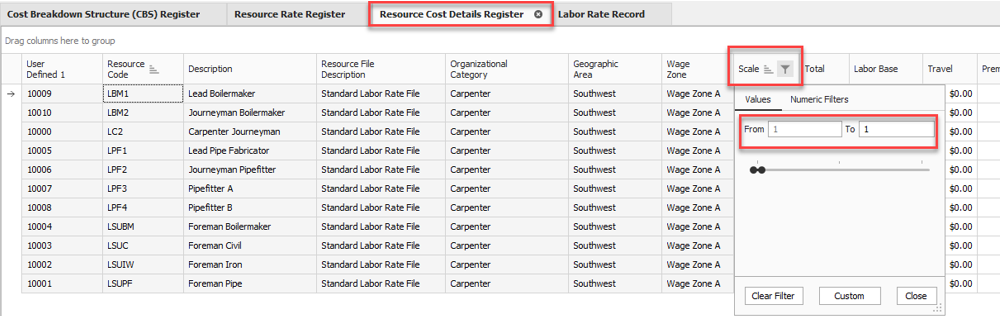
From the Scale column header, click the filter icon..
Set the From and To values to 1.
Back on the excel spreadsheet, highlight the base rates to bring in.
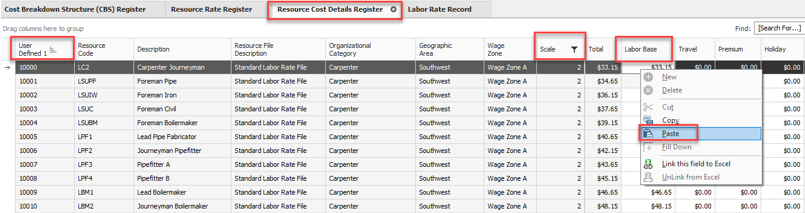
Right click and select Copy in the context menu.
Go to Estimate. Right click and select Paste from the context menu.
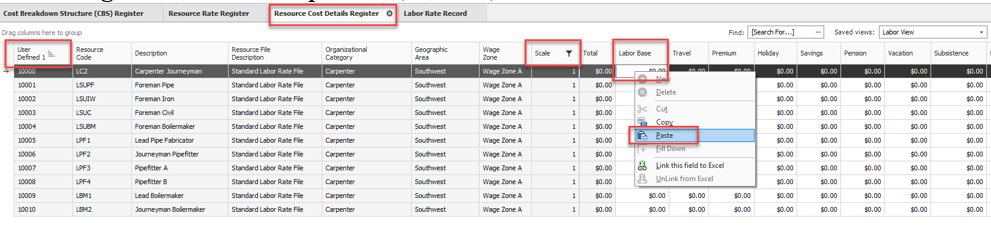
You will be prompted with a Are you sure you want to insert these values? message as before. Select Yes to continue.
If the organization wants to have more in-depth cost details for each scale rather than using scale factors the same procedure will be utilized to copy Labor burden, fringes, and other add-ons to setup Scale 2 & Scale 3.
For Base Wage Factor Columns will not be active if your organization is using method 2.

From the Scale column header, click the filter icon..
Set the From and To values to 2.
Back on the excel spreadsheet, highlight the base rates to bring in.
Right click and select Copy in the context menu.
Go to Estimate. Right click and select Paste from the context menu.
You will be prompted with a Are you sure you want to insert these values? message as before. Select Yes to continue.
Follow the same procedure for scale 3.
The same principles can be applied for the other resource types within InEight Estimate. This procedure covers installed material, but can also be used for the other six resource types.
Create a view to mirror both the register and excel sheets to easily bring information back and forth from the two applications.
Example of columns
Follow the step by step once you have information filled out in excel.
Open the excel file.
Sort the sheet by sequential number in the Sort Code field.
Highlight the cells you want to bring into the estimate.
Copy the cells using right click and selecting Copy from the context menu.
Open Estimate to the Resource Rate Register.
Select the User Defined 1 column in the Installed Material tab of the Resource Rate Register.
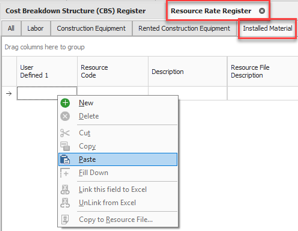
Right click the empty cell and select Paste from the context menu. A pop up will appear asking Are you sure you want to insert the selected values?
You will be prompted with a Are you sure you want to insert these values? message. Click Yes to continue.
Installed Material Resources are now in the system. You can apply rates to those resources. Create a view to mirror the accompanying excel sheet or create one to bring in the associated resource cost in the details register.
From the Ribbon, select the Actions tab.
Under the View section, select the Resource Cost Details option. The Resource Cost Details Register opens.
Create a view to mirror the accompanying excel sheet or create one to bring in the associated resource cost in the details register.
From the Saved views drop down, select the Installed material view to filter down to only material resources.
Right click a column header and select Column Chooser.
Drag and drop the columns into the view identified below.
Example of columns – The level of detail and utilization of specific cost categories is a decision for each organization:
Additional Information
9977 N 90th Street, Suite 250 Scottsdale, AZ 85258 | 1-800-637-7496
© 2024 InEight, Inc. All Rights Reserved | Privacy Statement | Terms of Service | Cookie Policy | Do not sell/share my information