Products
Solutions
Resources
9977 N 90th Street, Suite 250 Scottsdale, AZ 85258 | 1-800-637-7496
© 2024 InEight, Inc. All Rights Reserved | Privacy Statement | Terms of Service | Cookie Policy | Do not sell/share my information

From the Library landing page, on the Setup tab, click the Resources button in the Master Resources section. The Library Resource Rate Register opens

Select the Labor tab.
Right-click any row header and select New. A new Labor Rate Record shows.
In the Code field, type L + [your initials].
Press the Tab key.
Fill in the Description field.
Click on the resource’s Setup tab, and then select Standard Labor Rate File from the Resource File drop-down list.
Select a location for the Geographic Area.
Select Wage Zone A for Wage Zone.
Select a labor type for the Organizational Category.
For Tag 1, select a code.
For Tag 2, select a code.
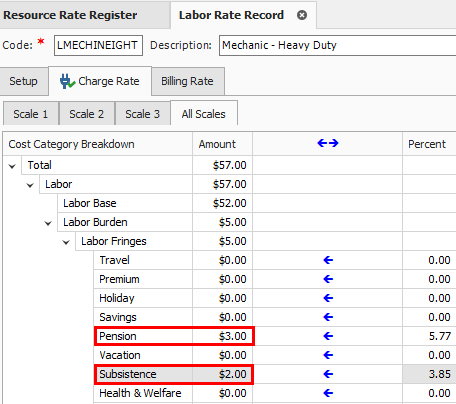
On the Charge Rate tab, enter a dollar value for your Labor Base.
Expand Labor Burden and under Labor Fringes, type in a dollar value for Pension and Subsistence.
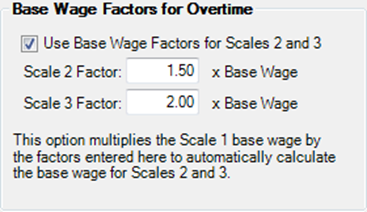
Define an overtime and double-time rate for the resource. Select the checkbox for Use Base Wage Factors for Scales 2 and 3.
Set the Scale 2 Factor to 1.50 x Base Wage and Scale 3 Factor to 2.00 x Base Wage.
Click OK, to close the record.
Open the Library Resource Rates Register.
Select the Rented Construction Equipment tab.
Right-click on any row header, and then choose New. A new Installed Rented Equipment Rate Record shows.
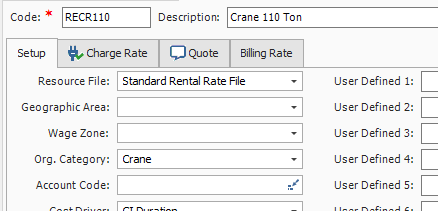
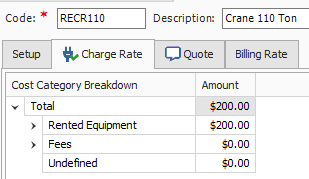
In the Code field, type RECR + [your initials], and then press Tab.
In the Description field, type Crane 110 Ton.
Click on the resource’s Setup tab, and then select Standard Rental Rate File from the Resource File drop-down list.
Select a resource from the Organizational Category drop-down list.
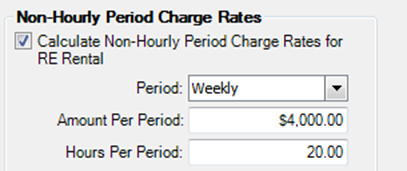
Click the Charge Rate tab, and then enter the charge rate using the relevant fields. You can also use the Non-Hourly Period Charge Rates section on the bottom left to calculate hourly rates for fixed rates such as weekly or monthly rates. See the Non-Hourly Rate Calculator section below.
Refer back to your last entry's rate amount. Under Non-Hourly Period Charge Rates on the right, check the Calculate Non-Hourly Period Charge Rates check box.
On the resulting prompt, click OK.
In the Period field, select Weekly.
In the Amount Per Period field, type in a number value.
Type in a number of hours in the Hours Per Period field.
Click OK to close the record.
Select Resource Rates from the Library landing page. The Resource Rate Register displays
Select the Installed Material tab.
Right-click on any row header, and then select New from the drop-down menu. A new Installed Material Rate Record shows.
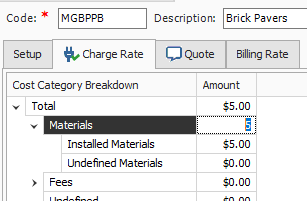
In the Code field, type MGBP + [your initials], , and then press Tab.
In the Description field, type Brick Pavers.
Select a unit of measure from the Unit of Measure drop-down list.
On the resource’s Setup tab, under Resource File select Standard Material Rate File.
On the Charge Rate tab, expand Materials, and then enter a number value in the Installed Materials Amount field.
Click OK to finish adding this resource.
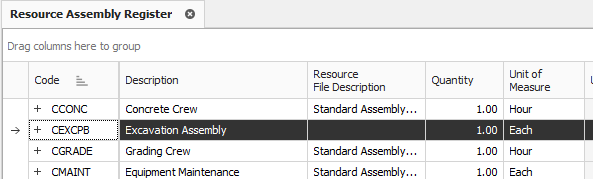
From the Library landing page, under the Master Resources section of the Setup tab, select Resource Assemblies. The Resource Assembly Register shows.
Right-click on any row header, and then select New from the drop-down menu. A new Resource Assembly Record is shown.
In the Code field, type a code as the unique code for the assembly. For example, you can type CEXC + [your initials].
Add a description in the Description field.
In the Assembly Details register at the bottom of the screen, click in the Resource Code column in the first blank row, and then select the Resource icon that shows in the cell.
On the Labor tab of the resulting register, select the resource with your description. For example, you can select LL2Laborer, and then click OK to add this resource to the assembly.
You can add dditional resources if needed.
You can use the Ctrl and Shift keys to select multiple resources at once.
Click OK to save and close the new assembly.
Additional Information
9977 N 90th Street, Suite 250 Scottsdale, AZ 85258 | 1-800-637-7496
© 2024 InEight, Inc. All Rights Reserved | Privacy Statement | Terms of Service | Cookie Policy | Do not sell/share my information