Products
Solutions
Resources
9977 N 90th Street, Suite 250 Scottsdale, AZ 85258 | 1-800-637-7496
© 2024 InEight, Inc. All Rights Reserved | Privacy Statement | Terms of Service | Cookie Policy | Do not sell/share my information

From the Backstage view, select to create a new job from scratch.
In the New Job dialog box, click in the Core Project field to select a Platform job from the list.
Modify the Code field as needed.
Enter a description of the job in the Description field.
Determine if you want to select the Auto-Update Job in Connected Analytics check box.
Click OK to create the new project.
On the Job Properties > Security tab, select the Restrict access to this Job… check box.
Notice the checkbox to “Allow ALL users with Bid Wizard access to use this job as a source” is checked by default. Make sure to keep this checked as well
Click the Add Users / Groups button to add users.
In the Select Users or Groups dialog, type the email addresses for those that need access and then click OK.
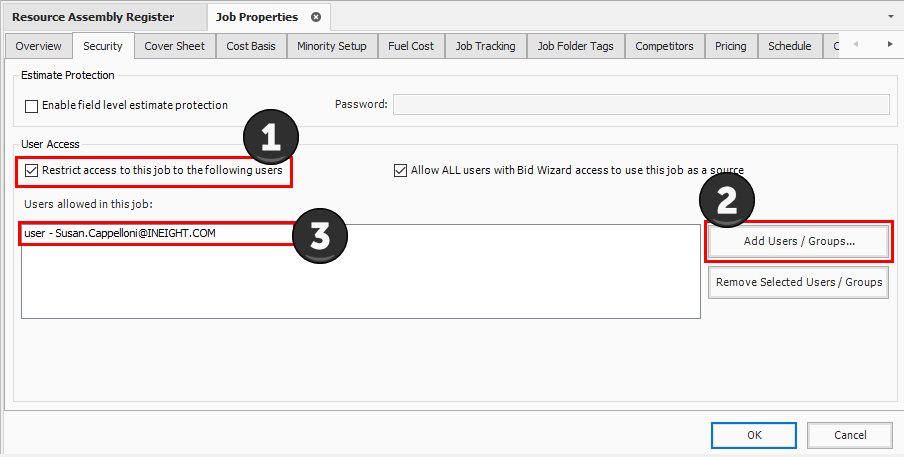
The job can now only be opened by those listed under Users allowed in this job
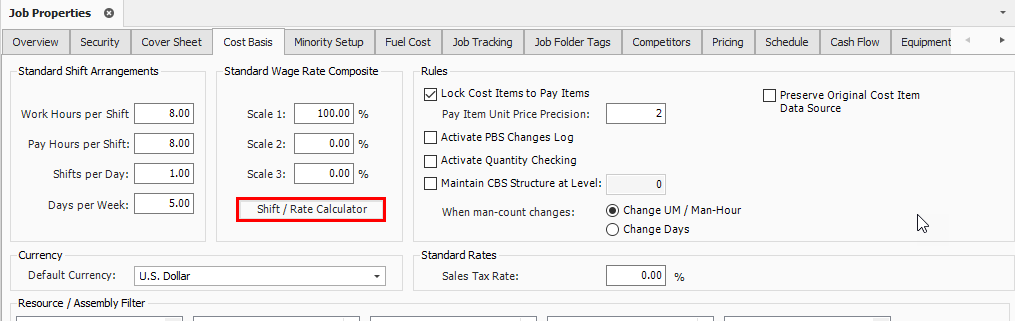
On the Job Properties > Cost Basis tab, select the Shift Rate Calculator button.
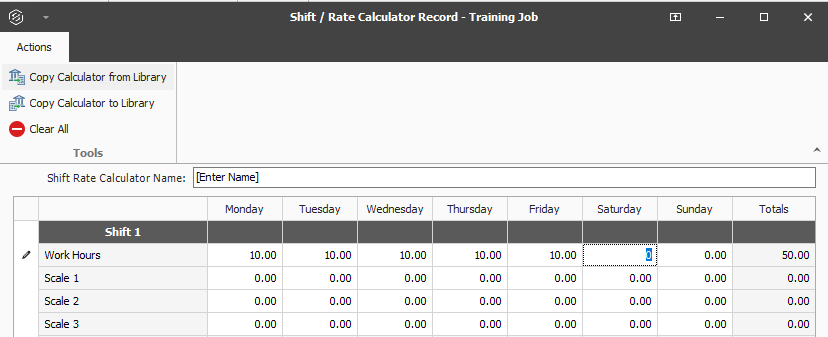
For Shift 1, type a number value of hours in the Monday through Friday Work Hours fields.

In your Job, go to the Job Properties > Cost Basis tab, select the Labor Rate resource type.
Under Resource File Description, select Standard Labor Rate File.
In the Geographic Area, select an Area.
For Wage Zone (Work Center), select a Wage Zone.
For Organizational Category, select All.
Follow the same steps for the remaining resource types.
Select the Import Filtered Resources button to bring your selected resources into the job.
For this example, we'll select the following filters for the Labor resource type:

In your job, open the Job Properties > Fuel Cost tab.
In Cost Per UM column, enter a dollar amount into the following:
Diesel
Gas & Gasoline
Off Road Diesel
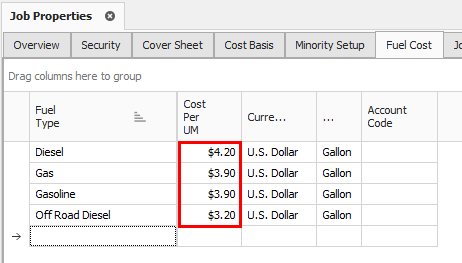
Currency should read U.S. Dollar and UM should read Gallon.
Open your job and select Setup tab >Pay Item & Proposal from the InEight Estimate landing page.
The Pay Item & Proposal Register displays
In the Pay Item Number column, in the first blank row, type a number value.
Use the Tab key to move to the Description column and type a description.
Leave the Pay Quantity at 1.00 and change the Unit of Measure to LS (Lump Sum).
The Forecast (T/O) Quantity will auto populate to match your pay quantity, but can be changed later
You can tab to the next row to create additional pay items if needed

Additional Information
9977 N 90th Street, Suite 250 Scottsdale, AZ 85258 | 1-800-637-7496
© 2024 InEight, Inc. All Rights Reserved | Privacy Statement | Terms of Service | Cookie Policy | Do not sell/share my information