Products
Solutions
Resources
9977 N 90th Street, Suite 250 Scottsdale, AZ 85258 | 1-800-637-7496
© 2024 InEight, Inc. All Rights Reserved | Privacy Statement | Terms of Service | Cookie Policy | Do not sell/share my information

Your plan to install the horizontal and cross member assemblies (red columns) has been executed and sent for approval.
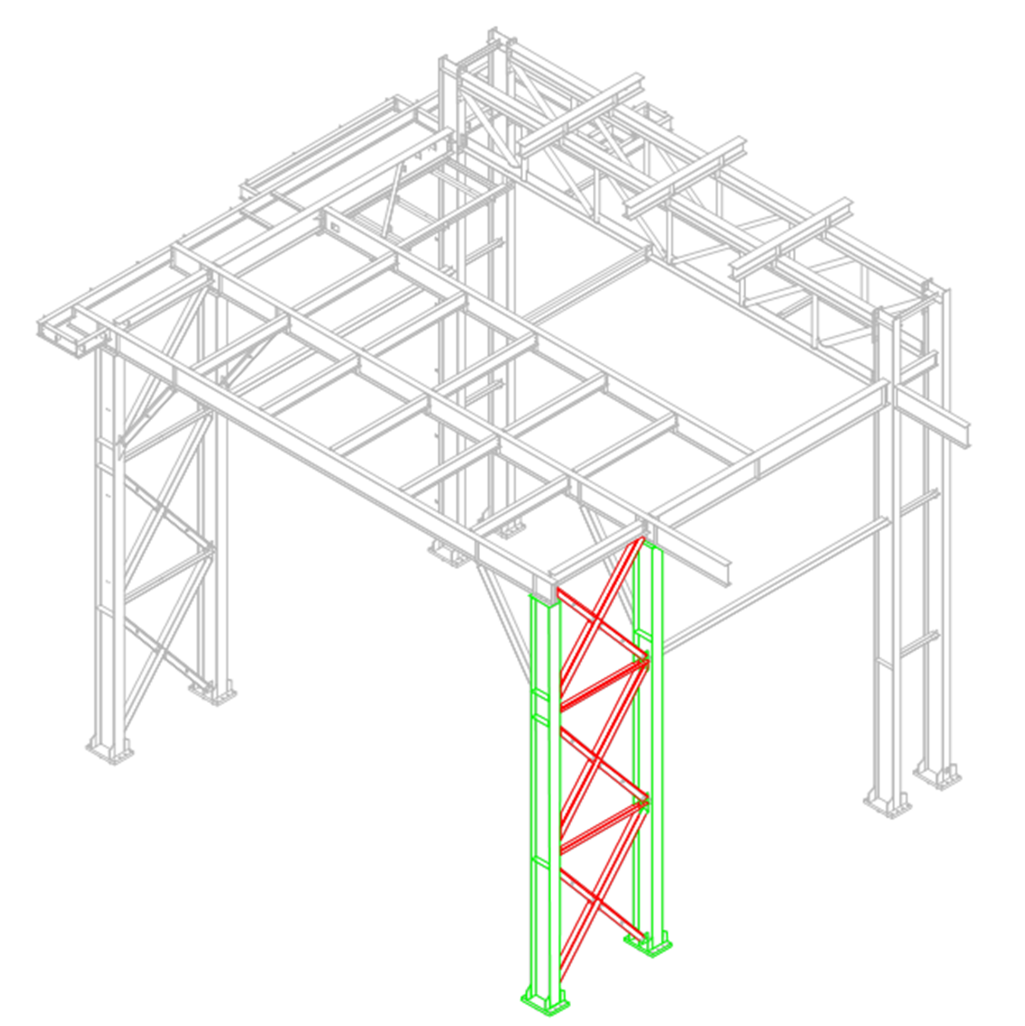
As a reminder, the steel members you will be installing are:
A23
A24
B23
B24
C23
C24
D23
E22
E23
E24
F22
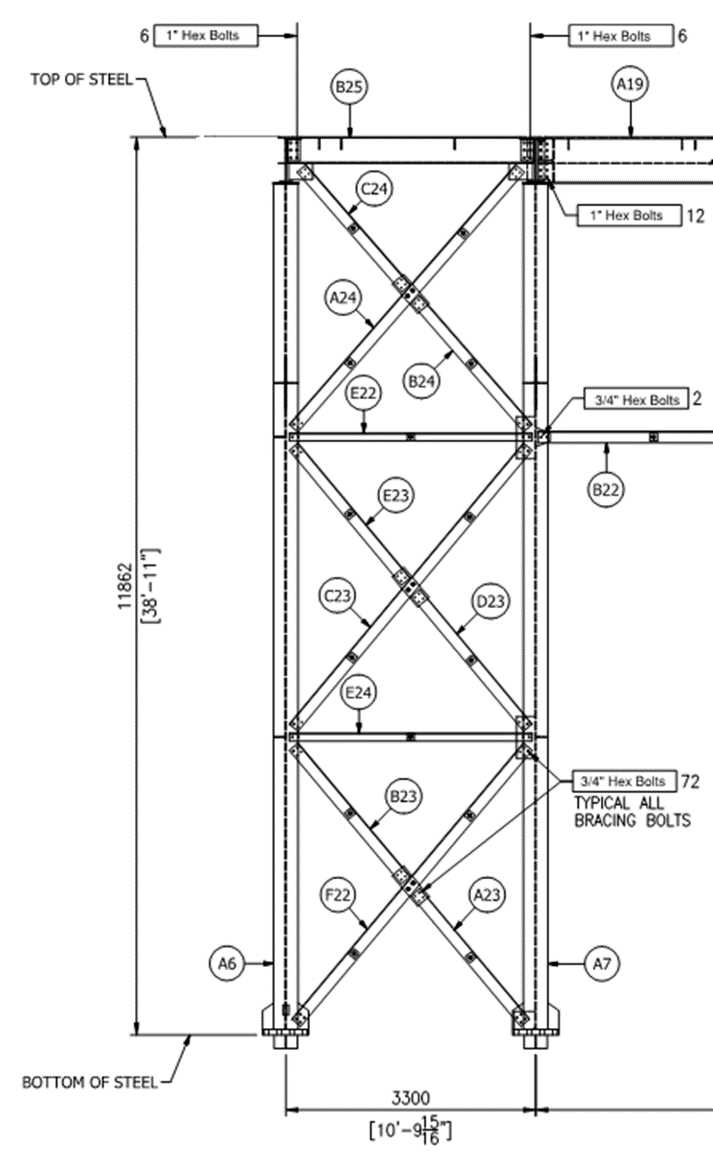
The plan was to shakeout and transport the steel members by 1/2 ton pickup truck to the work area. You also planned to erect and bolt up members C23, D23, E23, and E24.
After verifying the steel members with their respective drawings, it was noted that members E23 and E24 had dimensions that did not match the drawings. The foreman created a note to communicate this discrepancy back to the approver. Instead of installing E23 and E24, the crew went ahead and installed B23, A23, and F22.
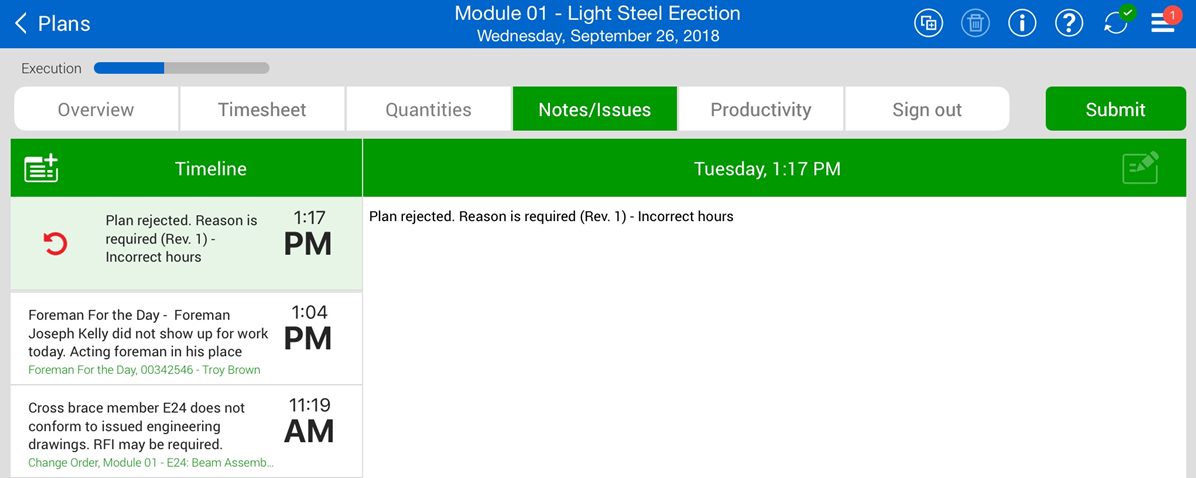
One of your employees was asked to be Foreman for the day when the original foreman did not show up for work. The new Foreman also worked 2 extra hours to help the field engineer develop the RFI. The plan will have to be revised to reflect these changes.
Once a daily plan has been executed and synchronized, the final step before the daily plan is approved is reviewing the actuals. This last review is extremely important; it is the last chance to verify all actual values input during the Execution Phase are correct, and if there are any mistakes this gives supervisors an opportunity to correct them.
In Progress, the daily plan’s status in the plan list will change from Execution to Awaiting Approval once submitted for approval. The plan color will then revert to blue.
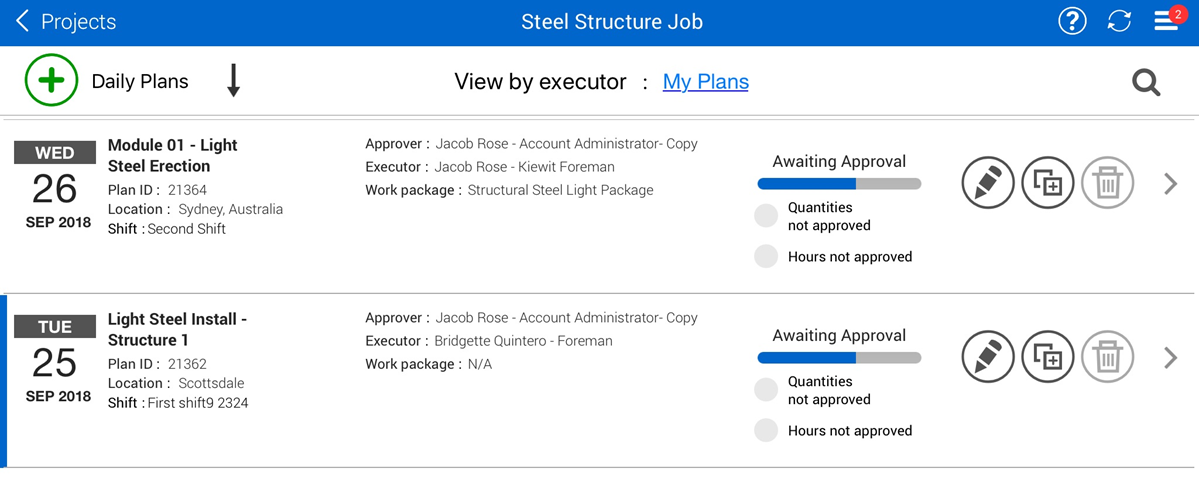
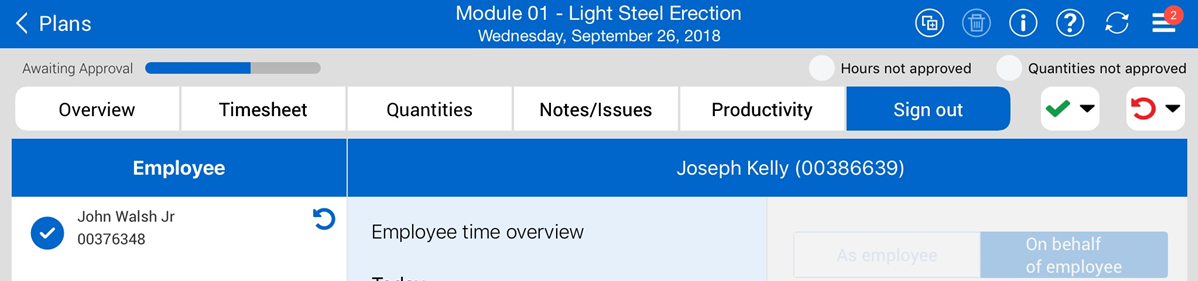
In the Awaiting Approval Phase, a daily plan will have six tabs (same as the Execution Phase) :
Overview
Time sheet
Quantities
Notes/Issues
Productivity
Sign Out
The first five tabs, (Overview, Time sheet, Quantities, Notes/Issues, and Productivity), in the Awaiting Approval Phase are identical to their respective tabs in the Execution Phase. All information entered, edited, or removed in the Execution Phase will be reflected in the Awaiting Approval Phase. Furthermore, the Awaiting Approval Phase has the same level of editing on the previously discussed tabs as the Execution Phase does.
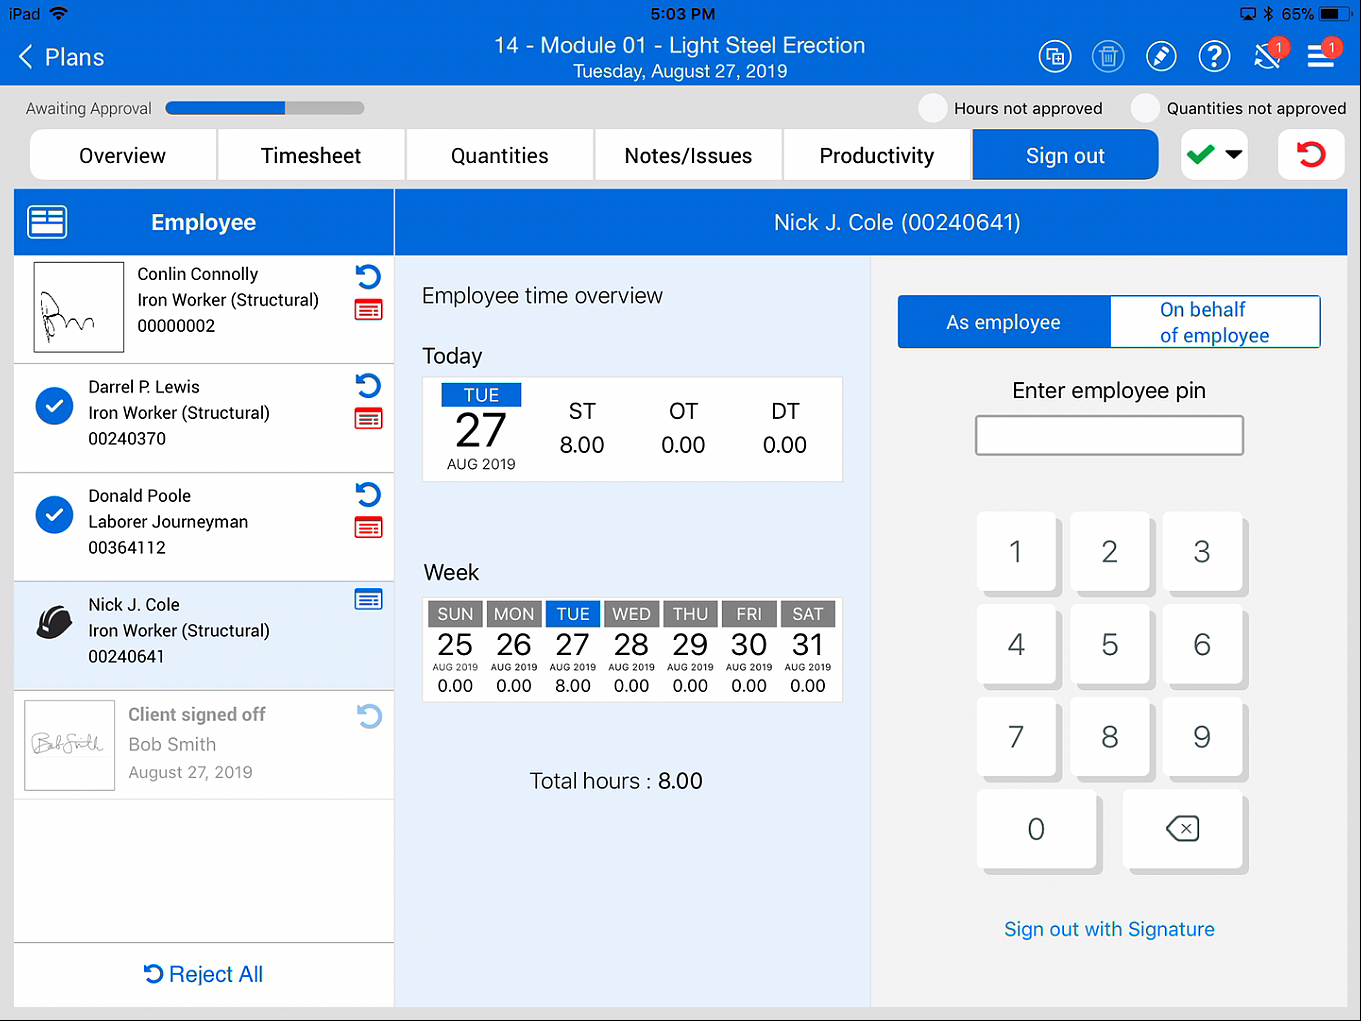
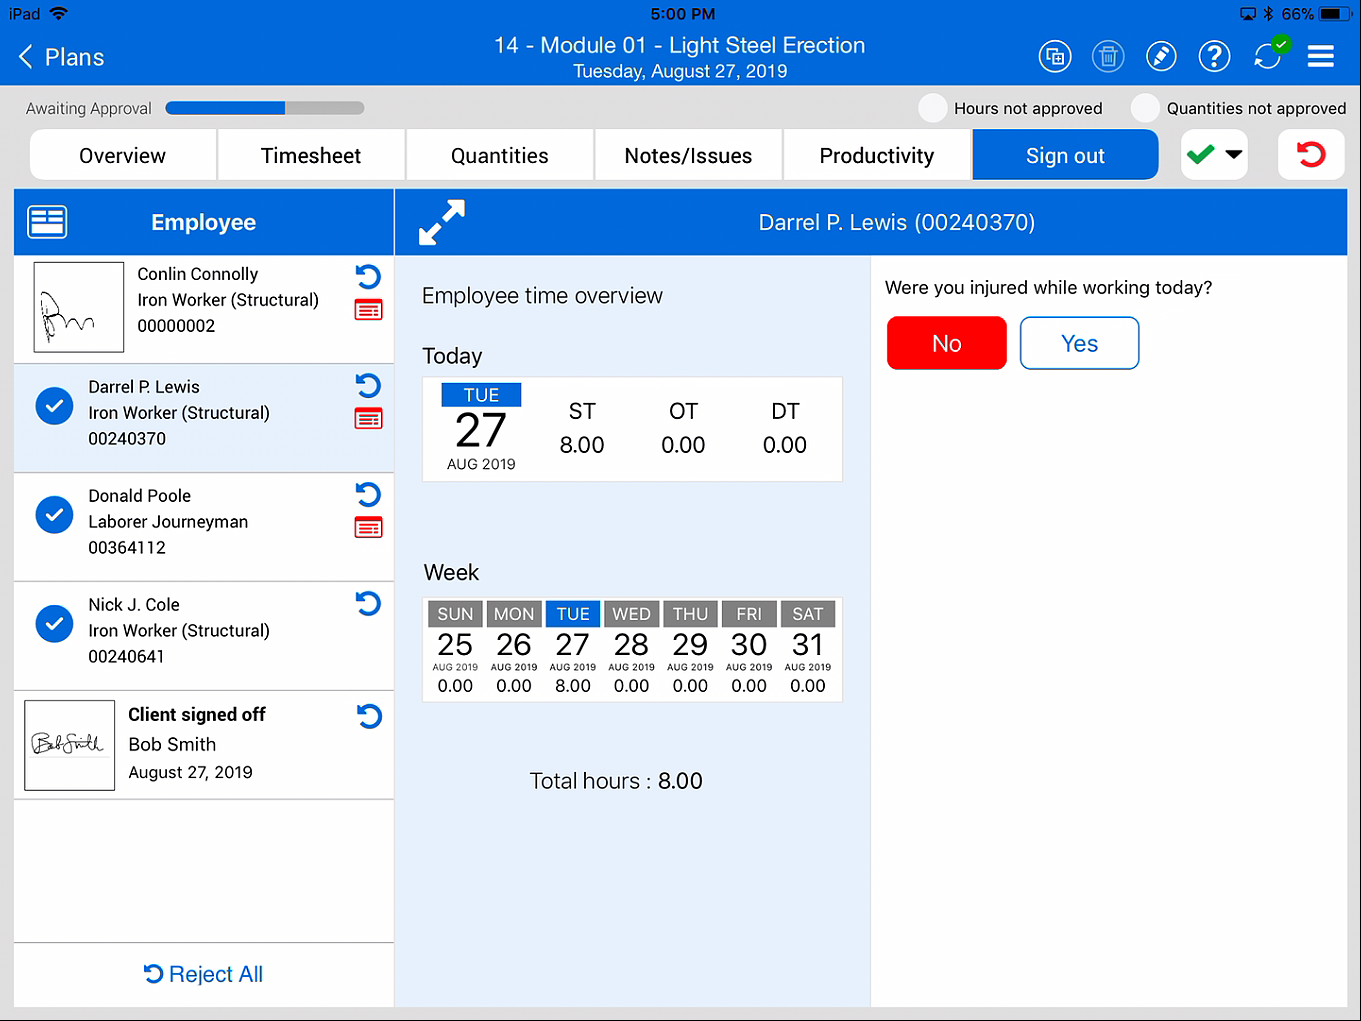
On the Sign Out tab, you will now be able to review the submitted time for each employee on the crew, as well as previously approved hours for the week, and the answered compliance questions. At this point, you are also able to make changes to an employee’s hours by rejecting an employee’s sign out. If you are completely unsatisfied with the plan, you have the option to reject the plan and send it back to execution for editing.
In Progress, from any screen, you can access the help screen by pressing the  button. This is located in the upper right hand side of the application.
Once selected, the help screen will look like the following:
Select the close button at the bottom of your screen to close the help screen.
Reviewing a plan once executed is an integral step in the approval process. You can make changes to the plan, such as rejecting an employee’s hours, modifying them, and then signing the employee back out.
The following Step by Step walks you through how to reject an employee’s sign out, modify their actual hours and re-sign them out on their behalf.
From the Daily plans page, open your daily plan.
Tap on the Sign Out tab.
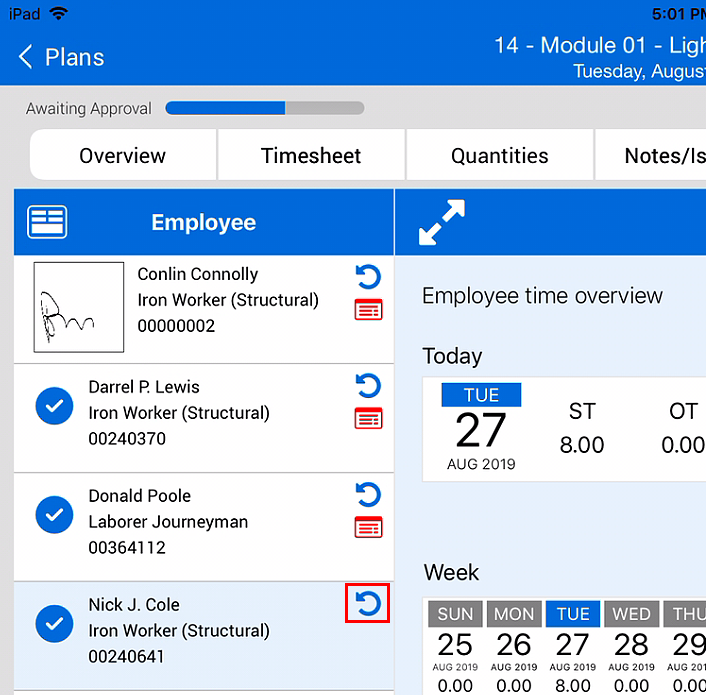
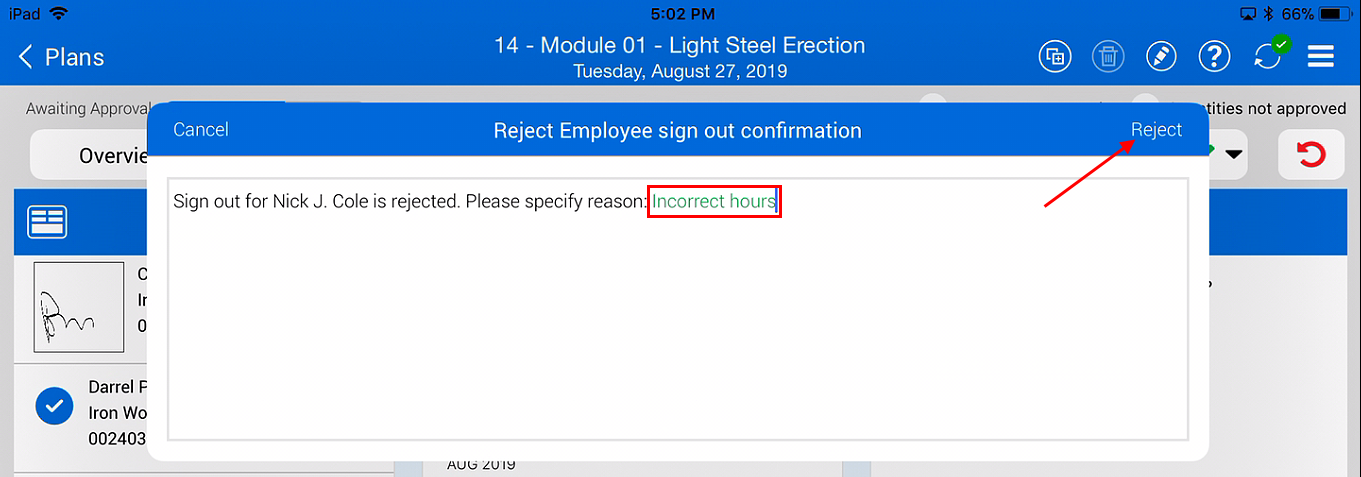
Tap the Reject button for one of your employees.
Type a reason for rejection and then tap Reject.
Tap on the Time sheet tab.
Tap in the hours entry area for the employee whose hours you rejected.
You can tell which hours have been rejected by the Reject icon  in the bottom corner
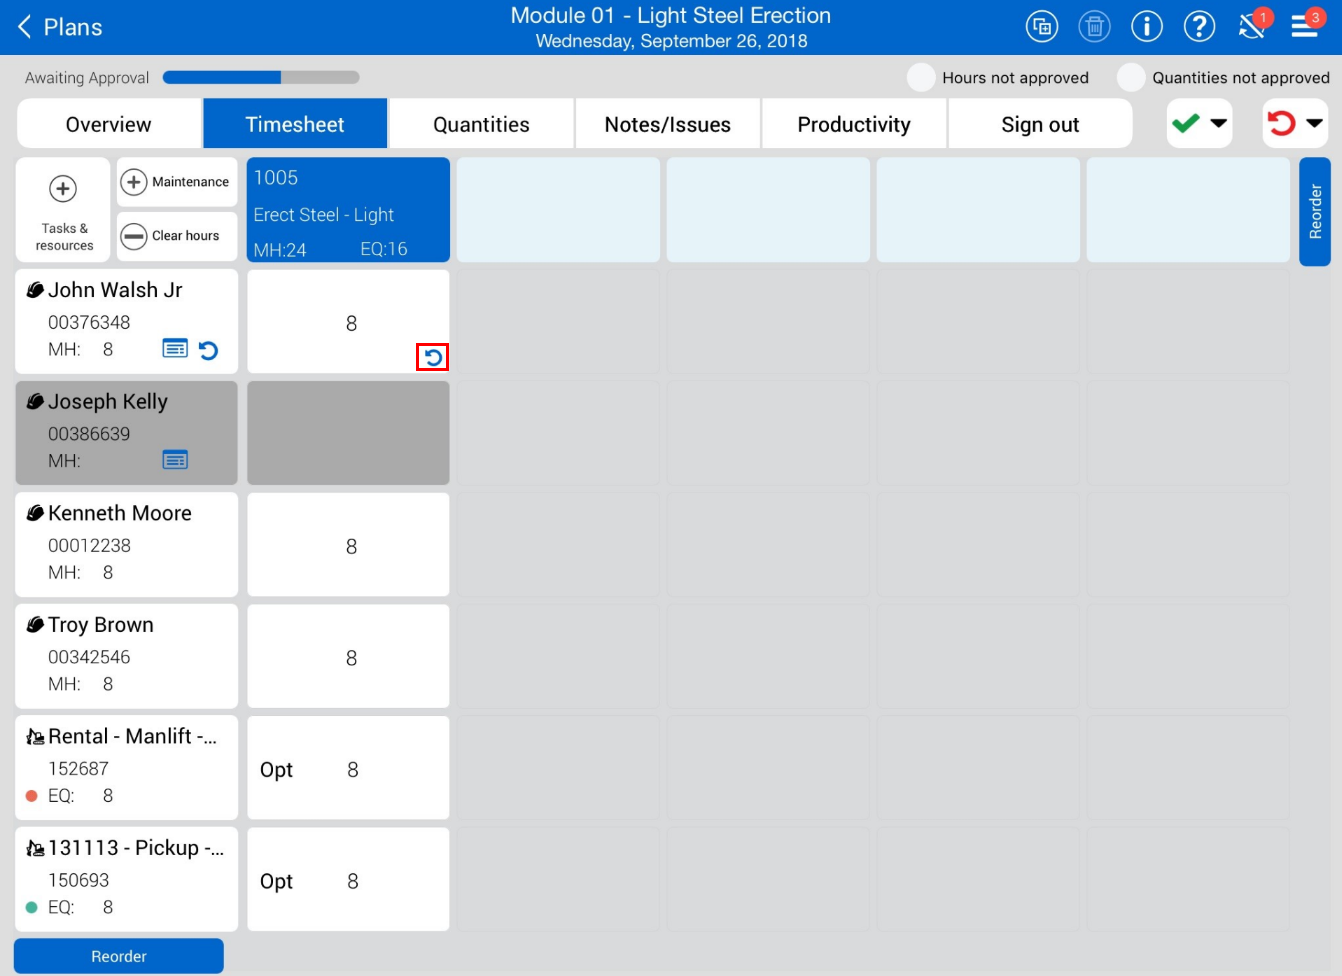
Adjust the employees hours.
Tap Done.
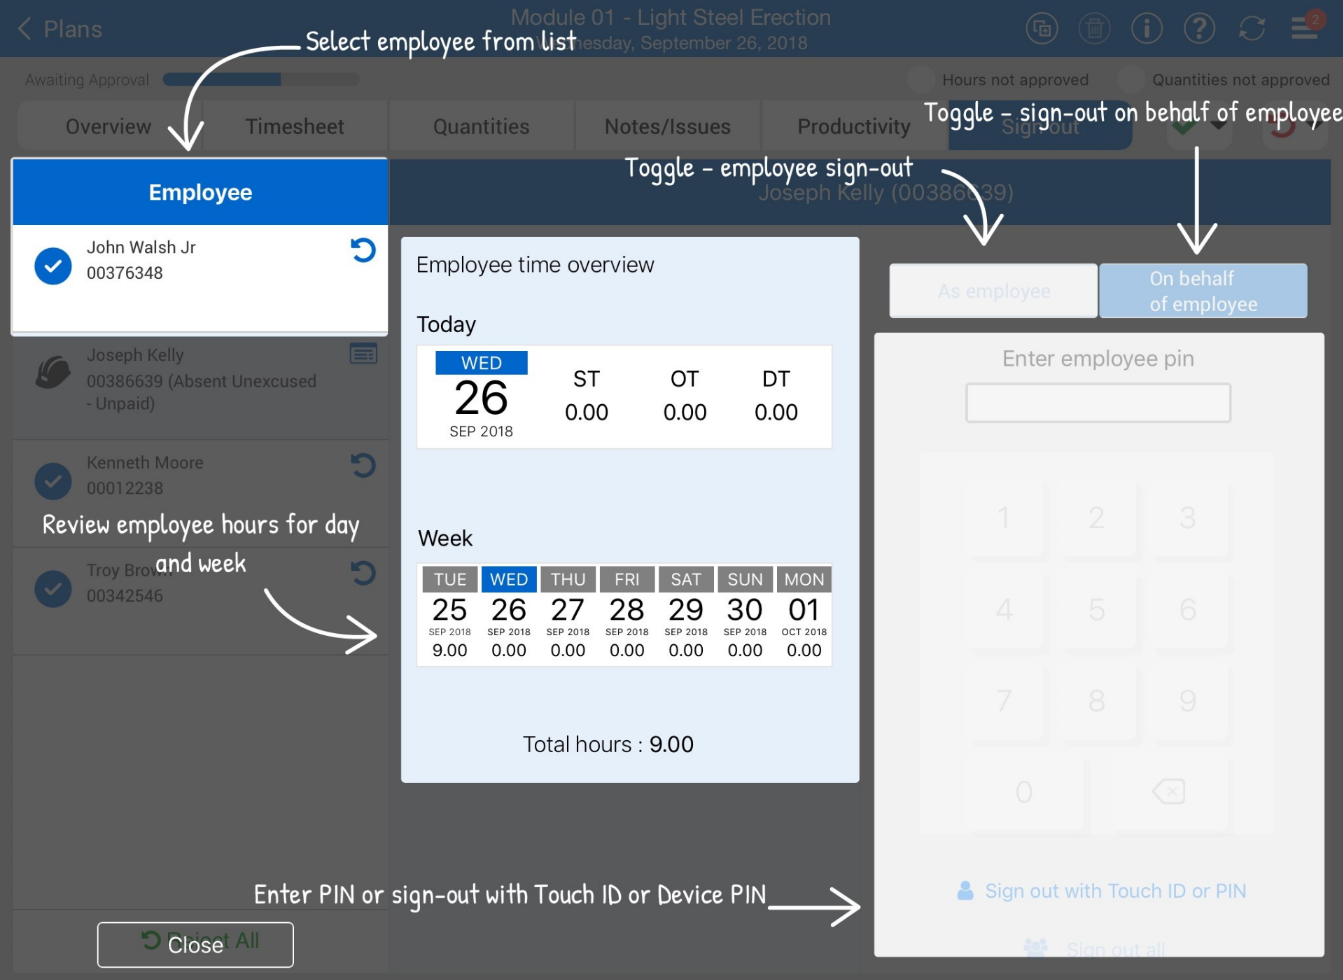
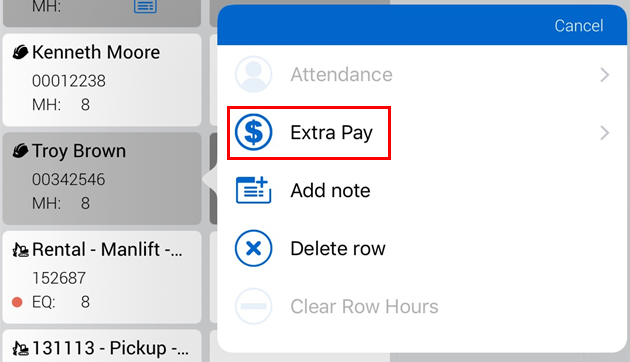
Tap on one of your employees and select Extra Pay.
Select a reason for the extra pay (i.e. Foreman for the Day) and add a note (i.e. Foreman did not show up for work today. Acting foreman in his place).
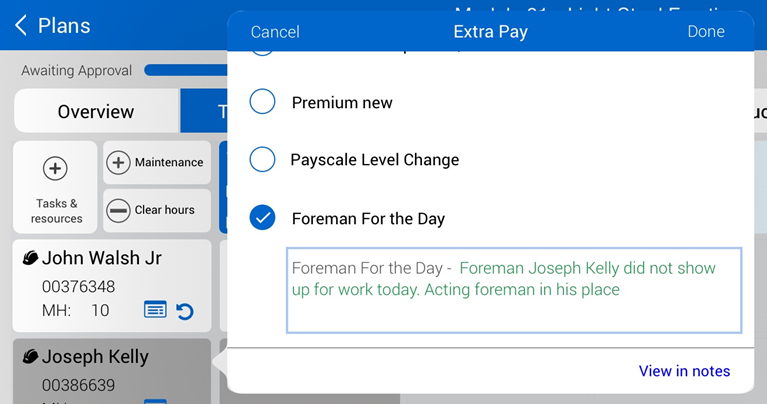
Select Done.
Tap on the Sign out tab.
Select an employee from the employee list on the left.
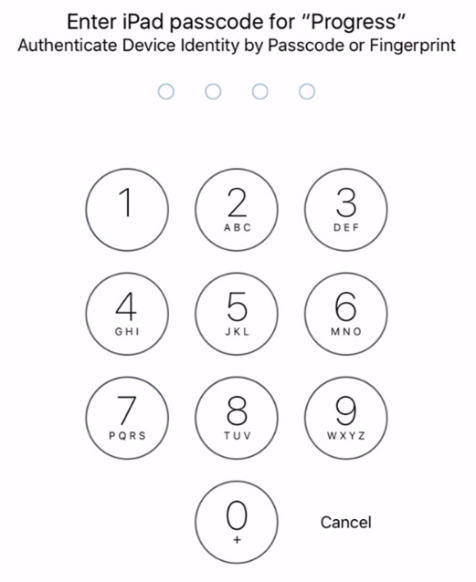
Select On behalf of Employee and then Sign out with Touch ID or PIN.
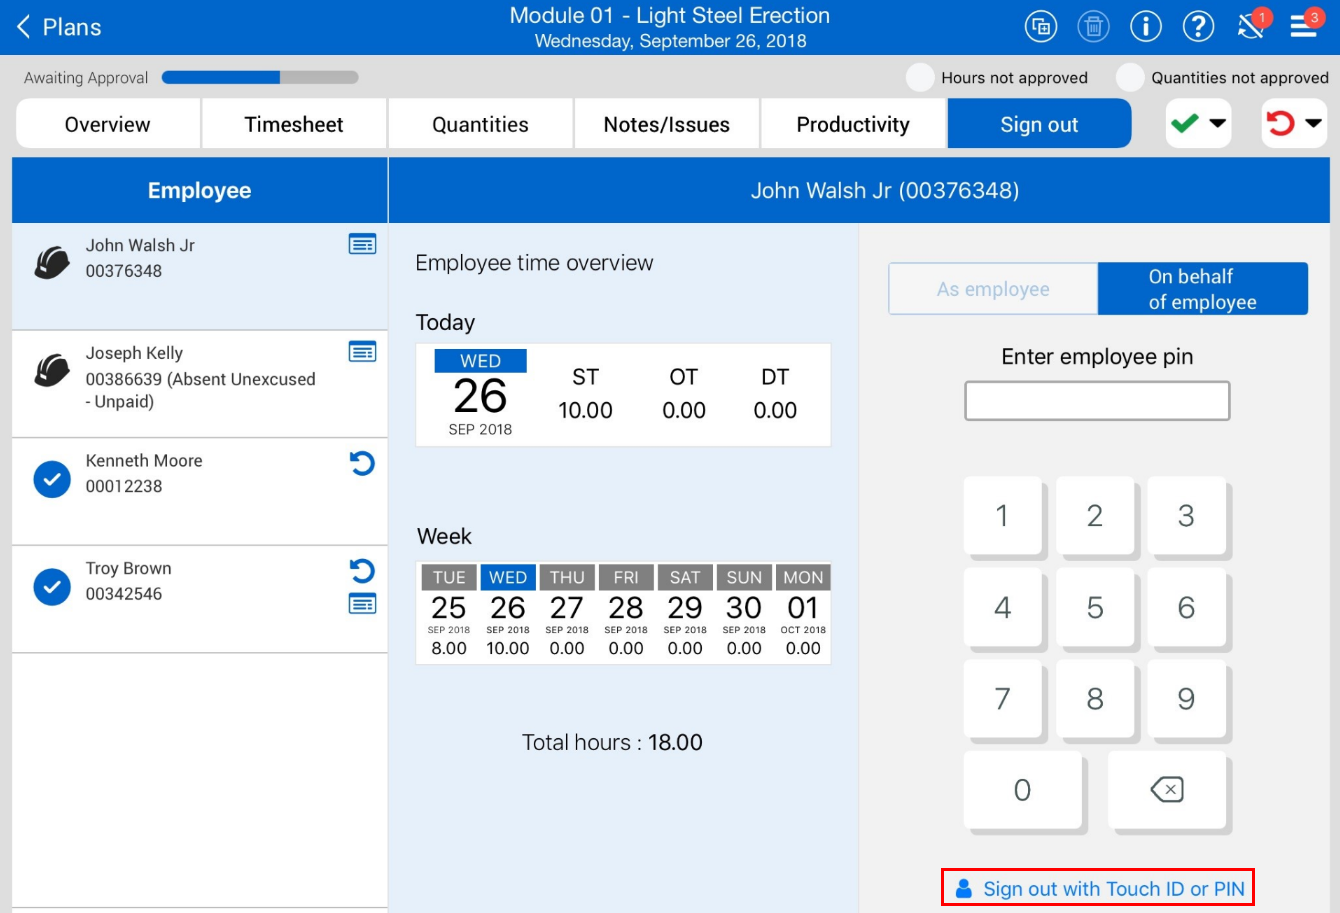
Enter the passcode for your iPad.
Answer the compliance question.
Tap Done.
While reviewing a daily plan, you may notice that there has been mistake with all the employees’ hours. You can go through and fix the mistake individually as per the previous Step by Step, or you have the option to reject the whole plan. Rejecting the plan will put the plan back into the Execution Phase. The foreman will then be responsible to make any changes.
On any of the six tabs, to reject a plan select the  icon and then Reject Plan.

A pop-up window appears, and you will be required to give a reason for why the plan has been rejected; you will not be able to submit until you have entered a reason.
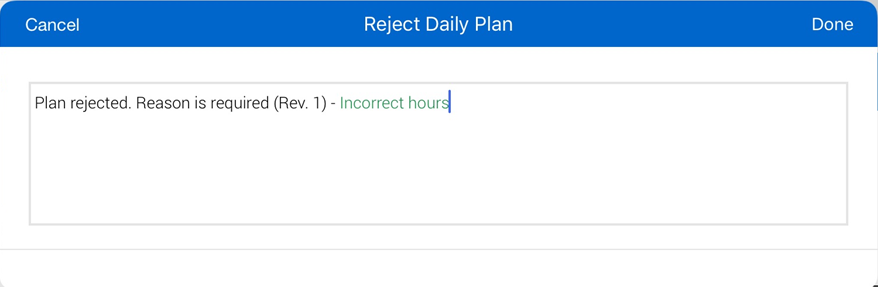
Once rejected, the plan will revert to the Execution Phase. The red arrow icon will now also appear on your plan.

You can now go through the whole Execution Phase again, making the changes that have been requested by the approver. You can view the reason for rejection in the Notes/Issues tab. Once all information has been fixed, you can submit the plan back to approval.
Additional Information
9977 N 90th Street, Suite 250 Scottsdale, AZ 85258 | 1-800-637-7496
© 2024 InEight, Inc. All Rights Reserved | Privacy Statement | Terms of Service | Cookie Policy | Do not sell/share my information