


Products
Solutions
Resources
9977 N 90th Street, Suite 250 Scottsdale, AZ 85258 | 1-800-637-7496
© 2024 InEight, Inc. All Rights Reserved | Privacy Statement | Terms of Service | Cookie Policy | Do not sell/share my information

To navigate through the Daily Planning Phase, you will tap and complete each tab in the navigation bar.

While in the Planning pPhase, the page screen is highlighted with a blue accent. When in the Execution pPhase, this changes to green. This helps asto a reminder ofyourself which phase of the process you are in.
After Once a daily plan is created, you are taken to thean Overview pagescreen. Initially this page screen is blank because you have not entered any information. The Overview screen letallows you to review your daily plan before starting work and includes the following information:
|
Topic |
Description |
|
|---|---|---|
|
1 |
Tasks |
Include the planned quantity, man-hours and budget gain/loss (G/L). |
|
2 |
Tool Box Talks |
Provide key information including general discussion, safety, quality, and environmental considerations. |
|
3 |
Planner Notes |
Provides space for additional notes related to the plan. |
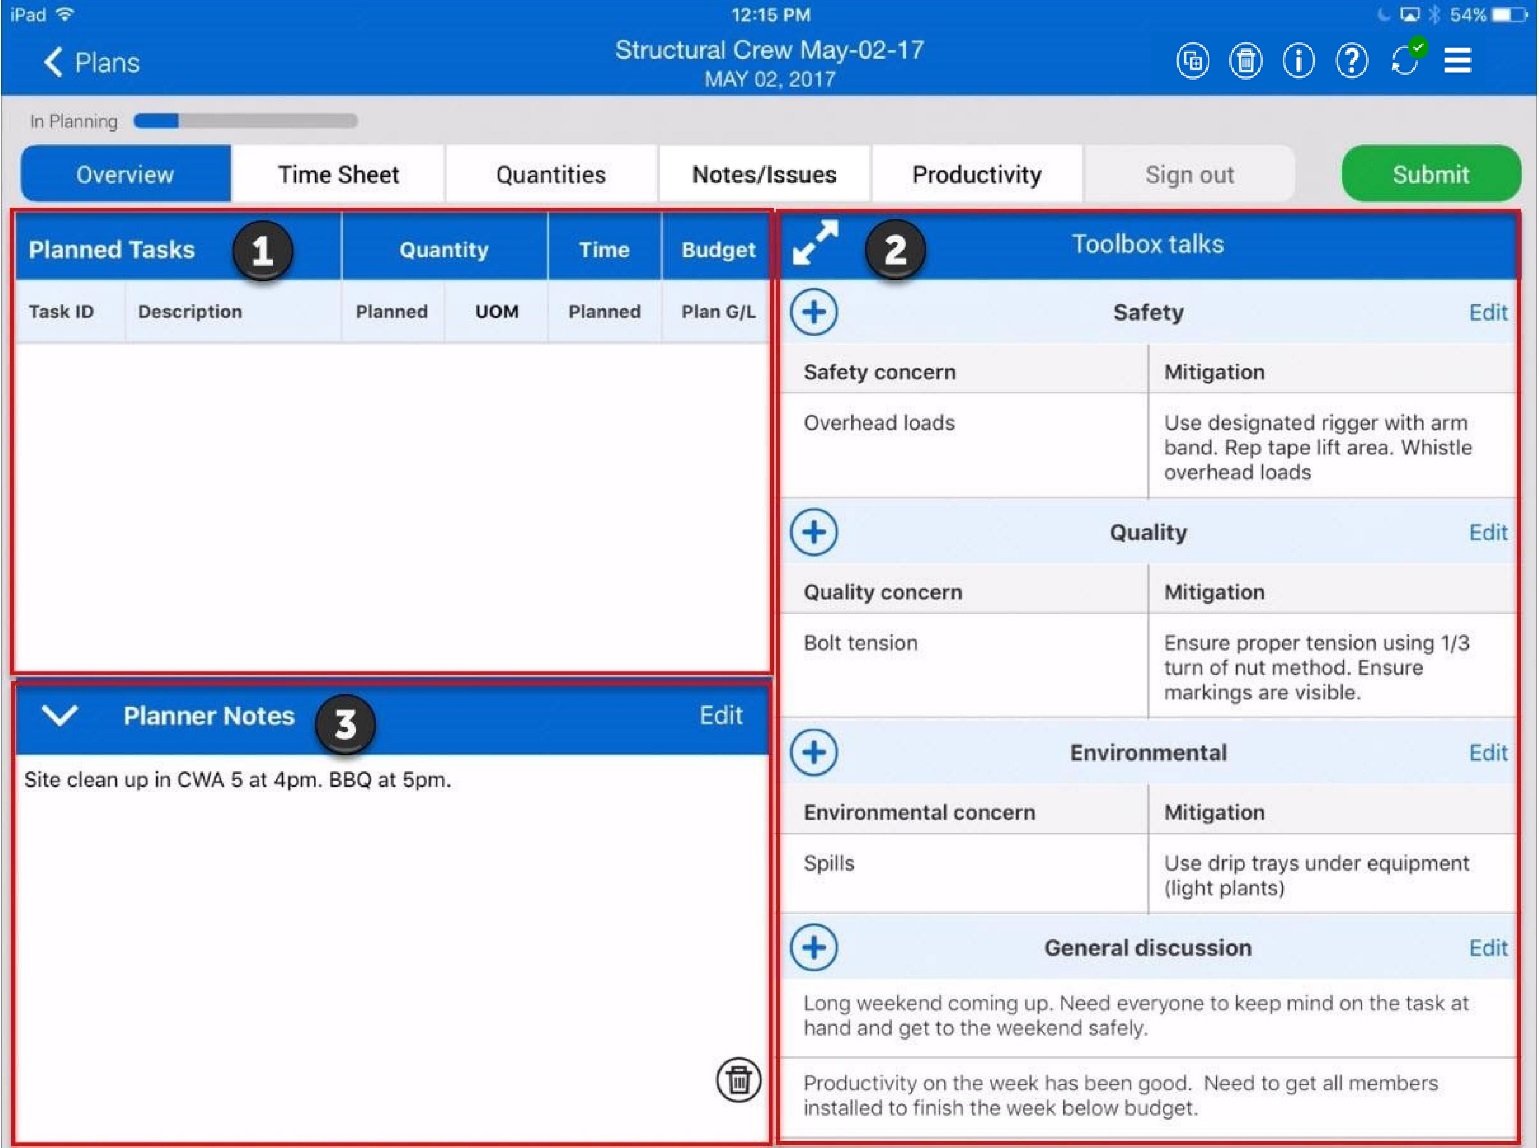
On the Overview tab, you can:
Add tool box talk items by tapping the  icon
icon
Tap the  icon to expand to a larger view
Minimize planner notes by tapping the  icon
icon
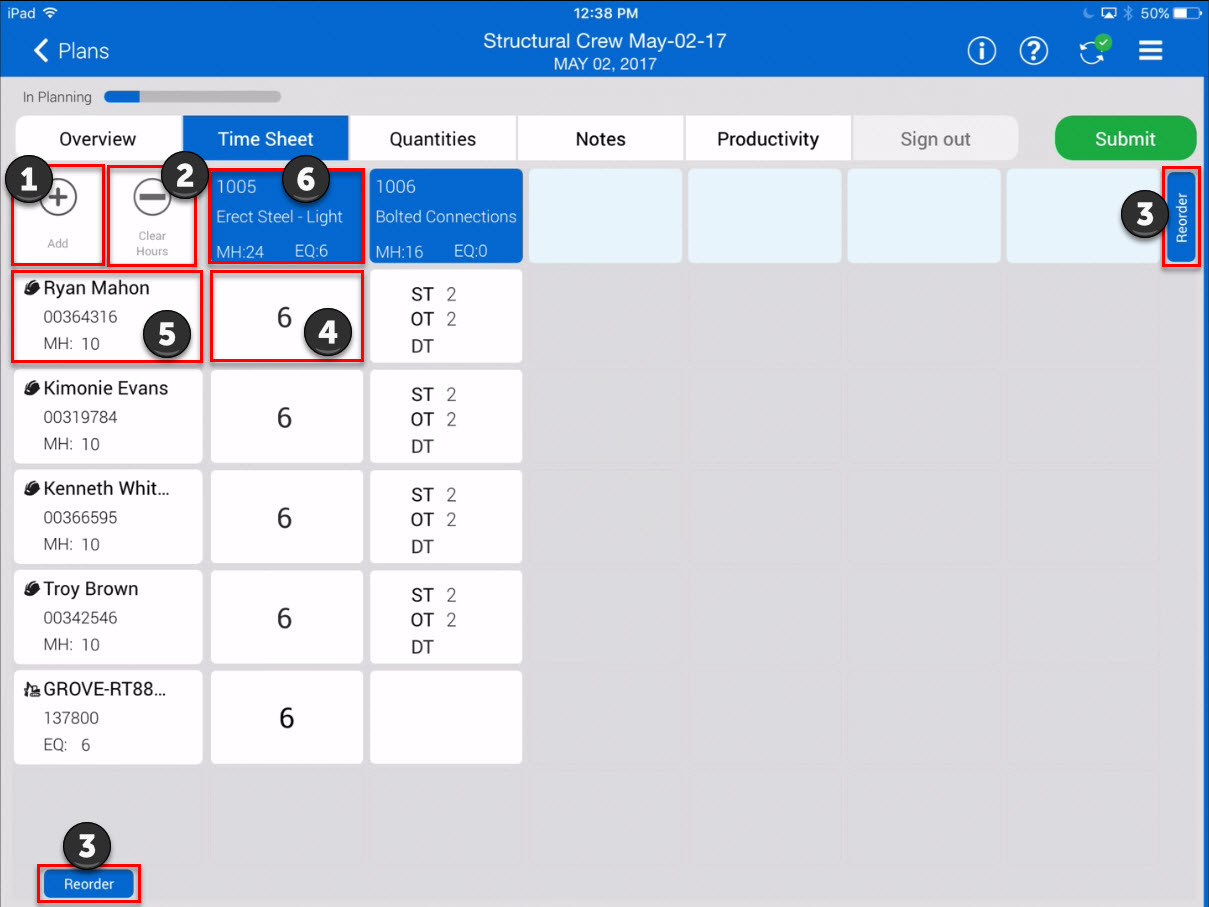
On the Time Sheet tab, you can enter all your tasks, employees and equipment and assign hours to each. The table below explains key navigation points.
|
Title |
Description |
|
|---|---|---|
|
1 |
Add |
Tap here to add tasks, employees and equipment. (Further explained below.) |
|
2 |
Clear Hours |
Tap here to clear all hours from the time sheet. |
|
3 |
Reorder |
Tap here to reorder tasks, employee and equipment in the time sheet. |
|
4 |
Enter Hours |
Tap here to enter hours (ST, OT, DT) for employees and equipment. |
|
5 |
Employee / Equipment Details |
Tap here to mark attendance, enter extra pay, temporarily change billing class, add notes, delete row, or clear hours. |
|
6 |
Task Details |
Tap here to enter total task planned hours, add notes, swap task or delete task. |
When adding tasks, employees, or equipment, the Add slide out panel appears as shown below.
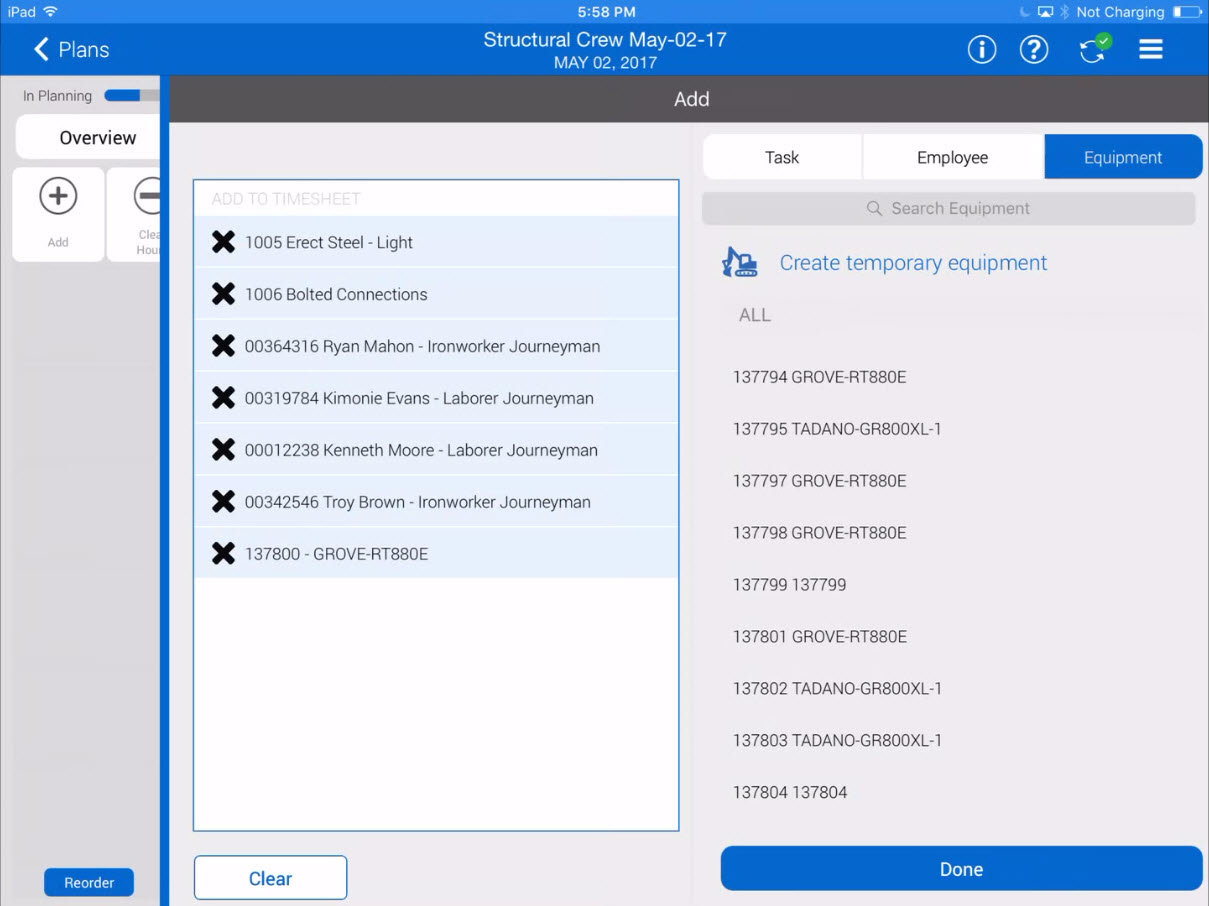
View your lists of all available tasks, employees and equipment by tapping on the appropriate tab at the top of the window
Once selected from a list, items appear on the left-hand side of the window under Add To Time Sheet as shown above
Tapping on the X next to an item removes it from the list
If an item you require is not available in the list, you can add a temporary task, employee or equipment by selecting Create Temporary Task, Create Temporary Employee, or Create Temporary Equipment
When you are satisfied with the list to be added to the Time Sheet, tap Done to return to the time sheet
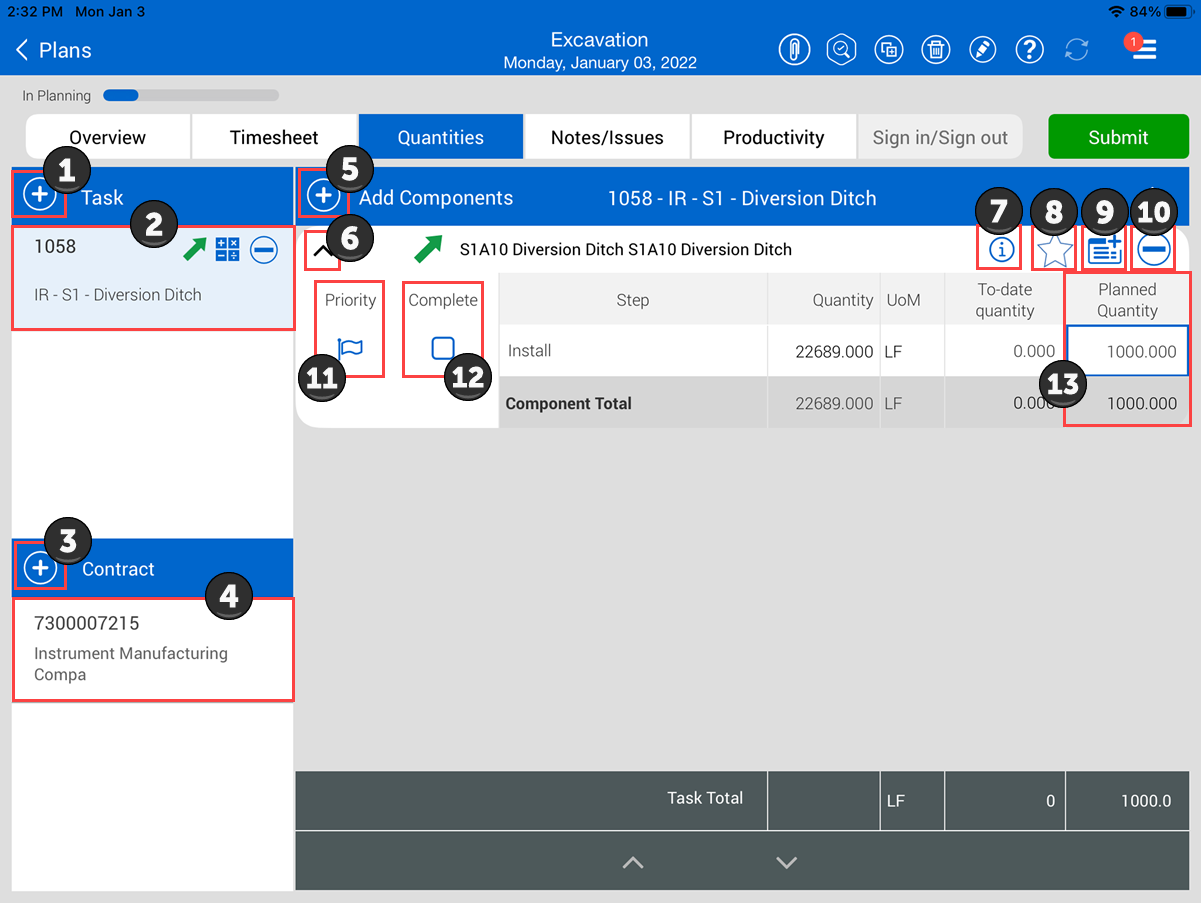
In the Quantities tab, you select components for each task. If you plan to use claiming rules with multiple steps, you can choose which steps you plan to complete. You can also indicate which components are higher priority.
|
Title |
Description |
|
|---|---|---|
|
1 |
Add task |
Tap here to add additional tasks. Resource hours must be assigned back in the Time Sheet tab. |
|
2 |
Select task |
Tap here to show or add components for the selected task. |
| 3 | Add contract | Tap here to add contracts. |
| 4 | Select contract | Tap here to show or add components for the selected contract. |
|
5 |
Add Components |
Tap here to add components for the selected task or contract by selecting from a list. |
|
6 |
Expand / Collapse |
Tap here to expand and collapse individual component details. |
| 7 | Information | Tap here to show a description of the component. |
| 8 | Favorite | Tap here to add the component to your favorites. |
|
9 |
Add note |
Tap here to add a note or issue associated with an individual component. |
|
10 |
Delete component |
Tap here to delete a component. |
|
11 |
Priority |
Tap here to mark a component step as a priority. |
|
12 |
Complete |
Tap here to select a component step to complete as part of the daily plan and add the corresponding quantity to the planned quantity. |
|
13 |
Planned Quantity |
Tap here to enter the planned quantity for a component step, providing the planned quantity does not exceed the component quantity. |
| 14 | View Planning slide-out panel | (Not pictured. See Daily Plan from Scratch) Tap here to view the quantity needed to break even for the selected task. Or you can manually enter any quantity to see how it would affect the gain/loss for the selected task. |
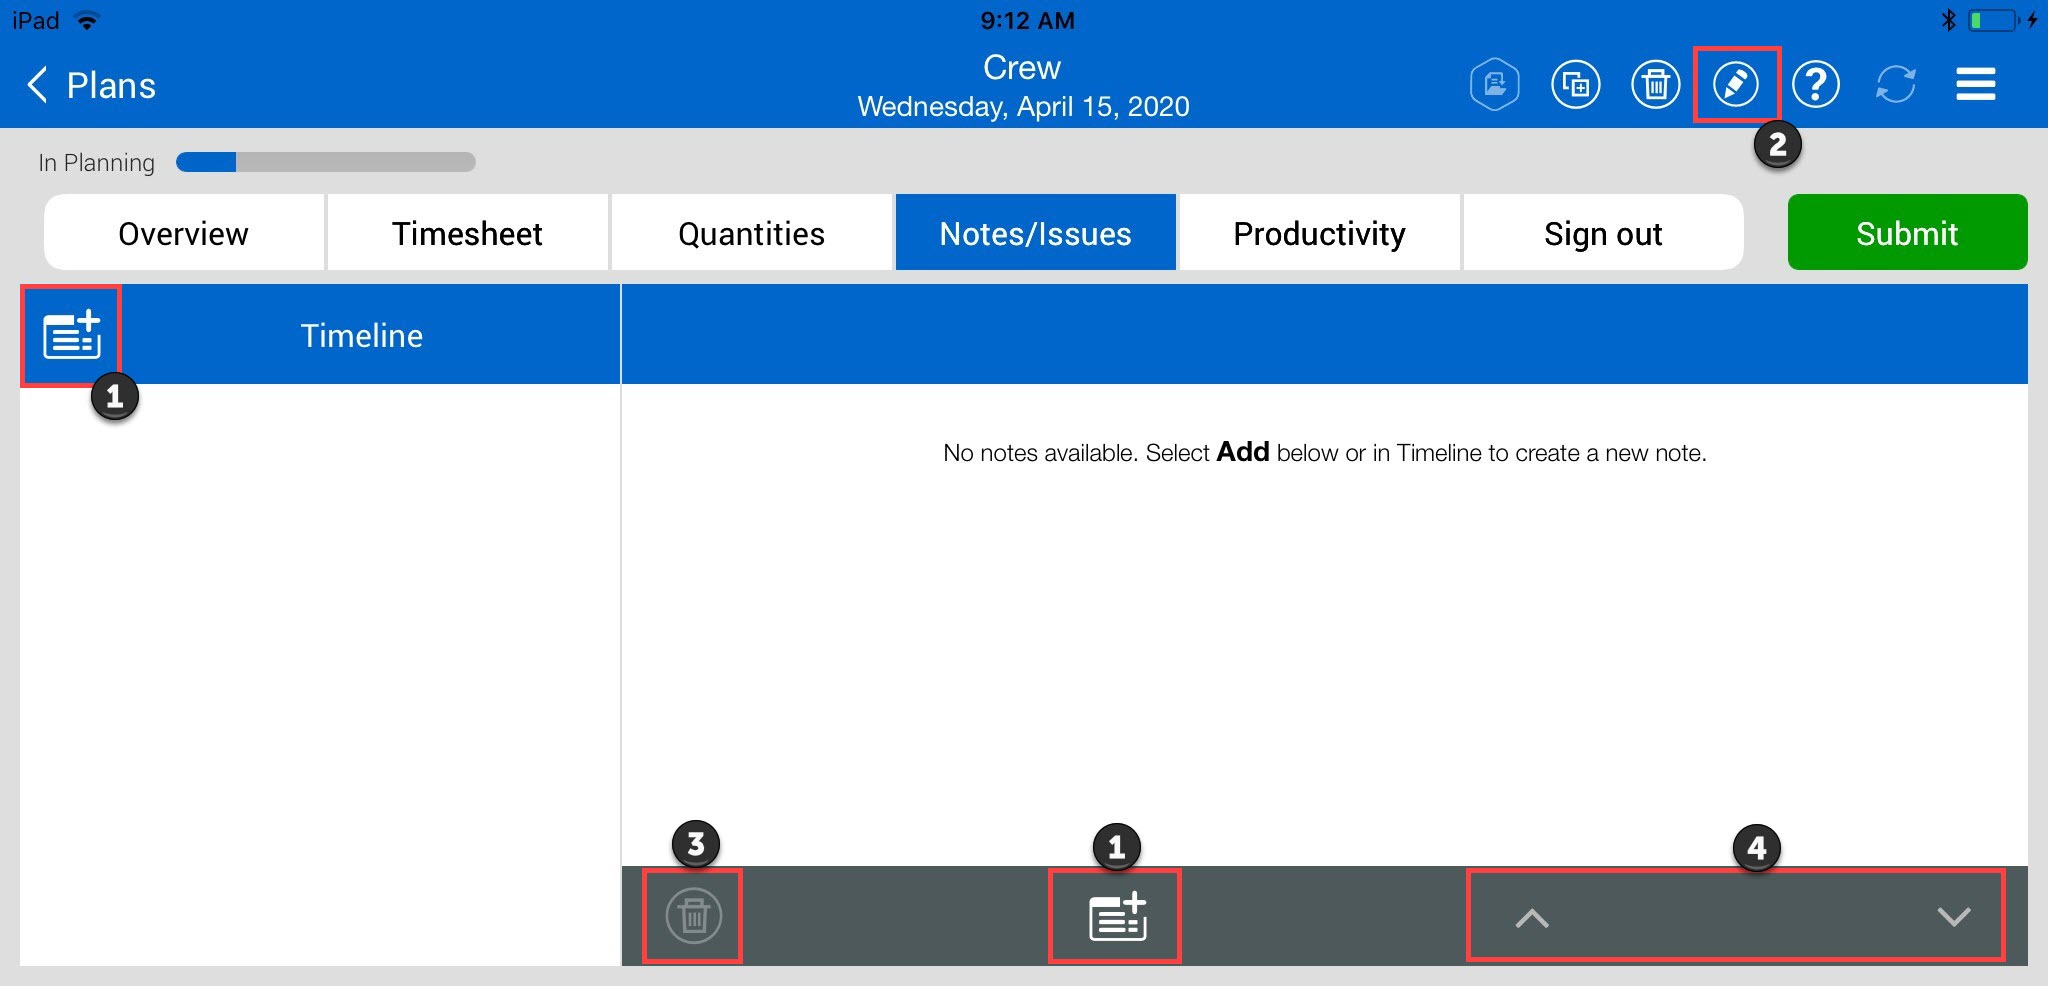
The Notes/Issues tab is where you can enter additional information regarding a task or component for the crew to be aware of when they execute the plan. You can add safety, quality control, environmental, subcontract, and other information. If an issue is added it will automatically show up on the issue log in the InEight Change application.
|
Title |
Icon |
Description |
|
|---|---|---|---|
|
1 |
Add |
|
The Add button allows you to add a note or issue under the Notes/Issues tab. |
|
2 |
Edit |
|
The Edit button allows you to make changes to an existing note. |
|
3 |
Delete |
|
The Delete button allows you to remove existing notes. |
|
4 |
Arrow Up Arrow Down |
|
The Arrow button allows you to navigate through the list of notes up or down. |
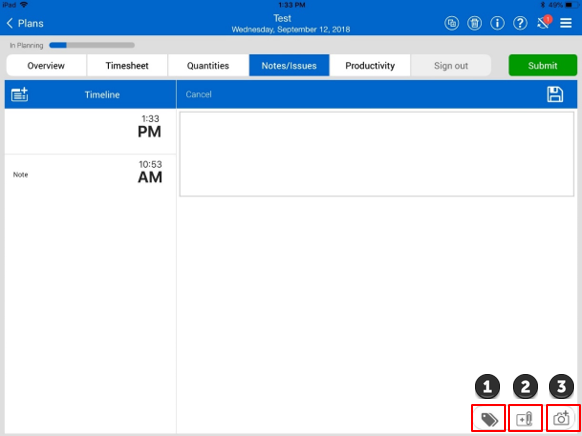
When you add a new note or issue, three icons will appear at the bottom. The following overview explains these icons.
|
Title |
Icon |
Description |
|
|---|---|---|---|
|
1 |
Tags |
|
The Tags button allows you to add tags to your notes. The following tags are available:
|
|
2 |
Associations |
|
The Associations button allows you to associate the note with a specific task, employee, equipment, components, or vendors. |
|
3 |
|
The Photo button allows you to add a picture to a note. The photo can either be taken from the device’s camera or from the saved photos on the device. |
|
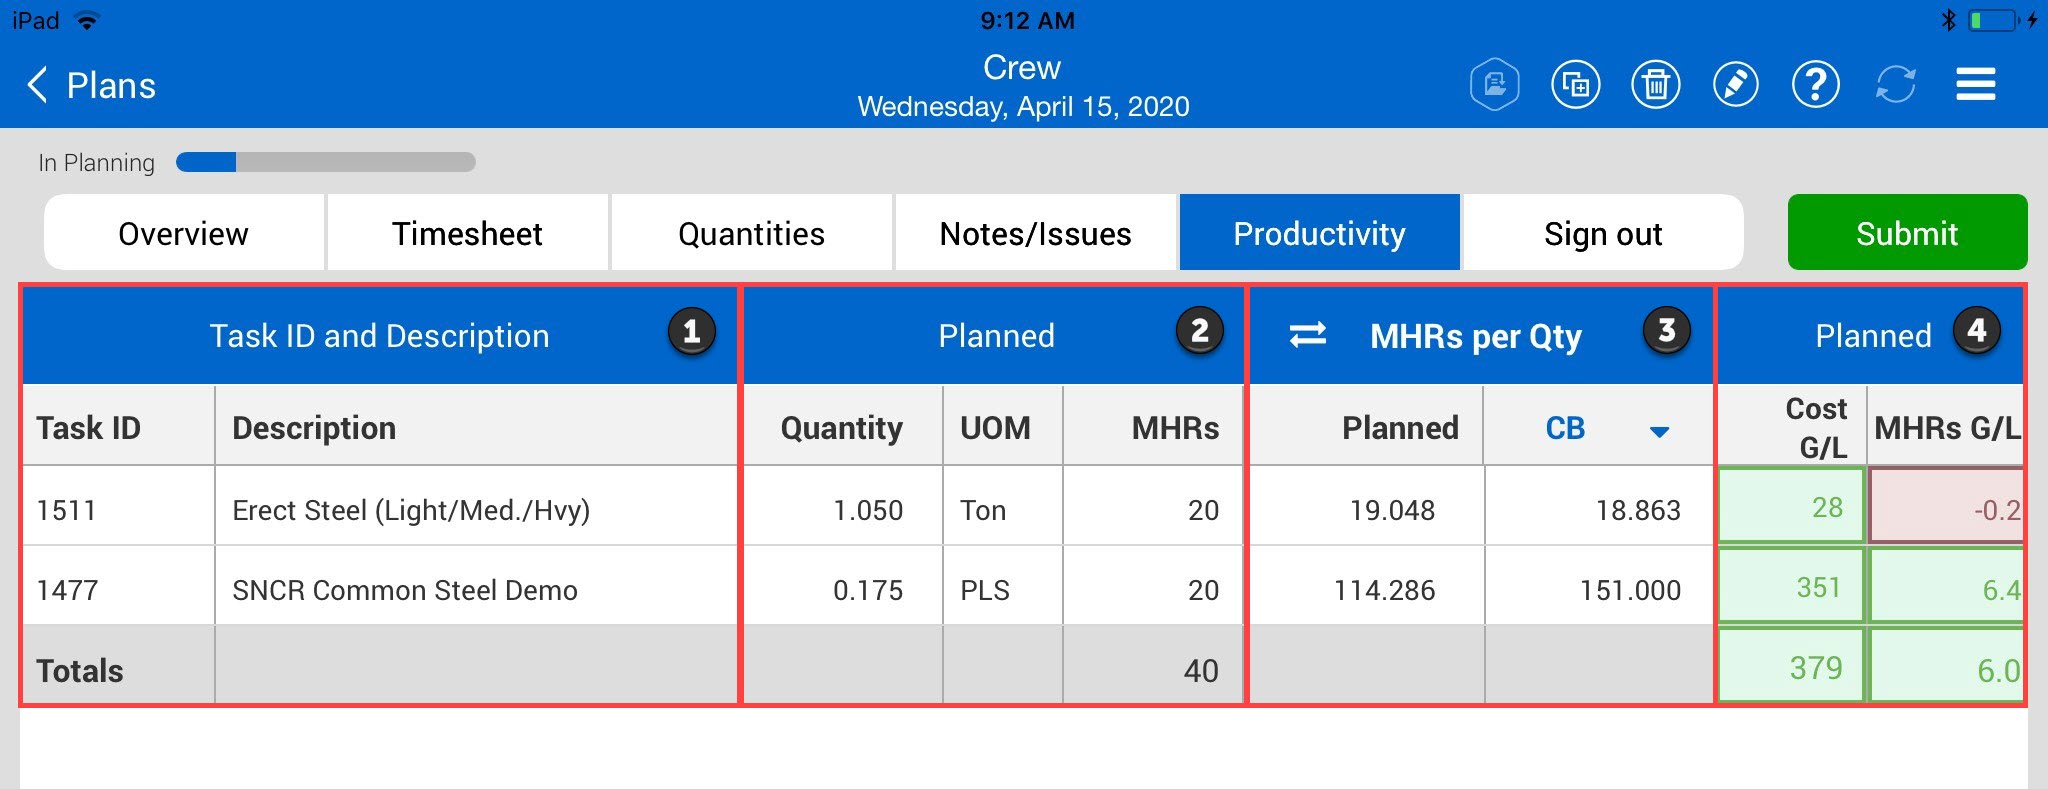
The Productivity tab is where you can review the planned quantity and man-hours in comparison to current budget, current estimate, and forecasted or goal unit rates which shows your planned gain/loss.
|
Title |
Description |
|
|---|---|---|
|
1 |
Task ID and Description |
Indicates the tasks planned for the crew to perform that day. |
|
2 |
Planned |
Displays the plan information you entered in the Quantity tab (quantity, unit of measure, and man-hours). |
|
3 |
MHRs per Qty |
Compares the planned values to the current budget values. |
|
4 |
Planned |
Displays gain/loss for planned $/mhrs compared to budget. |
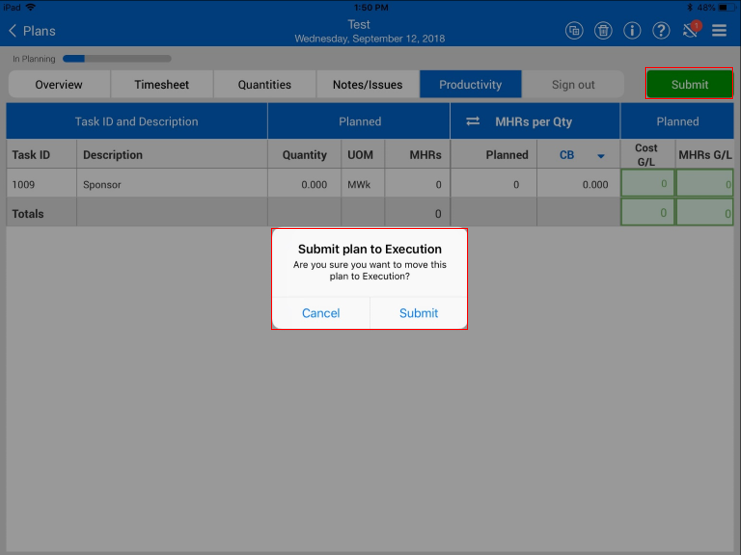
After reviewing the planned information in the Productivity tab and confirming that the employees and equipment you have are accurate for the tasks, you can tap on the Submit button.
When you tap on the Submit button, a warning pop-up window appears asking if you are sure you want to move the plan to Execution.
Daily Plan information will remain in the sync platform until you tap the sync button. Once you tap Sync, the Daily Plan information becomes available in the InEight Progress web application for review by the superintendent or engineer.
A Daily Plan still in the planning phase and created in the mobile app will not be available in the web app until it’s moved to the execution phase and synced. A Plan ID is assigned once the Daily Plan is in execution in the mobile app.
Paul can review the daily plan by navigating through each tab in the navigation bar and reviewing the data in each tab.
Additional Information
9977 N 90th Street, Suite 250 Scottsdale, AZ 85258 | 1-800-637-7496
© 2024 InEight, Inc. All Rights Reserved | Privacy Statement | Terms of Service | Cookie Policy | Do not sell/share my information