Completing a Daily Plan
You have just finished creating a new daily plan using the Daily Plan Wizard. However, some specific information was not available on the work package. You will now add this information to inform your crew.
Once you finish creating your daily plan via the Daily Plan Wizard, the next step is to assign specifics to your plan. In other words, even though you already populated the basic information via the Daily Plan Wizard you are still missing some important information required to execute the intended work. For example, you still need to enter the planned quantities or components and claiming steps to be completed and hours each employee and/or piece of equipment will work for the day.
This planning phase is crucial to making sure the work executes efficiently and on budget. To complete this phase, you'll move from InEight Plan to InEight Progress.
|
Title |
Description |
|
|---|---|---|
|
1 |
Main Menu |
Shows the selected project and provides access to favorites, All projects and organizations, reports, master data libraries, and suite administration. |
| 2 | Home | Opens your user home page. |
|
3 |
Notifications and User Profile |
Allows you to view notifications and your user profile or to log out. |
| 4 | App launcher | Opens applications and modules. |
|
5 |
Breadcrumbs |
Navigational links that allow you to track your path from the page you are currently viewing back to the daily plans page. Furthermore, identifies what and where you are within the daily planning module. |
| 6 | Tabs | Allow you to navigate between different functions on a page. The blue underline indicates what tab you are currently viewing. |
|
7 |
Toolbar |
Contains functions for the page you are on: add, edit, delete, copy, and Employee Register. |
|
8 |
Daily Plan Register |
Contains a list of all your daily plans. |
| 9 | Column Chooser | Allows you to add or hide columns from your user specific register view. |

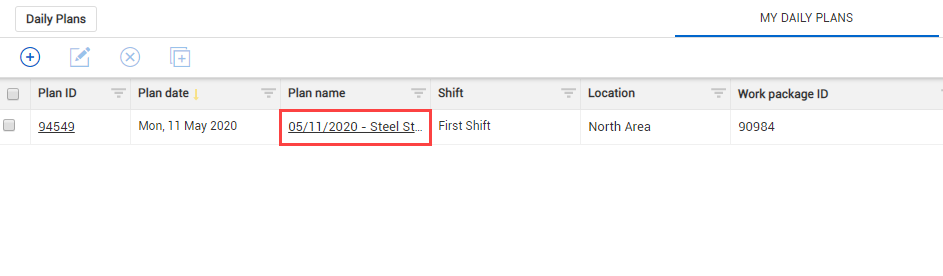
Daily Plans Page
To begin the Planning Phase of a daily plan, you must first open a daily plan. In the following Step by Step, you will navigate to the Daily Plans page and then open a daily plan.
Open a Daily Plan
-
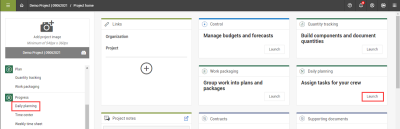
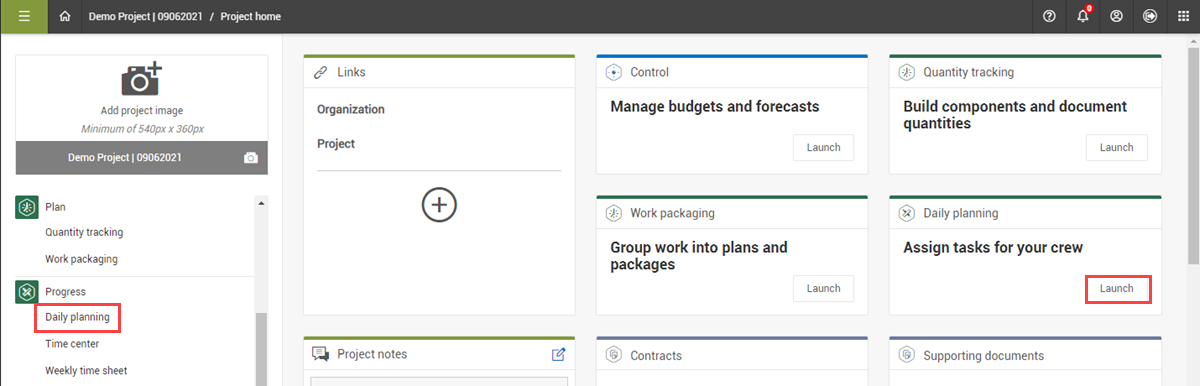
From your project home page, open the Daily planning module of Progress. The Daily plans page opens to a list of your daily plans.
-
Click on your daily plan's name.


When opened for the first time, a daily plan is in the planning phase by default and opens to the Details tab. In the planning phase, there are six different tabs where you can enter plan information.
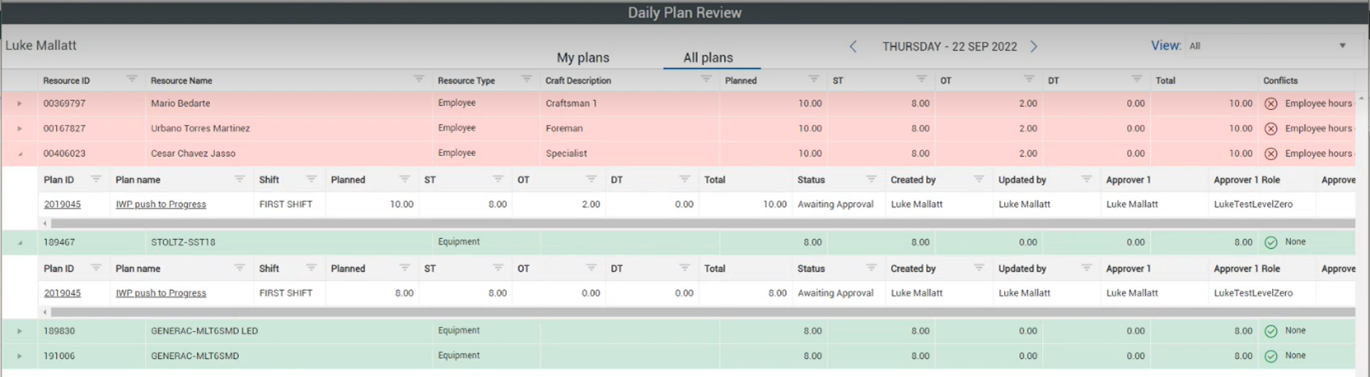
Equipment review
In Daily Plan Review, you can select employees or equipment and filter by date. A live report shows all resources that are being used. You can make adjustments by clicking the plan name.
The following sections give an overview of each tab of the Planning Phase of the daily plan and include Step by Steps to enter additional information where applicable.
Overview Tab
The Overview tab provides a summary level of all information related to the current daily work plan. The fields on this tab lets you modify basic daily plan information, approvers, executors, and associated work plans and vendors.

Details Tab
The Details tab is the default tab that displays when you open a daily work plan. The Details tab provides a summary level of all information related to the current daily work plan. This includes the capability to modify the plan description, plan date, location, approvers, executors, and work plan/package number.
|
Title |
Description |
|
|---|---|---|
|
1 |
Overview data block |
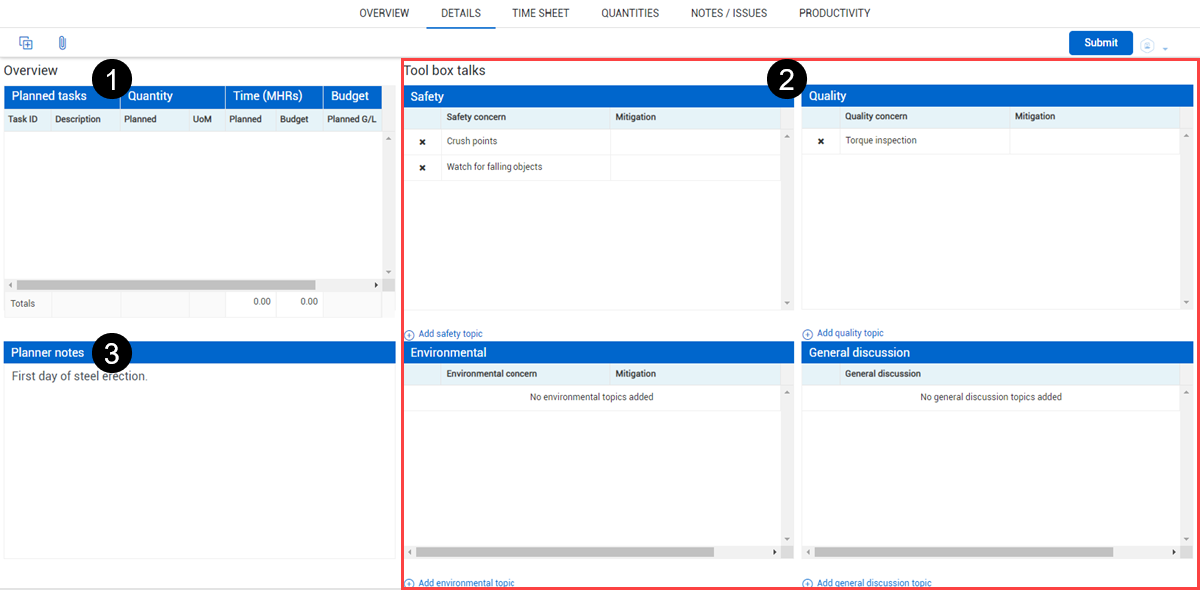
Shows the tasks, employees, hours, and quantity you are planning on having or completing the next day. This is a useful tool for the foreman to review with their crew as a morning meeting. |
|
2 |
Tool box talks data blocks |
Provides important messages on the concerns and mitigation measures for various risks which should be reviewed by your crew. |
| 3 | Planner notes data block | Lets you enter daily plan notes in an easily accessible section. |
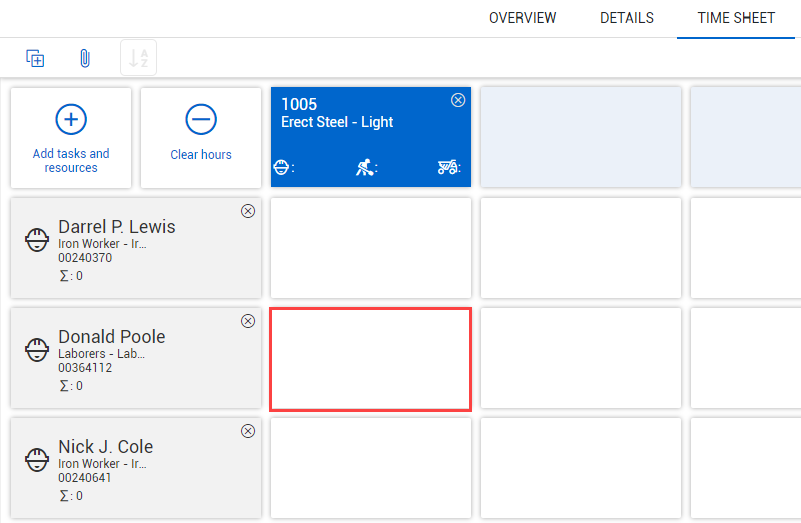
Time Sheet Tab
The Time Sheet tab is primarily used for entering the planned man-hours for each resource on each task. You can also add resources and tasks to the daily plan in this tab as needed. You can also add notes and assign or tag them to specific tasks or resources in this tab.
|
Title |
Description |
|
|---|---|---|
|
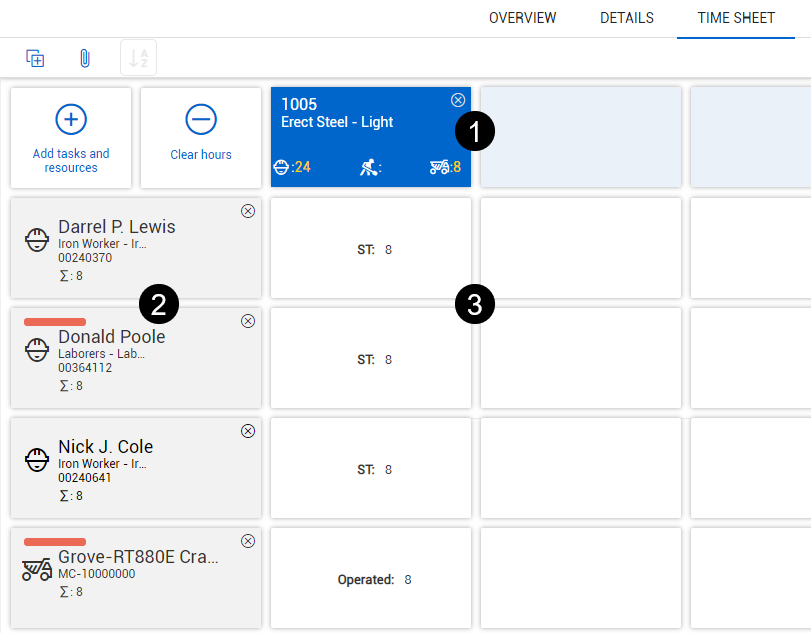
1 |
Task columns |
All tasks that are to be worked are shown here. |
|
2 |
Resource rows |
All resources being used are shown here. |
|
3 |
Hours entry area |
Hours for each resource on a given task are entered here. |
The following steps walk you through entering planned employee hours into a daily work plan. You must have added an employee and a task to the time sheet.
These steps assume that your project has reason codes enabled. If you do not use reason codes, the labor hours entry dialog box looks slightly different.
Enter planned employee hours into a daily plan
-
Open your daily plan.
-
Click on the Time sheet tab.
-
Click in the hours entry cell for your first listed worker. The Labor Hours dialog box opens.
-
Click the Add icon, and then select a reason code.
-
Enter the number of hours you expect the employee to work in the blank field, and then click Done.
You can also click the Premiums
 icon to apply premiums to hours if they are set up for your project.

Apply hours to multiple employees
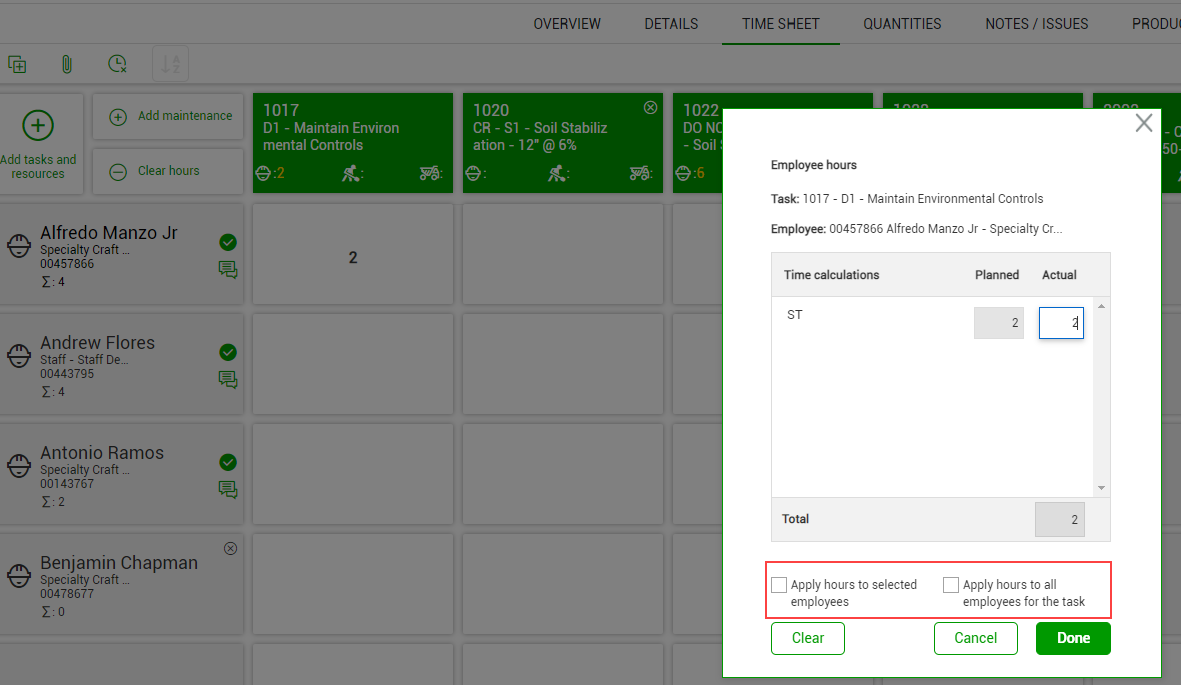
You can apply hours to multiple employees on the web. When you click the intersection of an employee and a task, the Employee hours dialog box now has the following options:
-
Apply hours to selected employees: This option lets you select the intersections of employees and tasks to apply the entered hours. When you are finished selecting intersections, click Done.
-
Apply hours to all employees for the task: This option automatically applies the entered hours to all employees.
The following steps walk you through entering planned equipment hours and operator hours for an employee into a daily plan. You must have added an employee, a piece of equipment, and a task to the time sheet.
These steps assume that your project has reason codes enabled. If you do not use reason codes, the labor and equipment hours entry dialog boxes look slightly different.
Enter planned euipment hours into a daily plan
-
Open your daily plan.
-
Click on the Time sheet tab.
-
Click in the hours entry cell for your first listed worker. The Labor Hours dialog box opens.

-
Click the Add icon, and then select the Operate Equipment reason code. Click Done.
The Operate Equipment reason code might be called something different depending on how reason codes are set up for your organization.
-
Enter the number of hours you expect the employee to operate the equipment in the blank field.
-
Click the Equipment icon, and then select the piece of equipment the employee will be operating. Click Done.

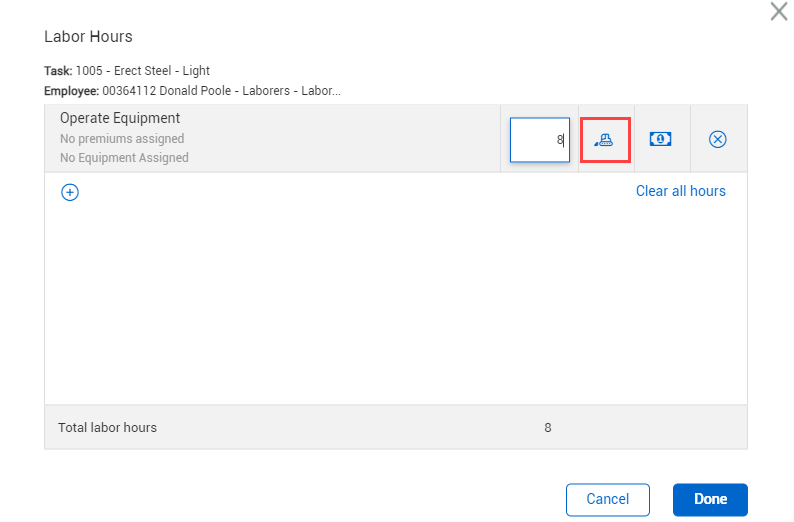
Click Done.
You can also add equipment hours without an operator by clicking the hours entry field for the equipment, and then adding hours only to the equipment.
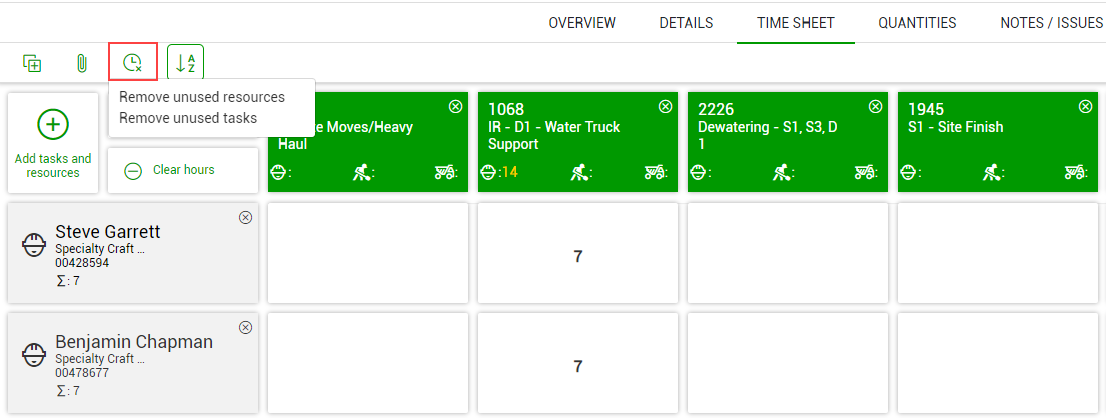
Remove unused tasks and resources
You can remove all unused tasks or resources from a daily plan at the same time. At the top of the Time Sheet tab, click the Remove unused tasks and resources icon, and then select one of the following options:
-
Remove unused resources: All employees with no daily plan data associated with them are removed from the daily plan.
-
Remove unused tasks: All tasks with no daily plan data associated with them are removed from the daily plan.
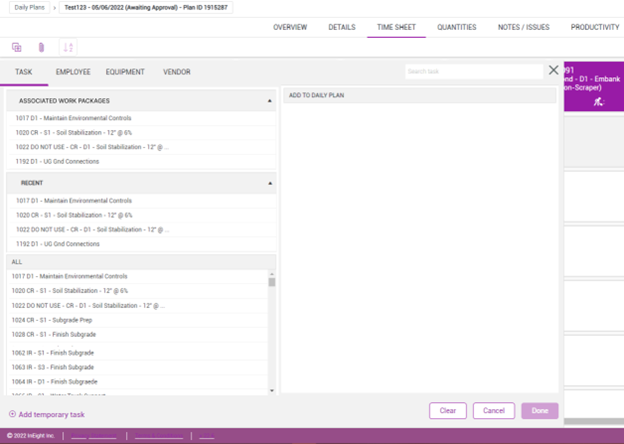
Resources Association
When adding resources in time sheets, you can access associated work packages. When selected and added to the plan, the associated work packages will no longer show. A work package in IWP must have resources, equipment, labor, or components with tasks or WSB associations, to bring values into the relevant fields.
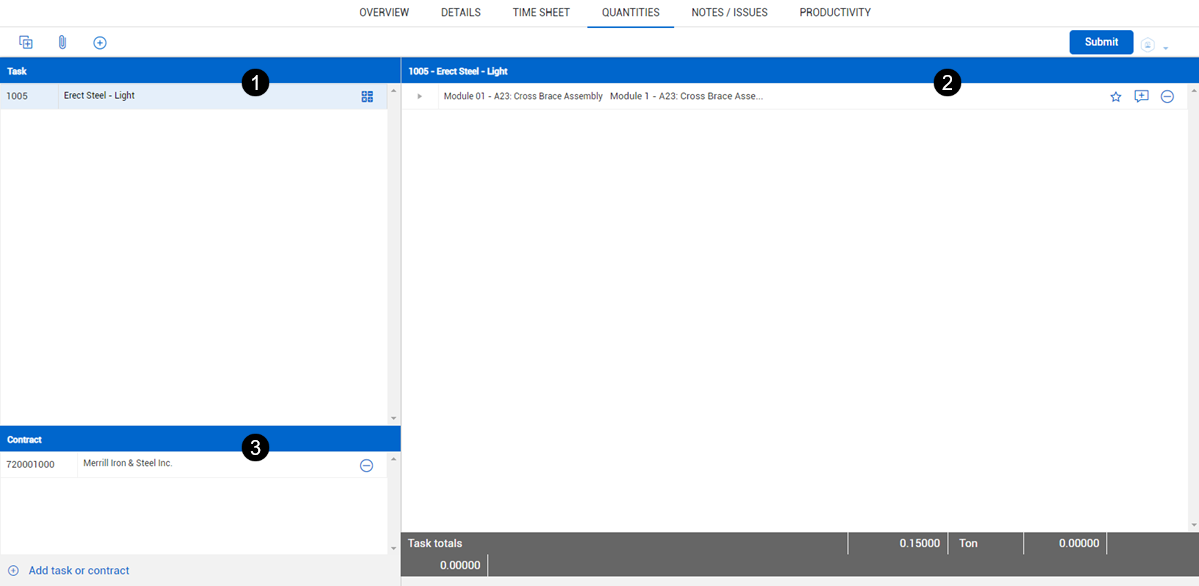
Quantities Tab
The Quantities tab is where you can view, add, or remove the components assigned to each task in your daily plan. The Quantities tab is also where you input the planned quantities to be installed for each component.
|
Title |
Description |
|
|---|---|---|
|
1 |
Task list |
Where all tasks assigned to the daily plan are listed. Tasks can also be added or removed here. The task on the quantities tab corresponds with the task column on the time sheet tab. Populating additional task in either location populates it in the other. |
|
2 |
Components list |
Where all components for each task assigned to the daily plan are listed. Components can also be added or removed here. |
| 3 | Contracts list | Where all contracts assigned to the daily plan are listed. Contracts can also be added or removed here. If contracts are not available, this area is not shown. |
The following steps walk you through how to input the planned quantity for components into a daily plan.
Enter planned quantities into a daily plan
-
Open your daily plan.
-
Click the Quantities tab.
-
In the components list, click the arrow next to your claiming scheme.
-
Select the Complete check box for the completed steps of the claiming scheme.
Selecting Complete indicates you plan for 100% of that step to be completed that day
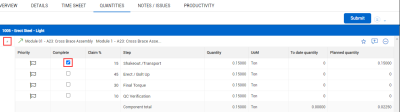
To calculate a breakdown of the cost and component quantities of a selected task, select the slide-out panel icon


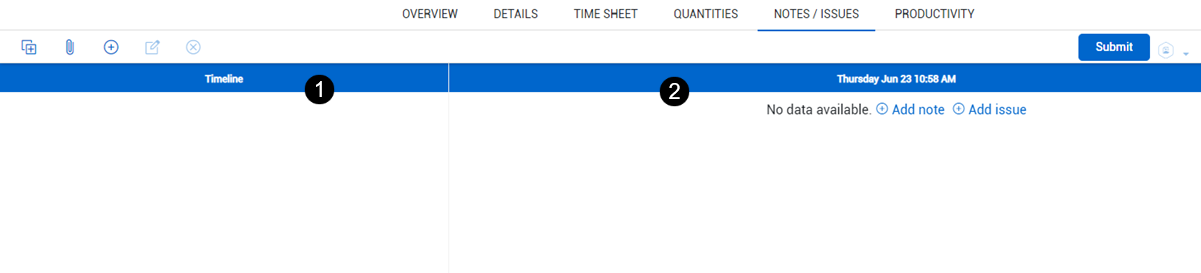
Notes/Issues Tab
The Notes/Issues tab is where you can enter additional important information pertaining to the daily plan. You can associate notes and issues to specific tasks, employees, equipment, and components as needed. You can also tag notes and issues with a variety of topics such as quality, safety, environmental, and many others.
If your company uses InEight Change, issues generated in Progress are imported to Change automatically for managing those issues, along with potential and contract change orders.
|
Title |
Description |
|
|---|---|---|
|
1 |
Timeline |
Where all notes for a daily plan display in a chronological order, with most recent at the top. |
|
2 |
Notes/Issues Creation Area |
Where notes and issues are created. |
The following Step by Step walks you through how to create a note or issue, and add a tag, association, and photo to that note or issue.
Create a note or issue in a daily plan
-
Open your daily plan.
-
Click the Notes/Issues tab.
-
Click the Add icon in the upper left, and then select Add noteor Add issue.
If there are no existing notes, you can also click Add note or Add issue in the notes area on the right.

-
For a note, enter a description for the crew in the text field. For an issue, enter an issue name and issue start date.
For an issue, you can also select a task associated with the issue.
-
You can tag notes or issues. Tags are defined by your organization and project. Click Add tags, and then select a tag in the slide-out panel. Click Done to close the slide-out panel.
-
You can associate notes or issues with tasks, employees, equipment, and components in the daily plan. Click Add associations, and then select associations in the slide-out panel. Click Done to close the slide-out panel.
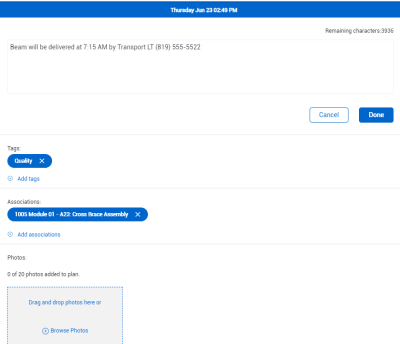
-
You can attach photos to a note or issue. Under Photos, click Browse Photos, and then select an image file. A preview of the photo is shown.
You can add up to 20 photos to a plan.
-
Click Done.


Productivity Tab
On the Productivity tab, you can:
-
Toggle the view to see planned production by man-hours per quantity or quantity per man-hours.
-
View the planned gain/loss in both dollars and man-hours against the current estimate, current budget, forecast, actuals, or goals, . Selecting the goals option will allow you to manually input a goal unit rate to compare planned and actual crew performance against.
-
View the Planned G/L.
|
Title |
Description |
|
|---|---|---|
|
1 |
Summary |
View a summary of the planned quantity, unit of measure and man hours for each task. |
|
2 |
Productivity toggle |
Switch the view to see planned production by man-hours per quantity or quantity per man-hours. |
| 3 | Productivity factor | View the gain/loss versus current estimate, current budget, forecast, actuals, and goals, in both dollars and man-hours. |
| 4 | Planned G/L calculator | Contains comparison formulas for the costs and man hours of your plan and your budget. |
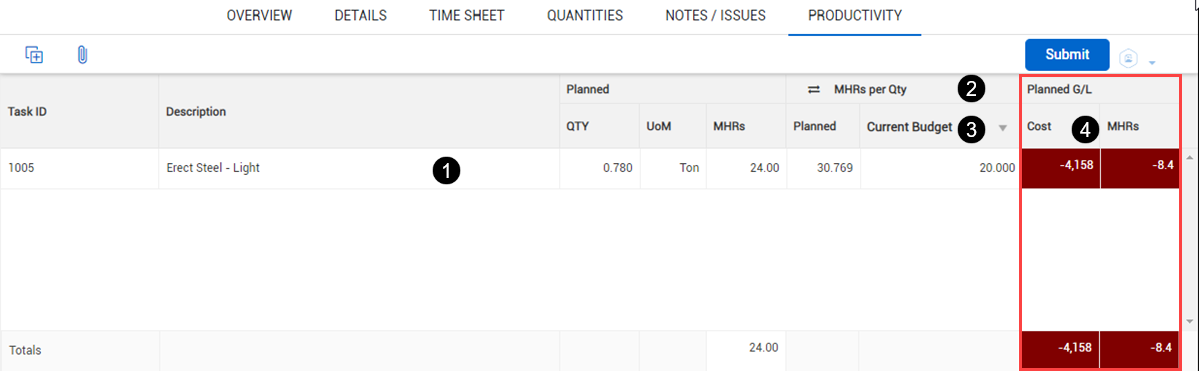
The Planned G/L compares the cost and man-hours of your daily plan to the costs and man-hours budgeted in InEight Control for the planned scope of work using the following equations:
-
Planned Cost G/L = (Sum of (Total planned quantity for the WBS * CE/CB/Forecast/Goals final unit cost) - (Planned total cost of labor + Planned total cost of equipment))
-
Planned total cost of labor = Sum of Total number of hours worked by the employee * Hourly rate of the employee
-
Planned total cost of equipment = Sum of (Total number of equipment hours operated * Hourly Unit rate of the equipment)
The following steps walk you through how to enter a goal productivity factor for a daily plan.
Enter a Goal Productivity Factor for a Daily Plan
-
Open your daily plan.
-
Open the Productivity tab. If needed, click the Productivity toggle button to switch to MHRs per Qty.
-
Click the Current Budget column header.
-
Select Goals from the drop-down list.
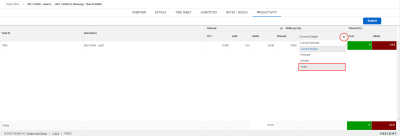
-
Enter your goal number rate of man hours per quantity in the free text box under the Goals column header.

Submit a Daily Plan to Execution
Once you have thoroughly filled out the daily plan, the final step is to submit the plan for execution. By submitting the plan to execution, you are ending the Planning Phase and verifying that the plan is ready to be handed off to a foreman for his crew to execute the work. Once you submit the plan, you cannot “un-submit”.
The following Step by Step walks you through how to submit a daily plan to the Execution Phase.
Submit a Daily Plan to Execution
-
Open your daily plan.

-
Click Submit in the upper right corner.
-
A dialog box opens verifying you want to submit the plan to execution
If you want to associate your work packages in InEight Document, select a Work plan or package ID - Name from the Overview tab. A new Document icon appears in the upper-right corner of the tab. Select this icon to see a drop-down list of work packages to open in Document.
-
-
Click Yes.