Products
Solutions
Resources
9977 N 90th Street, Suite 250 Scottsdale, AZ 85258 | 1-800-637-7496
© 2024 InEight, Inc. All Rights Reserved | Privacy Statement | Terms of Service | Cookie Policy | Do not sell/share my information


The project manager asks the scheduler to run scenarios to see if the pipe installation work can be expedited. The scheduler creates a what-if scenario to explore installing the pipe with two crews instead of one. He weighs the shortened durations against the increased costs and shares this information with the manager.
This section covers how to create a what-if schedule and compare it to your active schedule to determine impact.
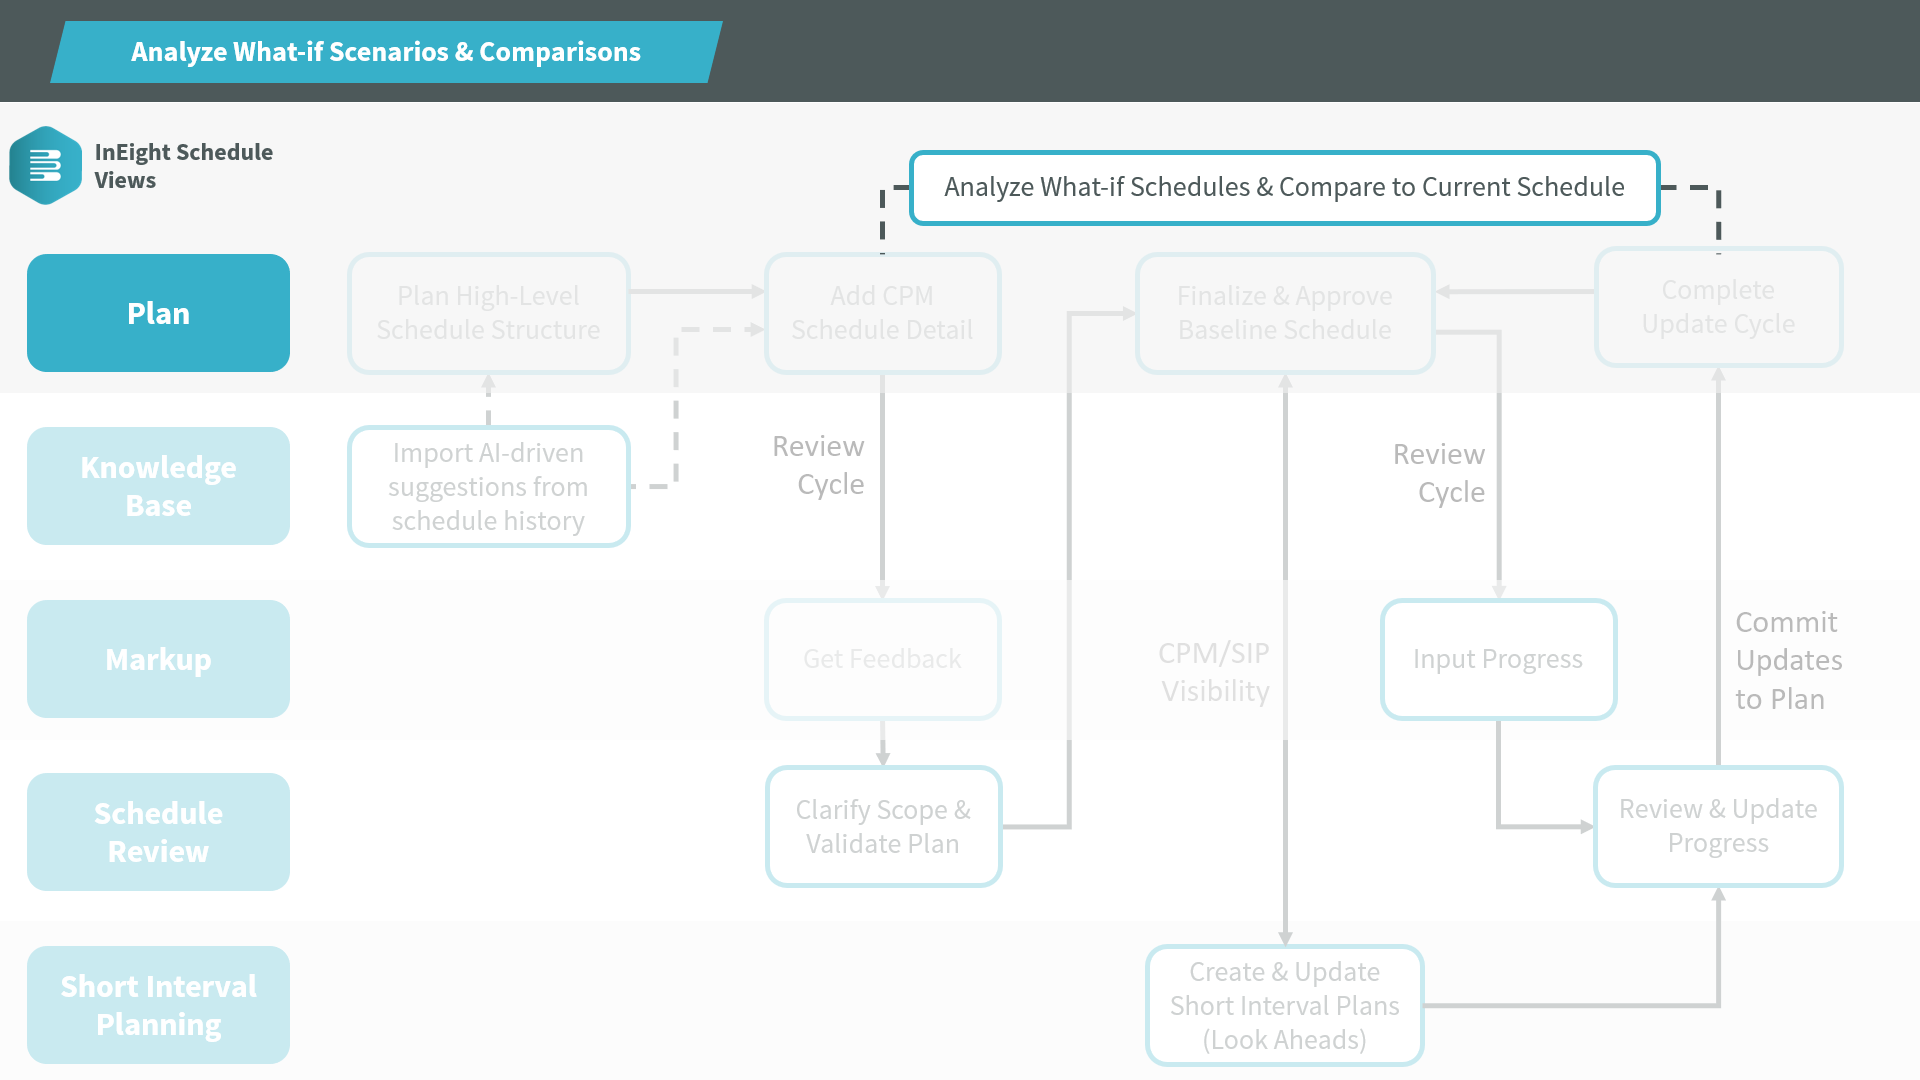
The following steps walk through how to create a what-if schedule for assessing impact.
From the Project List of InEight Schedule, select your Active Update schedule (the most recently approved schedule). Then click the Copy icon.
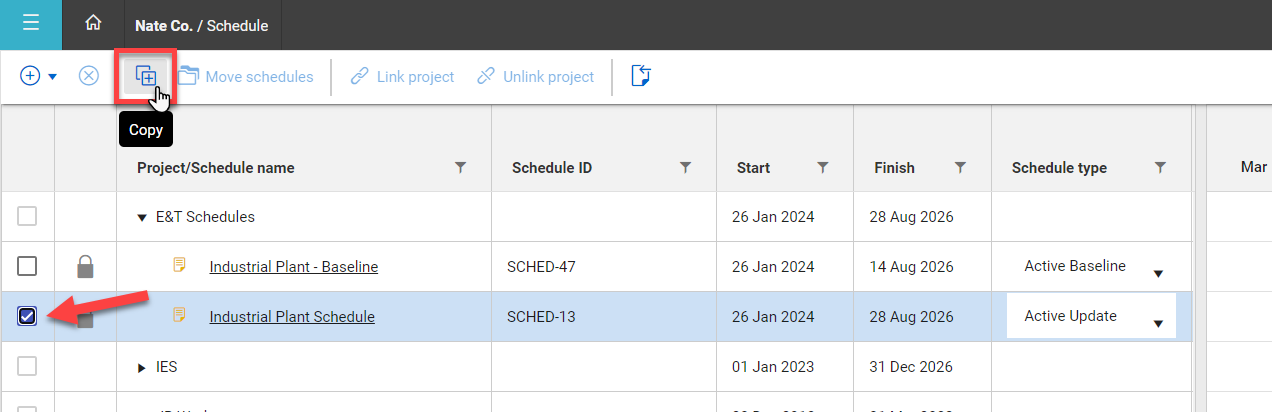
In the resulting window, input a name for the what-if schedule, then click Copy.
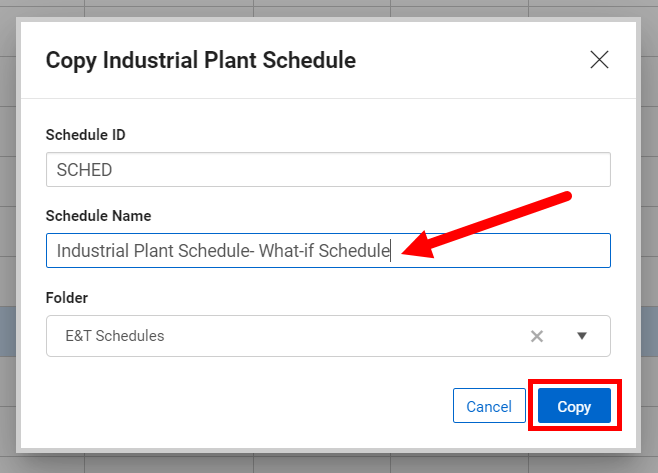
From the Project List view, change the Schedule type to What if.

In the What-if schedule you’ve created, you can make any changes necessary to explore alternate scenarios and how they affect durations and cost. This may include:
Adding or removing activities to represent different approaches to the work.
Editing durations and relationships of existing activities.
Editing resource hours, costs, and assignments.
Follow the steps below to see an example of exploring a new scenario in a what-if schedule.
As the scheduler, you’ve been asked to consider ways to expedite the pipe installation work. To explore your first scenario, you open the What-if schedule.
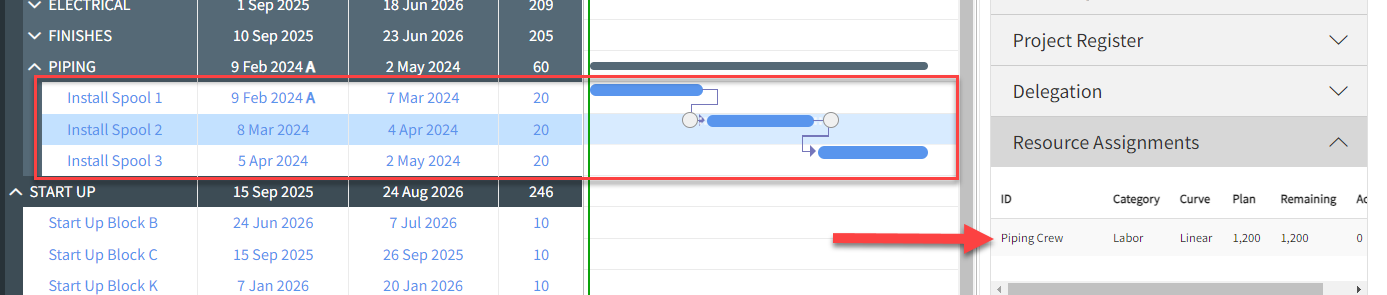
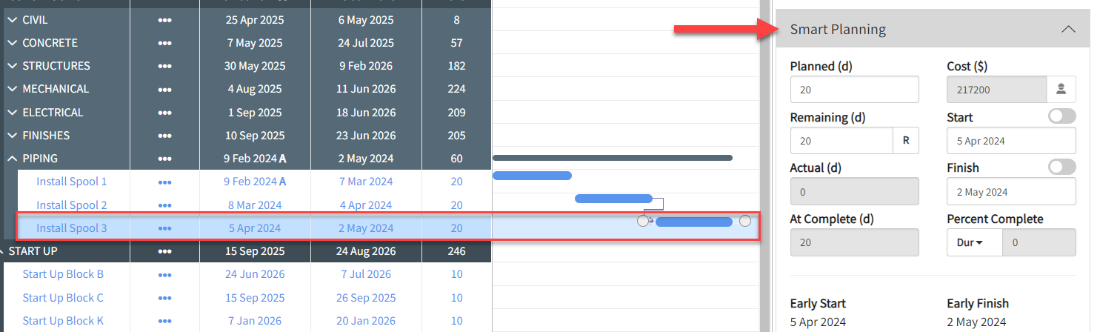
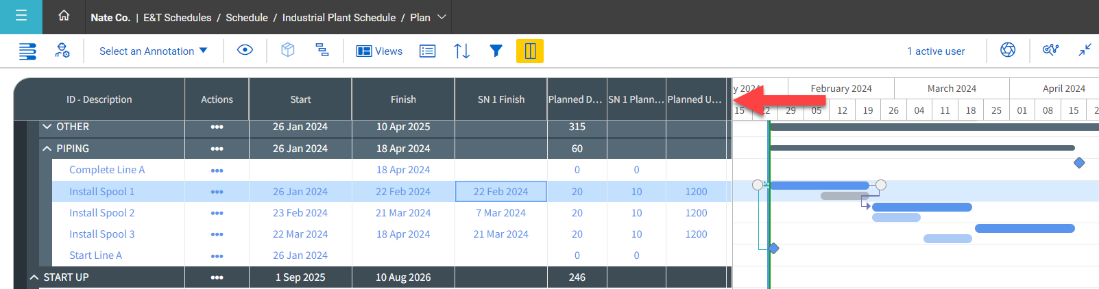
You select the Piping WBS and see that three installation activities are planned, each with one piping crew assigned as a resource.
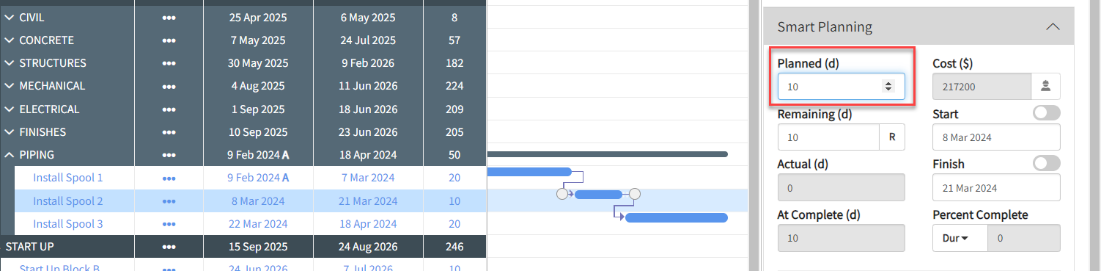
To explore a faster timeline, you select an installation activity. In the Iris panel, you expand Smart Planning.
You change the Planned duration to 10 days.
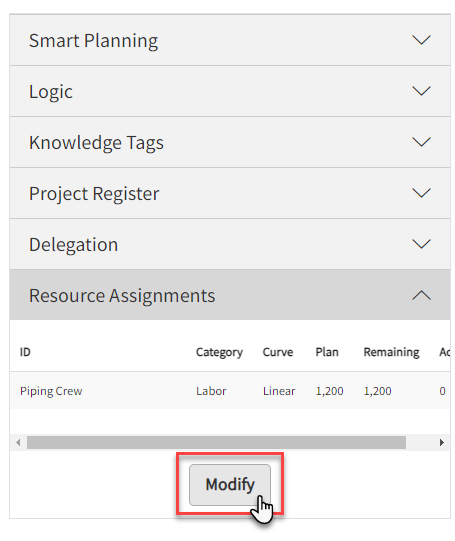
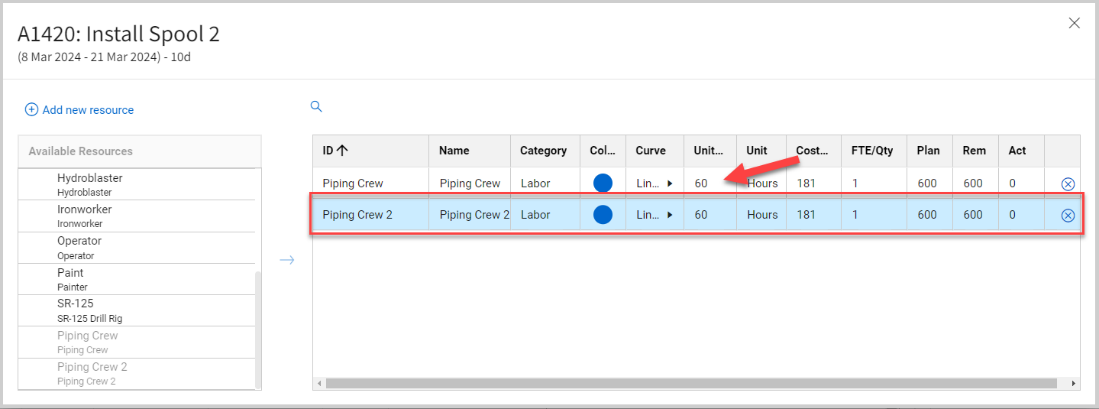
Next you check the impact of the duration change on your resources. Under Resource Assignments, you click Modify to see more details.
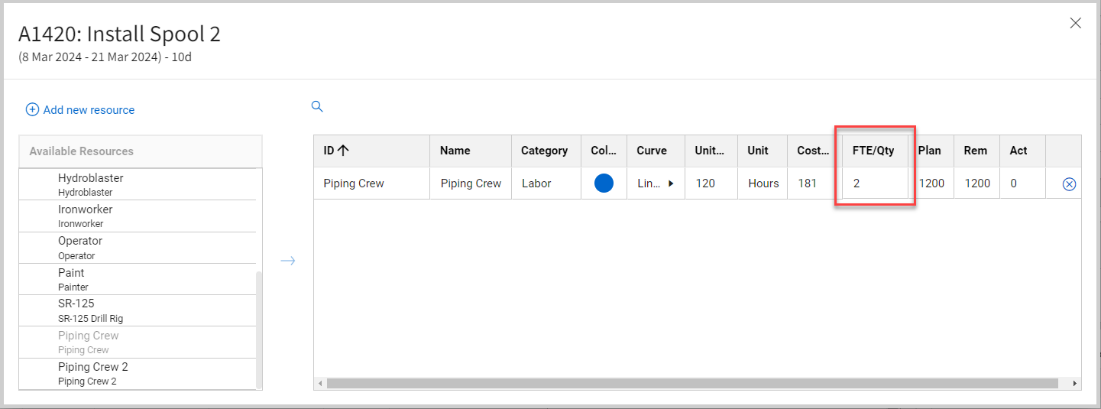
In the pop-up window, you see that the change in duration has increased the hours for the piping crew to a full-time equivalent (FTE) of 2.
You add a second piping crew to the activity and adjust the first crew’s hours back to 60, for a full-time equivalent of 1.
Now your changes have been applied, and you can continue making modifications to other areas of the what-if schedule.
Access the following link for additional information on managing resources.
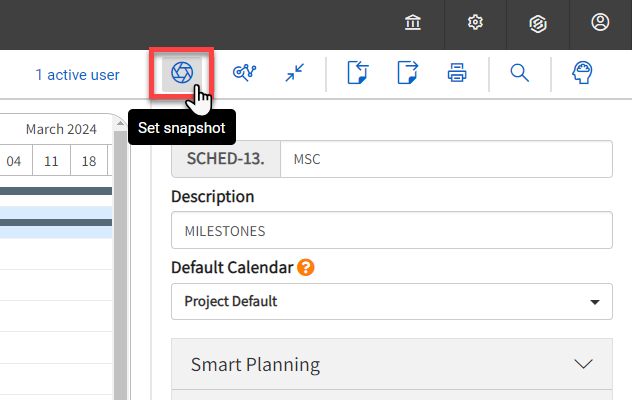
When you’ve finished making changes to the What-if schedule, you can use the Snapshot feature to compare it to the current schedule.
Follow the steps below to learn how to assign a snapshot.
Open the current (Active Update) schedule and click the Snapshot icon.
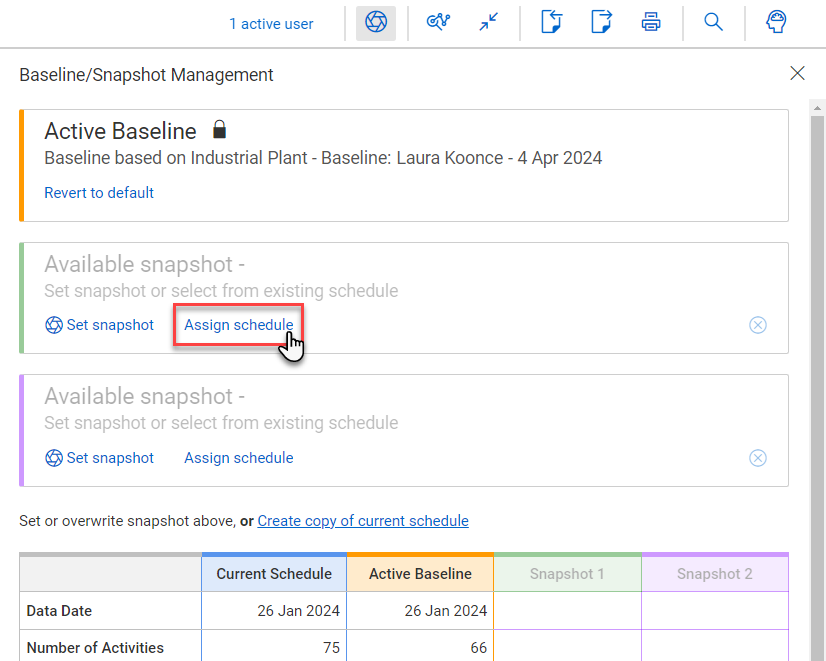
On the resulting slide-out, select Assign schedule under Available snapshot.
Select the What-if schedule, then click Save.
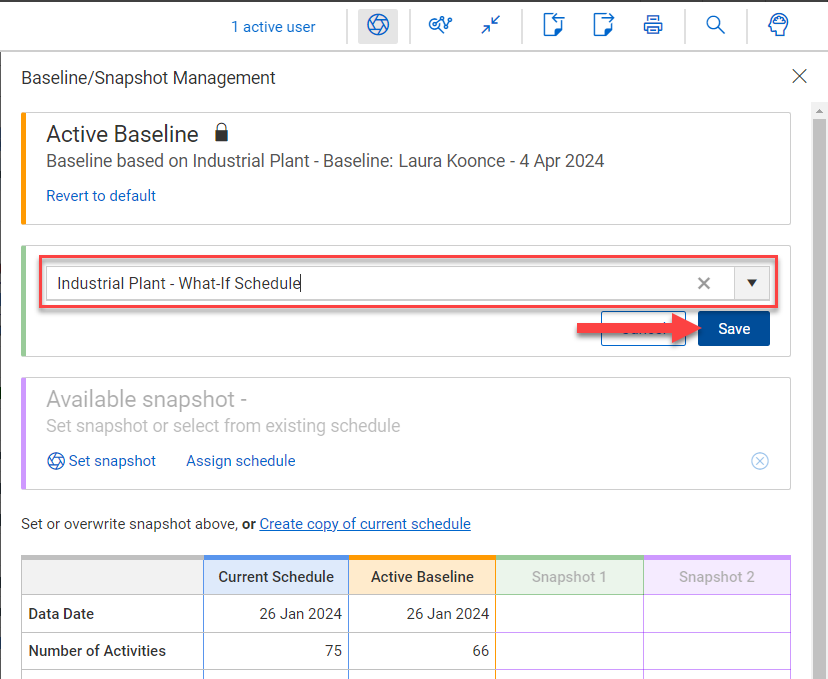
The What-if schedule has now been assigned as a snapshot, and you can see key details in the grid under Baseline/Snapshot Management.
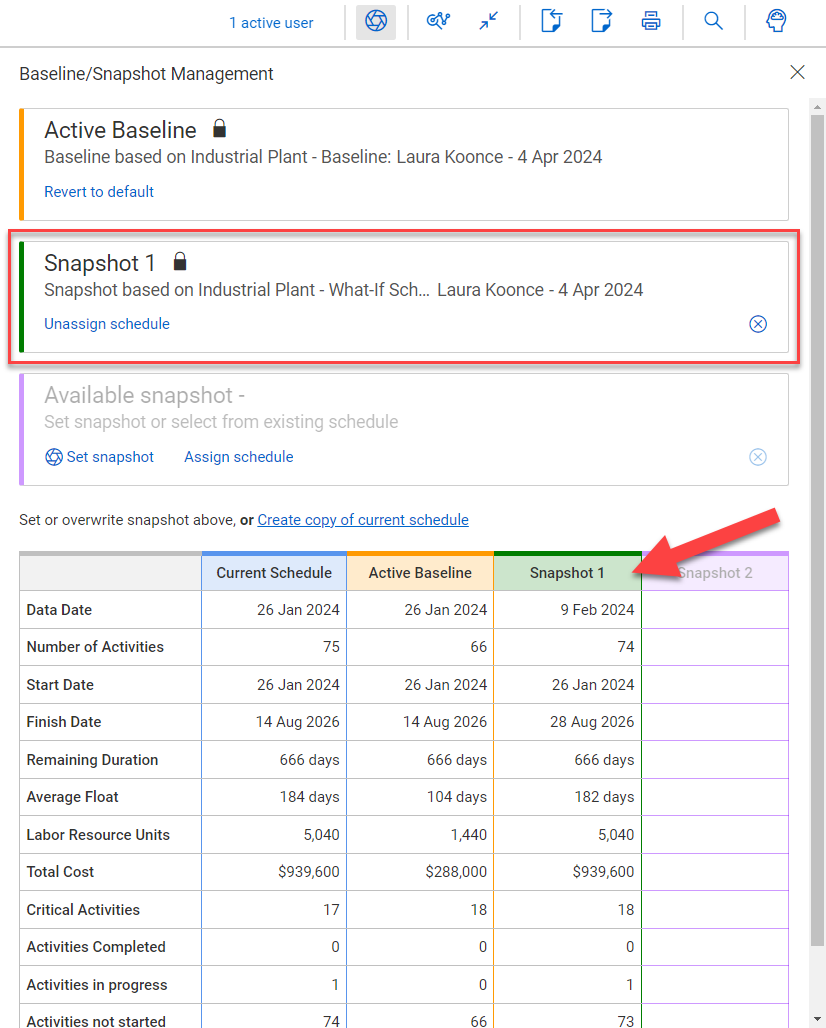
With the What-if schedule assigned as a snapshot, you’re ready to compare it to your current schedule.
The following details show three options for setting up your view to easily compare the current schedule with a snapshot.
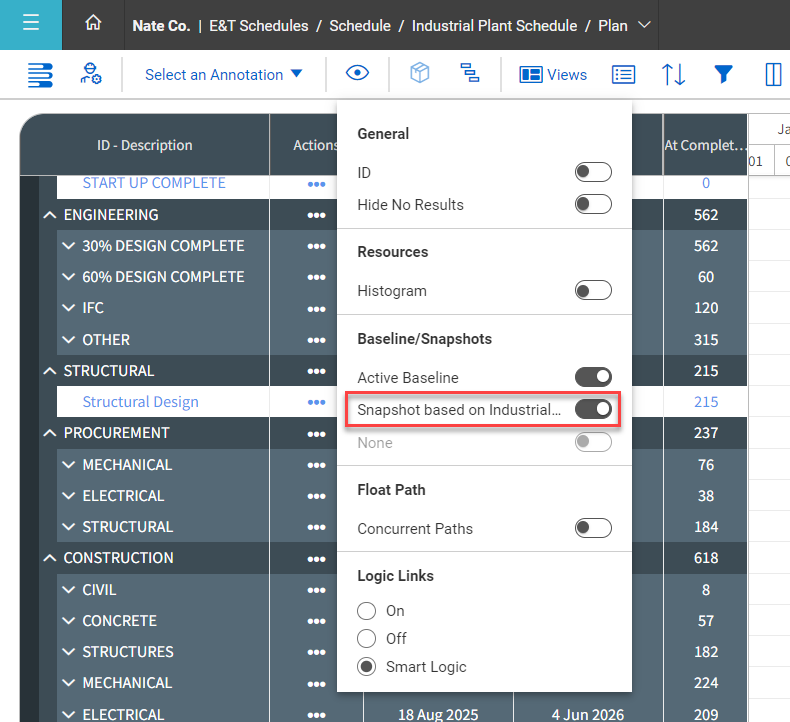
From Plan view of your current schedule, click the View options icon.

From this menu, you can configure your schedule view.
To compare your What-if schedule with the current schedule, you toggle on the snapshot under Baseline/Snapshots.
Now you can see the What-if schedule represented on the Gantt chart.

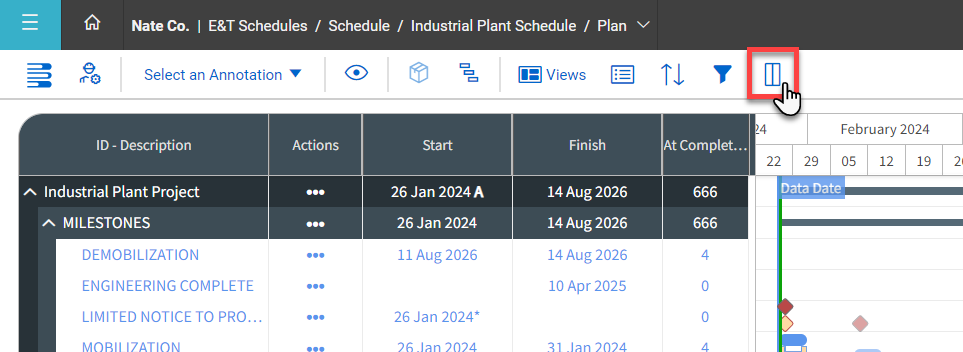
To view additional details from your snapshot, you can create a new column set with relevant columns.
From the top toolbar, open the Column Set Builder menu.
Name the new column set, and then add columns from the left menu to the Selected columns on the right.
For example, if you want to compare the current schedule with your What-if snapshot, you can select relevant Snapshot 1 (SN1) columns.
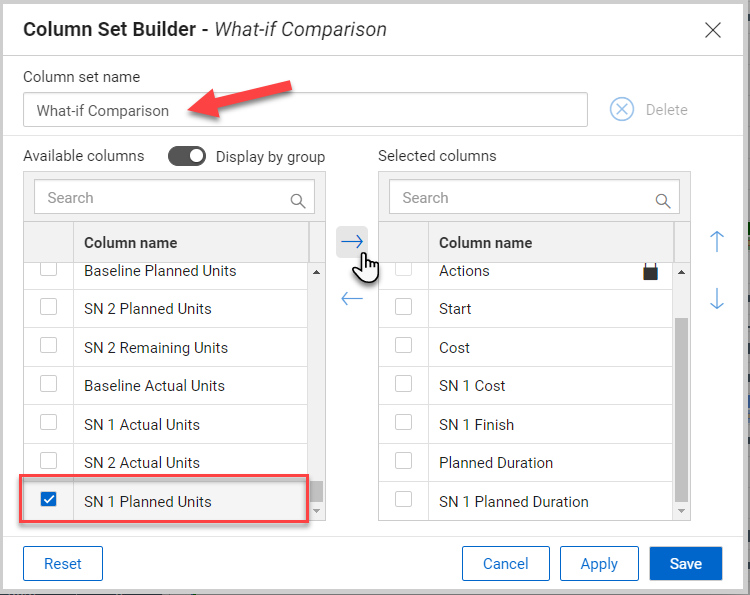
When you’re finished, you click Save.
Now you can see your snapshot details alongside the current schedule values.
You can use the Resources Histogram to compare resource allocation between snapshots and your current schedule.
To view the Resource Histogram, click the View icon. Then under Resources, toggle on Histogram.
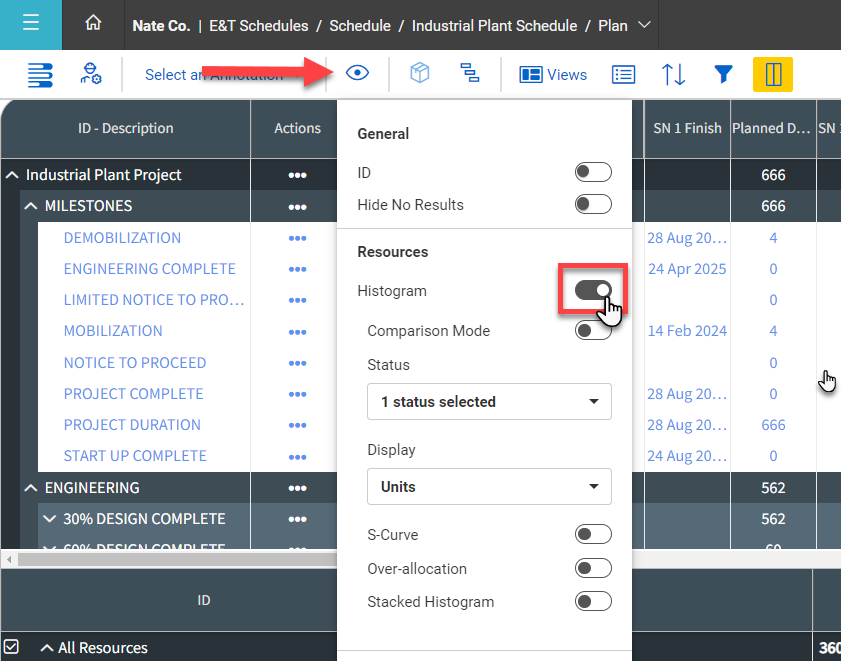
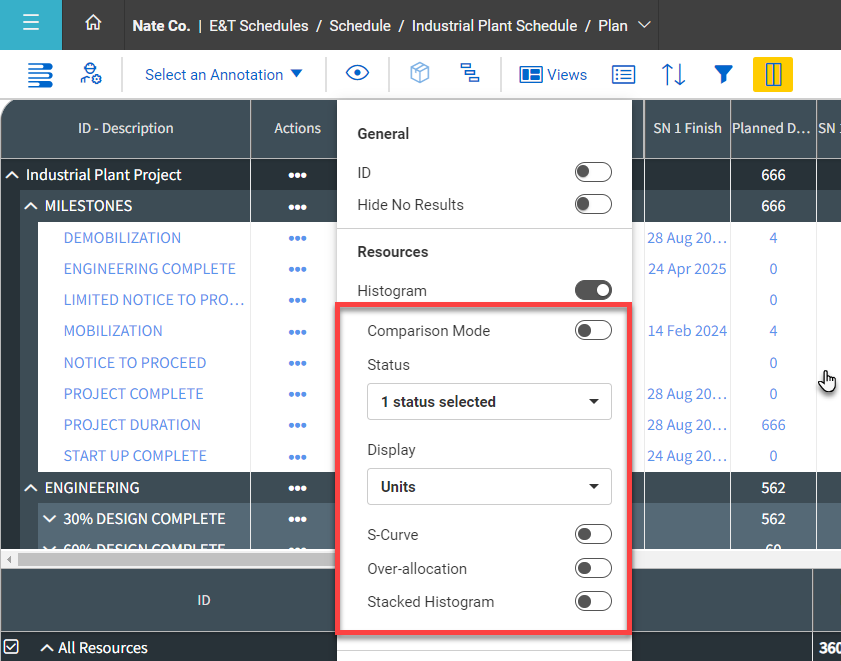
Note that there are a number of options for customizing your histogram view.
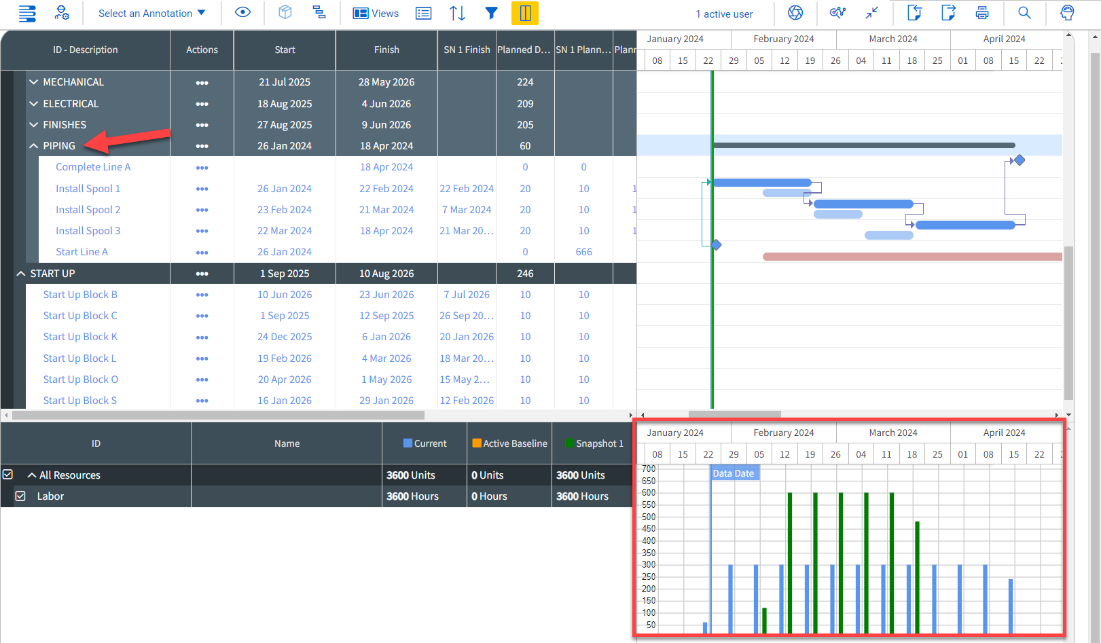
With the histogram added to your view, select a WBS summary item or a specific activity to see more details.
Access the following links for additional information on comparing schedules:
After comparing what-if schedules to the current schedule, you may decide to adopt the changes in a what-if schedule.
Follow the steps below to learn how to change a What-if schedule to the Active update schedule.
From the Project View list, change the Schedule type of the Active Update schedule to Inactive Update.
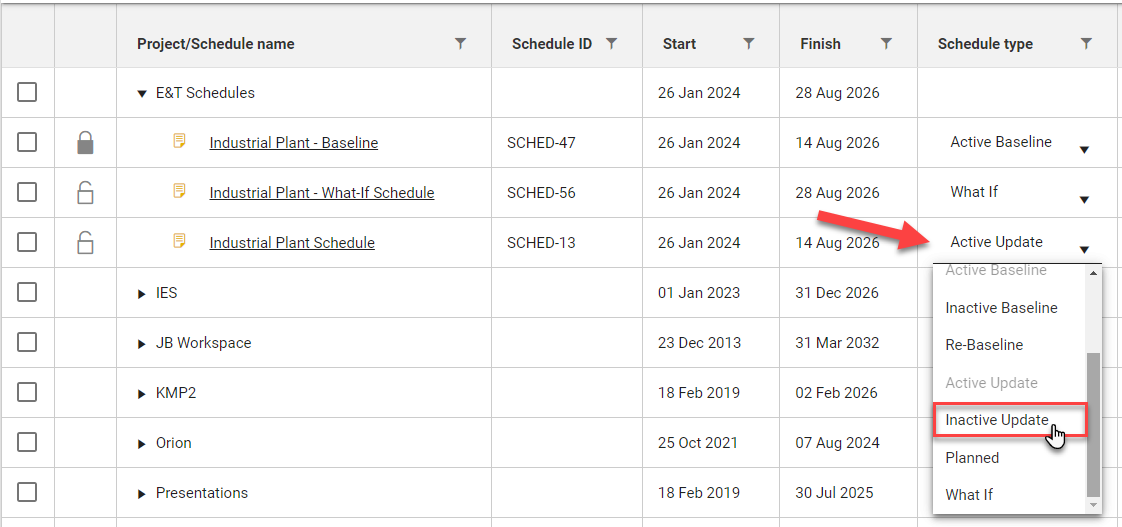
Next change the Schedule type of the What-if schedule to Active Update.

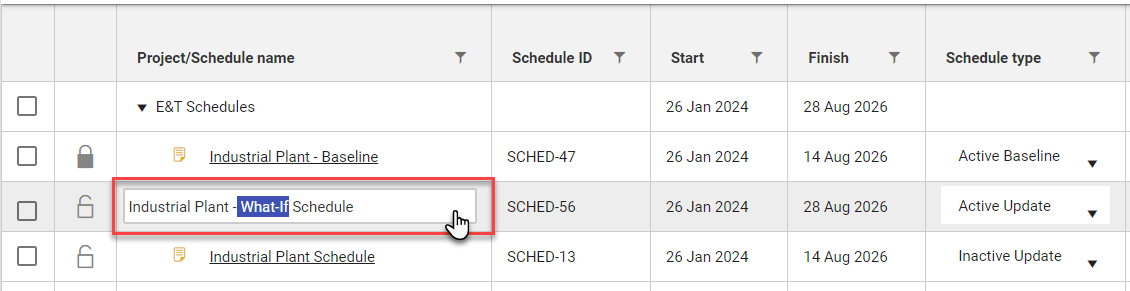
If necessary, you can change the name of a schedule to reflect its new status.
To change the schedule name, double click the Project/Schedule name field. Then edit the name directly.
Now the what-if version of the schedule will be used as the current schedule going forward. If you need to refer back to the previous version of the schedule or revert to it, it will remain available in the Project List.
Access the following links for additional information on adopting a what-if schedule:
Additional Information
9977 N 90th Street, Suite 250 Scottsdale, AZ 85258 | 1-800-637-7496
© 2024 InEight, Inc. All Rights Reserved | Privacy Statement | Terms of Service | Cookie Policy | Do not sell/share my information