Products
Solutions
Resources
9977 N 90th Street, Suite 250 Scottsdale, AZ 85258 | 1-800-637-7496
© 2024 InEight, Inc. All Rights Reserved | Privacy Statement | Terms of Service | Cookie Policy | Do not sell/share my information

You can manage pay items in the Pay Items tab in Control. Pay items typically represent the owner-required deliverables a contractor must submit pricing for. In Control, pay items are used to distribute the cost calculated in the Cost Breakdown Structure and all markup, fees or contingencies calculated in the pay items. This allows the total estimate value to be distributed to a structure different from the CBS.
You can group pay items in a hierarchy by utilizing the Position Code column.
In the Pay Items tab, you can manage your project’s pay items and their structure. The image and table below show the Pay Items tab functions:

| Item | Description | |
|---|---|---|
| 1 | Actions |
In the Actions drop-down menu, you can:
|
| 2 | Toolbar actions |
Upper left toolbar actions:
Upper right toolbar actions:
|
| 3 | View | You can select from the default Revenue and Price views. You can create new views, save updated views, and rename and delete custom views. |
| 4 | Revenue snapshot | You can view snapshot data for past periods. When the Enable manual snapshots option is turned on in the project's Project Tracking settings, you can also create a manual snapshot using the Take revenue snapshot option from the drop-down list and the Take snapshots options in the Actions drop-down menu. |
| 5 | Billed date filter |
Filter the revenue data based on a selected time frame of billed dates to apply to columns based on the billed date. To reset the filter, click the Calendar icon, and then select To date. When you use the Billed date filter, the To date option includes all bills and all cost item actuals. Selecting a date range filters to bills and actuals only within that date range. |
| 6 | Right-click menu options |
Right-click a pay item to do the following:
|
There are multiple columns available in the Pay Items register where you can easily view and manage cost item data. You can use the pre-defined Revenue and Price views to load revenue or price-relevant columns. You can also use the Column Chooser feature to manage columns and then save your custom defined view.
Key columns shown in the register relate to your budget and revenue.
Data in these columns help you understand the projected revenue and health of your project. For more information, see Revenue forecasting columns.
When integrated with InEight Change, you can view project changes such as budget moves that involve items like quantity, man-hour, and contract adjustments. Data in these columns let you view the number of change orders and amounts, providing greater visibility to track the progress of the project and better manage costs.
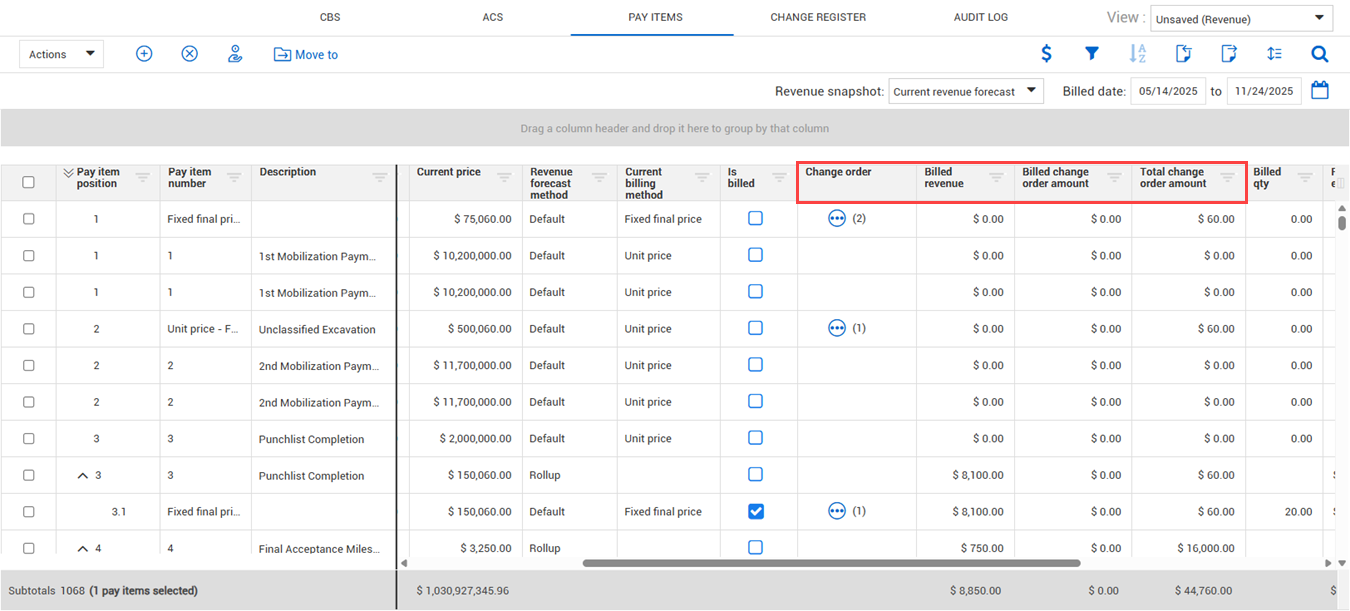
The following are key Change columns in the Pay Items register:
Change orders — View the change order number, which helps you in associating the change order or contract adjustment.
Billed change order amount — Amount billed to a customer from an actual change order.
Total change order amount — Shows how much of a pay item’s price is from change orders.
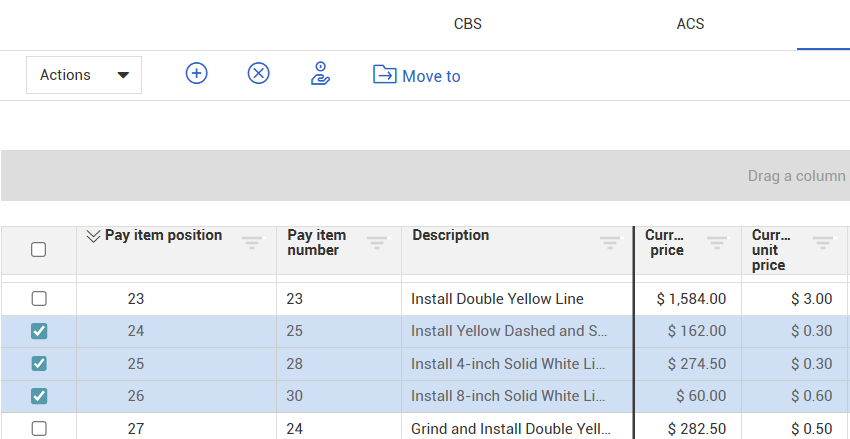
You can reorder pay items on the Pay Items tab. Use the Move to button to rearrange pay items into superior, equal, or subordinate positions.
Select the pay item(s) to be moved, and then click Move to.
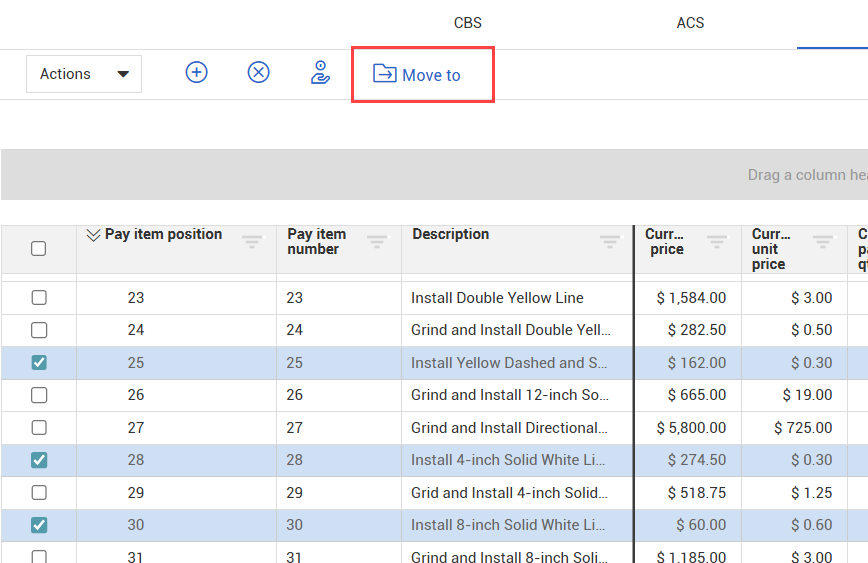
Enter the pay item position, pay item number, or the description. Select the correct pay item from the drop-down options. This is the position that the selected pay item will be moved to.

Click the Move to icon.

To move the selected pay item(s) to an equal position, select Sibling. To move the pay item(s) into a subordinate position, select Child.

To move a pay item into a child position, the parent pay item must have a value of 0 for billed revenue, billed quantity, and current price, and no cost items can be assigned to it.
The selected pay item(s) will now show in the new position.
Additional Information
9977 N 90th Street, Suite 250 Scottsdale, AZ 85258 | 1-800-637-7496
© 2024 InEight, Inc. All Rights Reserved | Privacy Statement | Terms of Service | Cookie Policy | Do not sell/share my information