Products
Solutions
Resources
9977 N 90th Street, Suite 250 Scottsdale, AZ 85258 | 1-800-637-7496
© 2024 InEight, Inc. All Rights Reserved | Privacy Statement | Terms of Service | Cookie Policy | Do not sell/share my information

As mentioned above, the Live Forecast is the official forecast used for financial reporting and shared with all members of the project.
You can push forecasts entered in the Forecast data block to the Live Forecast either individually or by selection. This allows you to send only the items that you choose from your forecast to the Live Forecast.
The Live Forecast can only be updated if the user is assigned the appropriate role with the associated permissions. Project Admin or Power User can edit the Live Forecast directly.
Forecast changes made in the Forecast data block WILL NOT be pushed to the Live Forecast without an additional action detailed in the Step by Step below.
Changes made to your Forecast are only seen by you, unless you share them with someone else (see topic 9.4 Forecast Management) or update them to the Live Forecast.
From the CBS tab with the Forecast data block in the view, select a group of cost items, by clicking the row header check boxes.
Click on the drop-down arrow in the center of the Forecast data block.
Select Push to Live Forecast.
The Push to Live Forecast option is disabled until you select one or more cost items.
After review, select Yes and your forecast values will push to the Live Forecast.
The time phased forecast feature lets you make edits in your time phased forecast. You are then able to push those edits to your live forecast.
You can edit your total forecast remaining cost and forecast remaining hour values in the Time phased forecast window. It would then override your forecast remaining cost and your forecast remaining man hour if there is a change.
The Time phasing Forecasting option must be enabled first in order to have the Push Time phased forecast to Live option available to be enabled. Enabling only the Forecasting option does not automatically enable both.
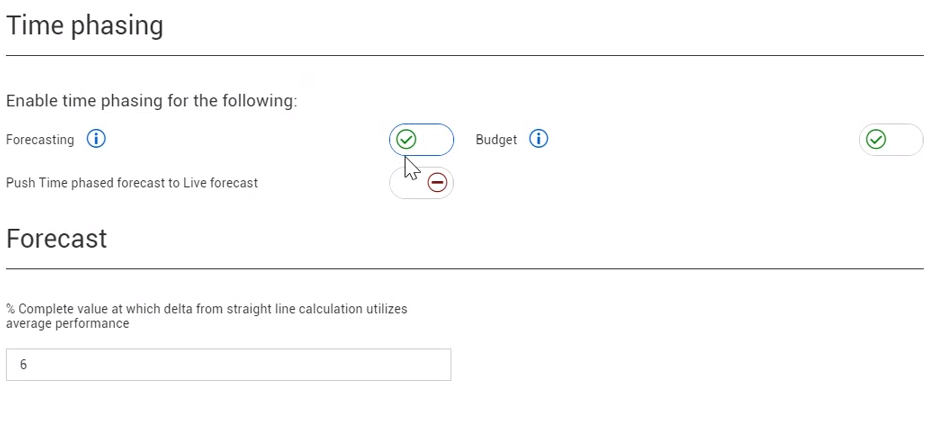
The Time phasing section can be located in the Project Settings of Control under the Project tracking tab.
When you have enabled both options under the Time phasing section click save. Then go back to the CBS tab.
Follow these step by steps to use a time phased forecast push to live.
Select cost items from the CBS tab with a Forecast remaining cost to use in the push to live feature.
Make sure the cost items you selected have start and end dates. Otherwise you cannot edit them in the Time phased forecasting window.
In the third data block where it has the Month and Year, scroll to the Remaining cost. Now move the scroll bar over to January of 2021.


If you believe the line item could take up more time and money, you can adjust the Cost and Man hours for the following month. These changes will then be added to the phased forecast remaining columns once you push to live.

Quantity will show as changed with a delta next to the column. Currently, you cannot push quantity updates to live.
When you have made all the changes you need, select the cost items you want to push to live. You can either select one or all.

Dialog appears asking if you want to push these values to the Live forecast. Select Yes to continue. The Cost and Man hours difference shows in the orange columns.

When this is pushed to live, your Forecast remaining cost and Forecast remaining man hour should update in the Live forecast. Your Forecast Method will then change to Manual ETC. Manual ETC will have a green dot indicator that states it was pushed from Time phased forecast when you hover over the item.
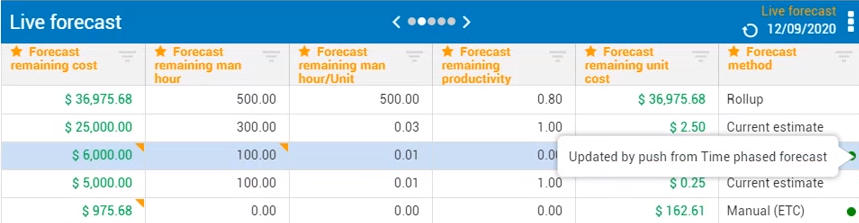
The Forecast remaining cost and Forecast remaining man hour columns will have an orange wedge indicator that shows you which values have been updated manually changed when you hover over the indicator.

Additional Information
9977 N 90th Street, Suite 250 Scottsdale, AZ 85258 | 1-800-637-7496
© 2024 InEight, Inc. All Rights Reserved | Privacy Statement | Terms of Service | Cookie Policy | Do not sell/share my information