Products
Solutions
Resources
9977 N 90th Street, Suite 250 Scottsdale, AZ 85258 | 1-800-637-7496
© 2024 InEight, Inc. All Rights Reserved | Privacy Statement | Terms of Service | Cookie Policy | Do not sell/share my information

The Start with Cost items workflow lets you begin by entering cost items with their adjustments and clearly defining a separate markup and fee. Through the assignment of your cost items to pay items, these adjustments, markups, and fees then roll up to the pricing of your pay items.
This workflow of starting with costs and markups to build up to the change in contract price is typically the preferred approach and recommended best practice, because of the visibility and ease of use it provides in working out the adjustment.
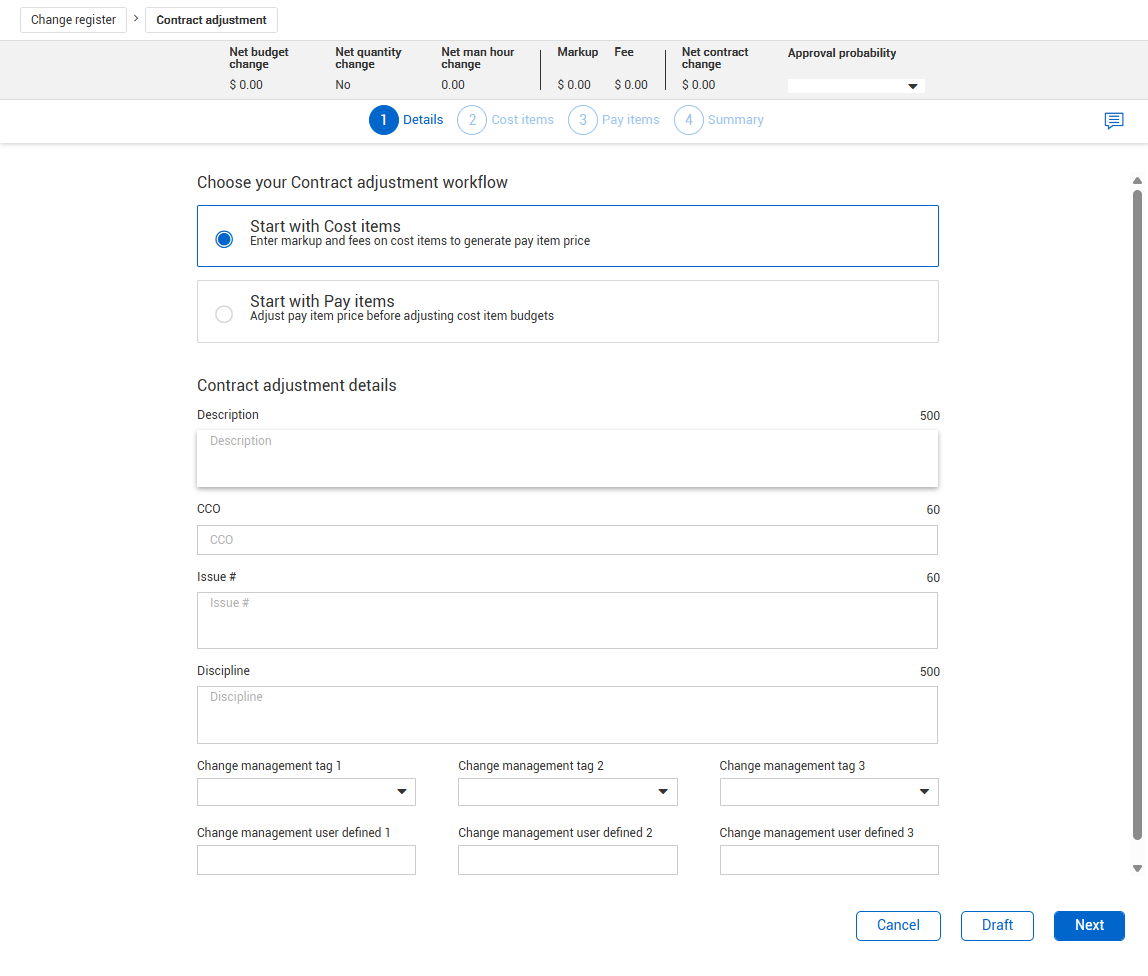
Click Actions > Budget and contract adjustment > Contract adjustment. The Contract adjustment wizard opens to step 1, Details.
On Details, select the Start with Cost items workflow option, and then add contract adjustment details as needed.
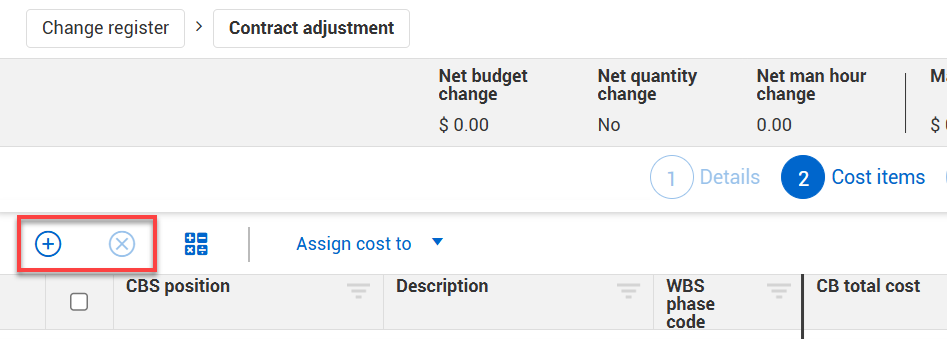
Click Next. The Contract adjustment wizard opens to step 2, Cost items. On Cost items, add the cost items involved in the contract adjustment and enter their adjustment amounts. Click the Add cost item icon to add cost items. To remove a cost item, click the Remove cost item icon.
On Cost items, add the cost items involved in the contract adjustment and enter their adjustment amounts. Click the Add cost item icon to add cost items. To remove a cost item, click the Remove cost item icon.
Click Add cost item. The Select cost items list opens. Select the cost items related to the contract adjustment, and then click Add.
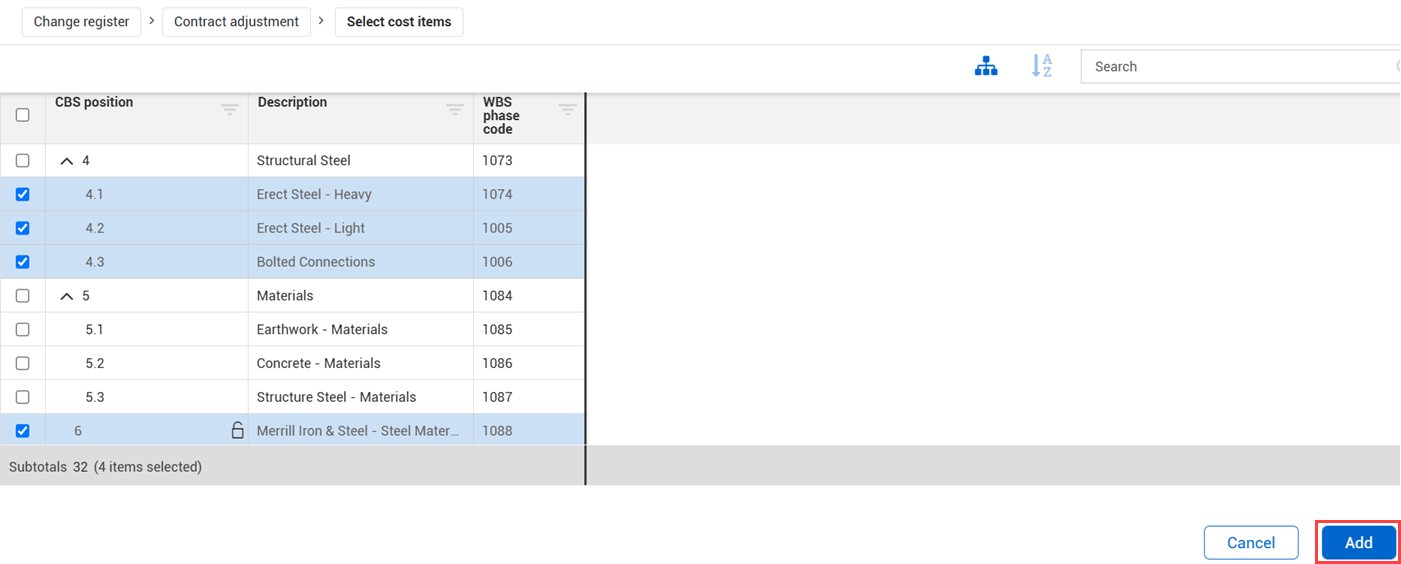
If the contract adjustment requires a new cost item to be added to the budget, this must be added to the Cost Breakdown Structure on the Workspaces CBS tab before creating the contract adjustment.
In the example above, a new cost item was added in the CBS for additional steel material (Merrill Iron & Steel – Steel Material) prior to creating the contract adjustment, so it is available to select.
When adding a new cost item to your locked budget, it will initially be unlocked and will therefore not be part of the Current Budget. A common practice is to keep the new change order-related cost item unlocked while working through the contract adjustment. If the contract adjustment becomes approved, the cost item will automatically become locked, and its costs and man-hours will become part of the Current Budget.
After your cost items are added to the page, you can enter adjustment values (positive or negative) to any of the following columns:
Adjusted CB cost
Adjusted CB MHrs
Adjusted CB qty
Any of the Adjusted CB cost categories (for example, labor, construction equipment, supplies, subcontract, etc.)
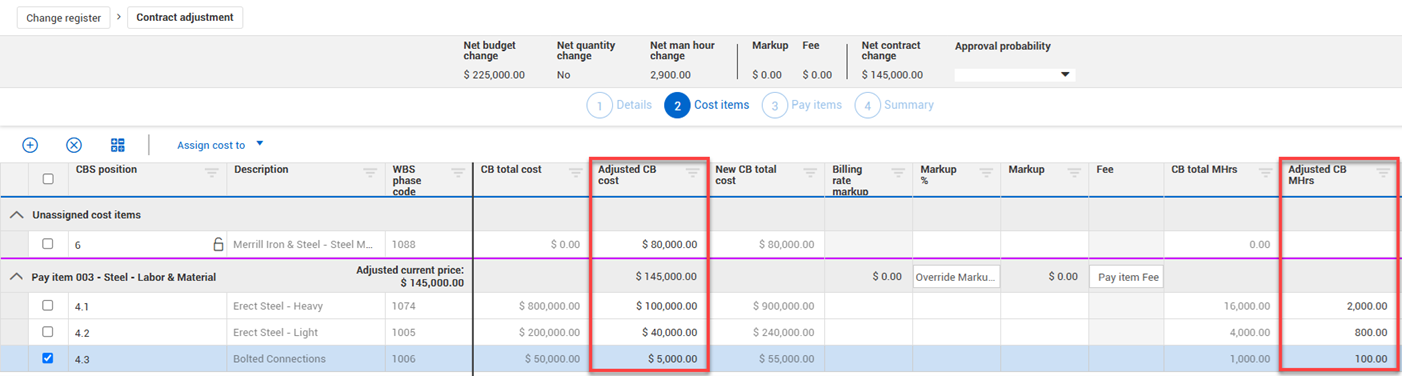
Contract adjustment with adjustment amounts added - The following image is an example of a contract adjustment with adjustment amounts added.
Assigning costs to pay items depends on the circumstances of your adjustment. There are multiple scenarios for assigning cost items to pay items.
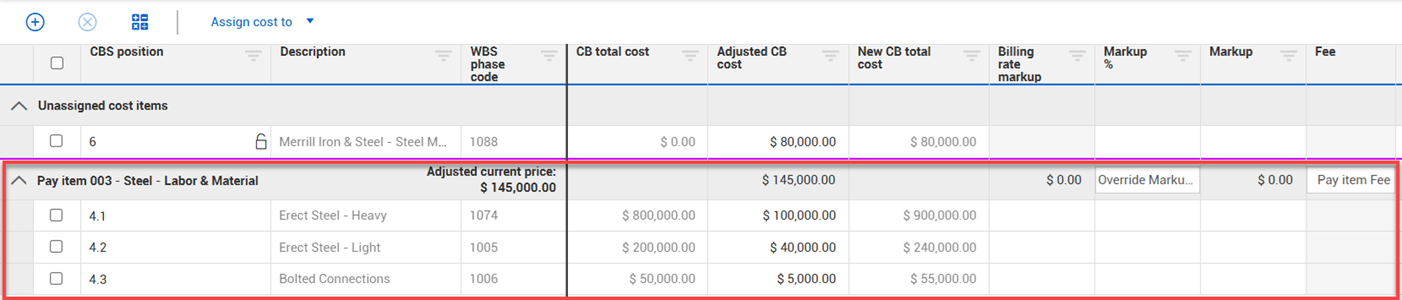
Cost item already assigned to pay item scenario - If the contract adjustment affects cost items that already exist in your budget, they will likely already be assigned to pay items. As you adjust the cost items, including adding markup and fees, the record will calculate the adjusted current price for the pay items the cost items are assigned to.
In the example below, costs are being adjusted on three existing cost items that are already assigned to the Steel – Labor & Material pay item. The Adjusted current price reflects the cost adjustments and markups of the assigned cost items, although a markup and fee have not yet been added.
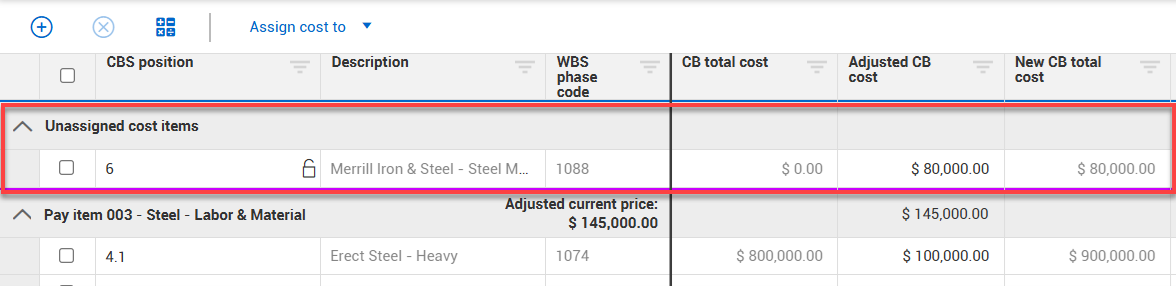
Unassigned Cost Assigned to New Pay Item scenario - If the change order requires a significant scope change, the owner may want to delineate it as a new pay item in the contract. Within the budget, the contractor will likely add a new cost item to represent the new work and assign it to the new pay item. This assignment can be made prior to the contract adjustment but can also be done within the contract adjustment record.
Assigning a pay item within a contract adjustment is temporary. It will not update the Pay item assignment in the CBS. It is used in the contract adjustment only to help drive the adjusted price for that contract adjustment only.
In the example below, the additional steel material is not yet assigned to a pay item.
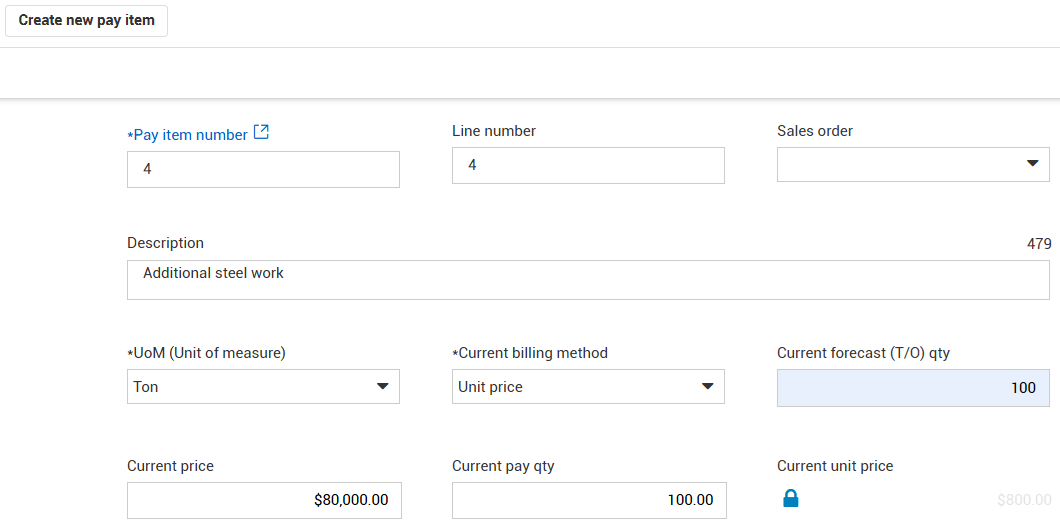
To assign an unassigned cost item to a new pay item, select the cost item, then select Assign cost to > Assign to new pay item.

The Create new pay item window opens. Add pay item details as needed. In this case, the adjusted cost amount is added in the Current price field, since markup and fees have not yet been considered.
Click Apply when finished. The new cost item is now assigned to the new pay item. The Adjusted current price is currently the amount you entered in the pay item details.
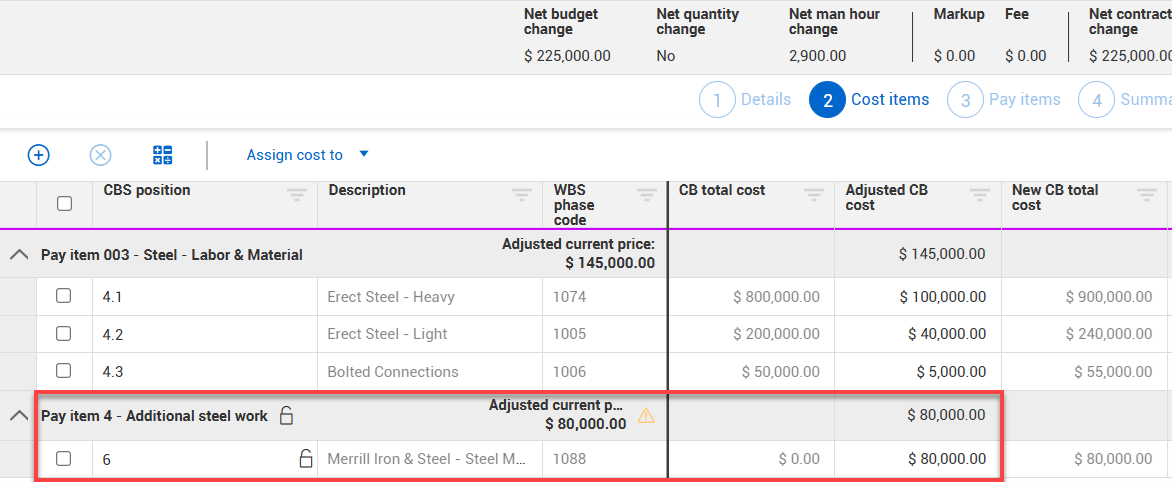
The unlocked icons indicate the pay item and cost item are currently unlocked (not yet part of the Current Budget).
Unassigned cost assigned to existing pay item scenario - There may be times when the change order requires a new cost item for the budget, but that cost item will pertain to an existing pay item. For those cases, you can select Assign cost to > Assign to existing pay item.

You can add individual markup percentages for each cost item assigned to a pay item.

Alternatively, you can add markup at the pay item level, and it will override the markup for all the assigned cost items.

You can also add a flat fee (for example, for permits, extra administration, or supervision). Fees are added only at the pay item level. The sum of your markup and fee is your planned profit.

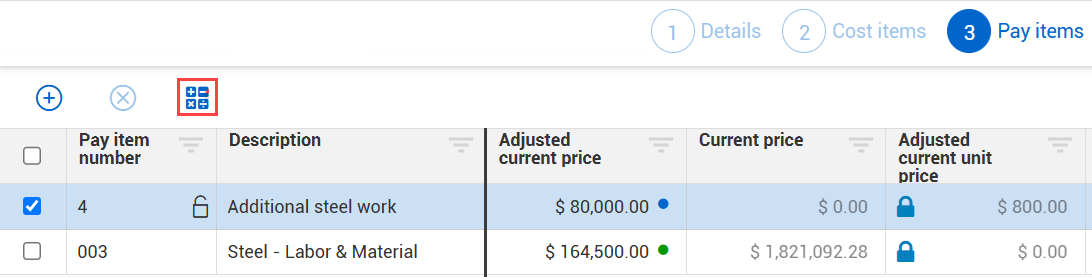
After adjustments, markup and fees are added, and pay item assignments made, click Next. The Contract adjustment wizard opens to step 3, Pay items. On Pay items, you can review the pay items related to the contract adjustment and make further adjustments to the current price and quantities as needed.
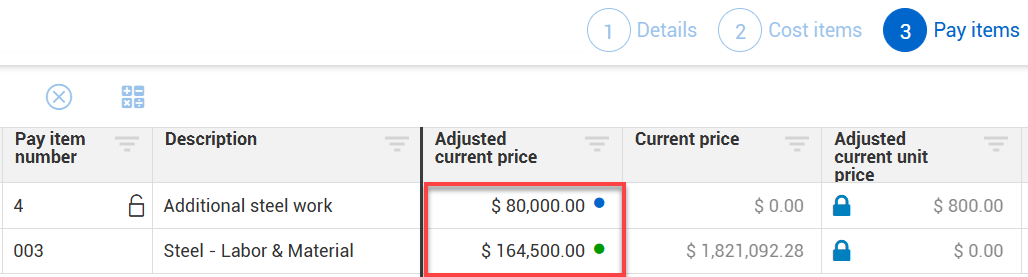
Adjusted current price indicators show next to the values in the Adjusted current price column. A colored dot indicates the source of your adjusted current price values.
Green dot - Indicates the Adjusted current price was calculated automatically from the Adjusted current cost + total markup + total fee. You can view the calculation when you hover over the dot.

Blue dot - Indicates the value was manually overridden. You can hover over the dot to view what the value was before.

This example shows that because the cost item was assigned to a new pay item, the current price was added manually when filling out the new pay item’s details.
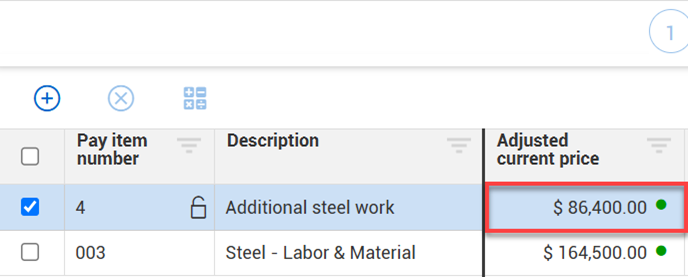
Click the Auto-calculate button to adjust costs, markup, and fees after selecting the applicable pay items.
When prompted, if you are sure you want to revert back to system-generated values, select Yes. The Adjusted current price updates to the current pricing information calculated by the system from the Cost items step.
After making any necessary adjustments, click Next. The Contract adjustment wizard opens to step 4, Summary.
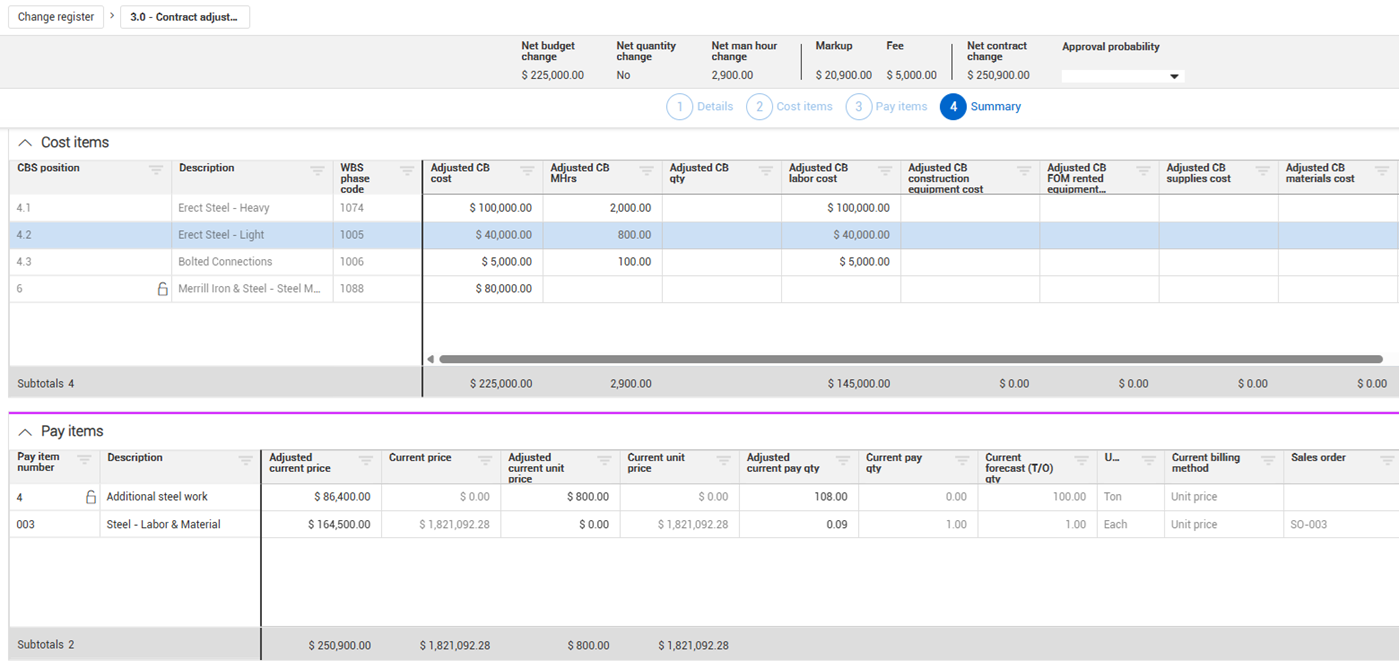
In Summary, you can review the cost items and pay items summary involved in the contract adjustment with their adjusted values for a final review. Click Submit to send it to the Change Register for review and approval. With the applicable permissions, you can approve the contract adjustment directly from the record’s Summary step by clicking the Approve button.
At any time during the development of the contract adjustment you can use any of the following buttons:
Back - Use this button to move back a step in the contract adjustment workflow.
Draft - If the contract adjustment is not yet complete or ready for review, select Draft to save it for later. This will save the adjustment as a draft in the Change Register. At any time, you can edit the adjustment by selecting the Edit icon for the record on the Change Register.
![]()
Cancel - Select to close the contract adjustment without saving any changes.
Additional Information
9977 N 90th Street, Suite 250 Scottsdale, AZ 85258 | 1-800-637-7496
© 2024 InEight, Inc. All Rights Reserved | Privacy Statement | Terms of Service | Cookie Policy | Do not sell/share my information