Products
Solutions
Resources
9977 N 90th Street, Suite 250 Scottsdale, AZ 85258 | 1-800-637-7496
© 2024 InEight, Inc. All Rights Reserved | Privacy Statement | Terms of Service | Cookie Policy | Do not sell/share my information

The master set of account codes is created and stored under Master data libraries > Account Codes.

The Account Codes master data library contains four tabs: Published, Staging, Audit Log, and Import Log.

The Published tab lists all account codes that have been created and published under the Staging tab.
Under the Staging tab, you create and edit account codes, and then publish them for use. Account codes are not available for use in projects until they are published
The Audit Log tracks changes made to the Account Code Structure, including the value before and after, the changed date, and who made the change
Under the Import Log tab, you can track the status of all the account code import processes.
When you hover over the Failed with errors imports, a pop-up will provide a brief import status, along with next steps
Under the pop-up, there is a down facing blue arrow where you can download a detailed error log

The account codes within the Account Code Structure are arranged into a hierarchy of parent-child relationships that can contain varying levels of detail, indicated by color, for each level of the hierarchy. You can assign account codes to cost items anywhere, from the highest level to the lowest level. The lower the level assigned, the higher the level of detail associated to the account code.
The example below shows a level 3 account code (50.03.04) acting as a parent to two subordinate account codes (50.03.04.002 and 50.03.04.004).

The following Step by Step walks you through how to create a new account code.
From the Project home page, select the 1st Level drop-down menu.
Select Master Data Libraries.
Select Account Codes.

All the account codes appear on your screen in a hierarchy format
Select the Staging tab.

Click the check box next to any of the existing account codes.

Click the Add Account Code button.
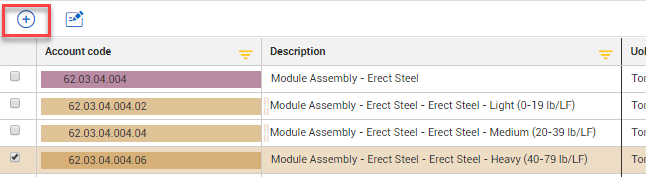
This creates a new account code with the code you selected as the parent
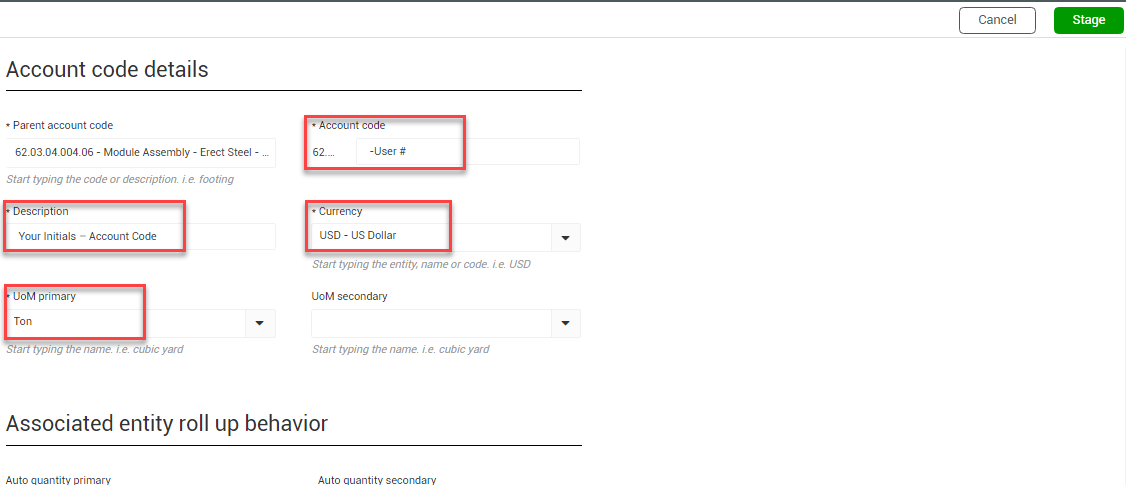
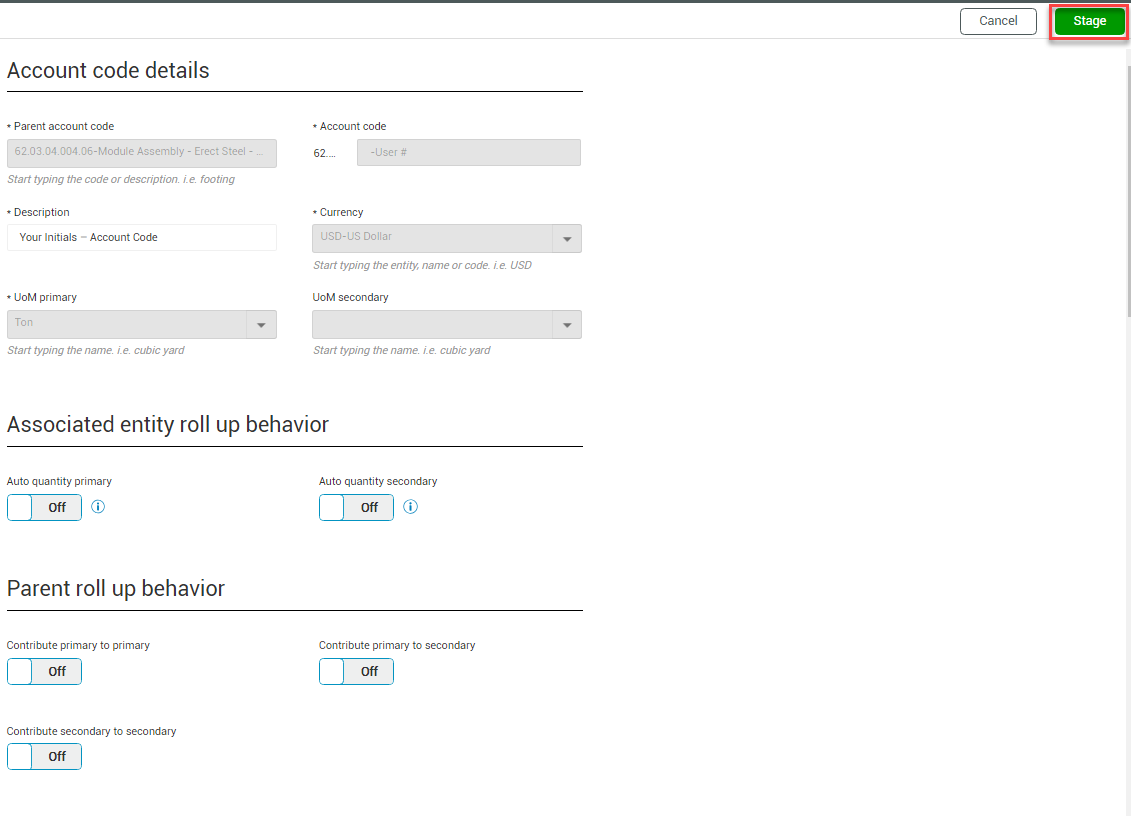
In the Account code details slide out panel, the following can be assigned:
|
Item |
Function |
|---|---|
|
Parent Account Code |
Account Code with lower level “child” account codes below it. |
|
Account Code |
The alpha numeric sequence assigned as the code. |
|
Description |
Description detailing the account code’s scope. |
|
Currency |
The currency assigned to the account code. |
|
UoM Primary |
The primary unit of measure for the account code. |
|
UoM Secondary |
The secondary unit of measure for the account code. |
|
Auto Quantity Primary/Secondary |
Automatically roll up cost item quantities if the cost items and this account code have the same primary/secondary UoMs. It can also be set on a project specific basis. |
|
Parent Roll Up Behavior |
Controls whether primary or secondary quantities of account code roll up to the parent account code’s primary or secondary quantity. |
|
Account Code Tag 1-20 |
Tags that can be associated to account codes to enable them to be categorized. |
|
User Defined Field 1-10 |
Optional open-text fields you can use to add information related to the account code. |
The asterisk (*) at the beginning of a tile indicates it is a required field and it must be populated before the code will be created.
Fill in the information below:
Account code: Your Initials (Since a parent was selected when creating this new account code, numbering prior to ‘–Your Initials’ will be the parent’s)
Description: Your Initials – Account Code
Currency: US Dollar
UoM primary: Ton
Leave all other defaults/blanks
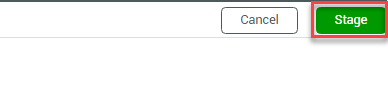
When you have filled out all the information, click Stage to send the new account code to staging area.
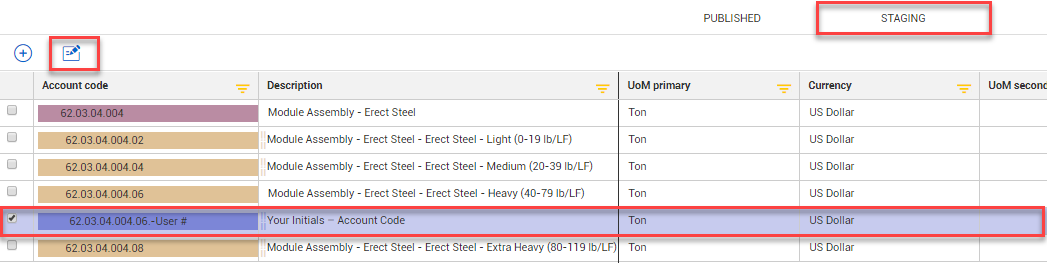
The new account code now exists in the Account Code Structure on the Staging tab
The new account code will not be available for use within projects until it is published
If you have the permissions to publish account codes, check the box for the account code you created..
Click the Publish button in the top-right corner of the page.
You can also edit existing account codes within the Account Code Structure, as indicted in the steps below.
From the Account Code – Staging tab, select the account code you created.
Click the Edit Account Code button.
The edit account code page opens where changes can be made
Note that only the description, auto quantity primary, auto quantity secondary, parent roll up behavior, and account code tags can be edited after an account code has been created. All other items are greyed out and read only.
Once you are done editing the account code, click Stage to update the account code.
If you have the required permissions, you can delete, replace, or rename account codes.
The account administrator does not have permissions automatically assigned to approve account codes. Your account administrator must add the permission to approve account codes in the Master data libraries to the administrative account.
Follow the step-by-step to delete an account code.
If you are deleting a parent account code, all children under the parent are also deleted.
Go to the Master data libraries and then select Account codes.
From the Staging tab, select an account code you want to delete.
Select the Edit icon in the upper-left corner.

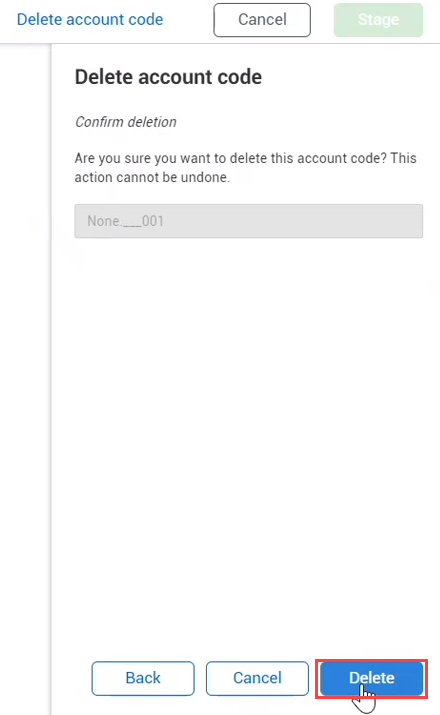
On the Edit account code page, select Delete account code, and then click Next.

In the Replacement account code optional text box, you can enter in an existing account code to replace the account code you are deleting.
On the Delete account code confirmation page, select Delete in the lower-right corner.
Click the Stage button.

From the Staging page, select Approve all, and then select Approve.
The deleted account code shows the following error code in the Cost Item Details and in the CBS tab.

To remove the #REF! error in the cost item details slide-out panel and grid, select the error to open the Assign Account Code dialog box. Select another account code from the list, and then click Assign. The error on both the CBS tab and the Cost Item Details slide-out panel is replaced with the account code you selected.

If you have the required permissions, you can rename account codes. Follow the step by step to rename an account code.
Go to the Master data libraries, and then select Account codes.
From the Staging tab, select an account code you want to rename.
Select the Edit icon in the upper-left corner.
On the Edit account code page, enter a new name for your selected account code in the Description text box. Then enter a new name for your selected account code.

Click the Stage button.
From the Staging page, select Approve all, and then select Approve.
Your renamed account code is viewable through the Account code column, Cost Item Detail tab, and the ACS tab.
Additional Information
9977 N 90th Street, Suite 250 Scottsdale, AZ 85258 | 1-800-637-7496
© 2024 InEight, Inc. All Rights Reserved | Privacy Statement | Terms of Service | Cookie Policy | Do not sell/share my information